Announcement Bar
Introduction
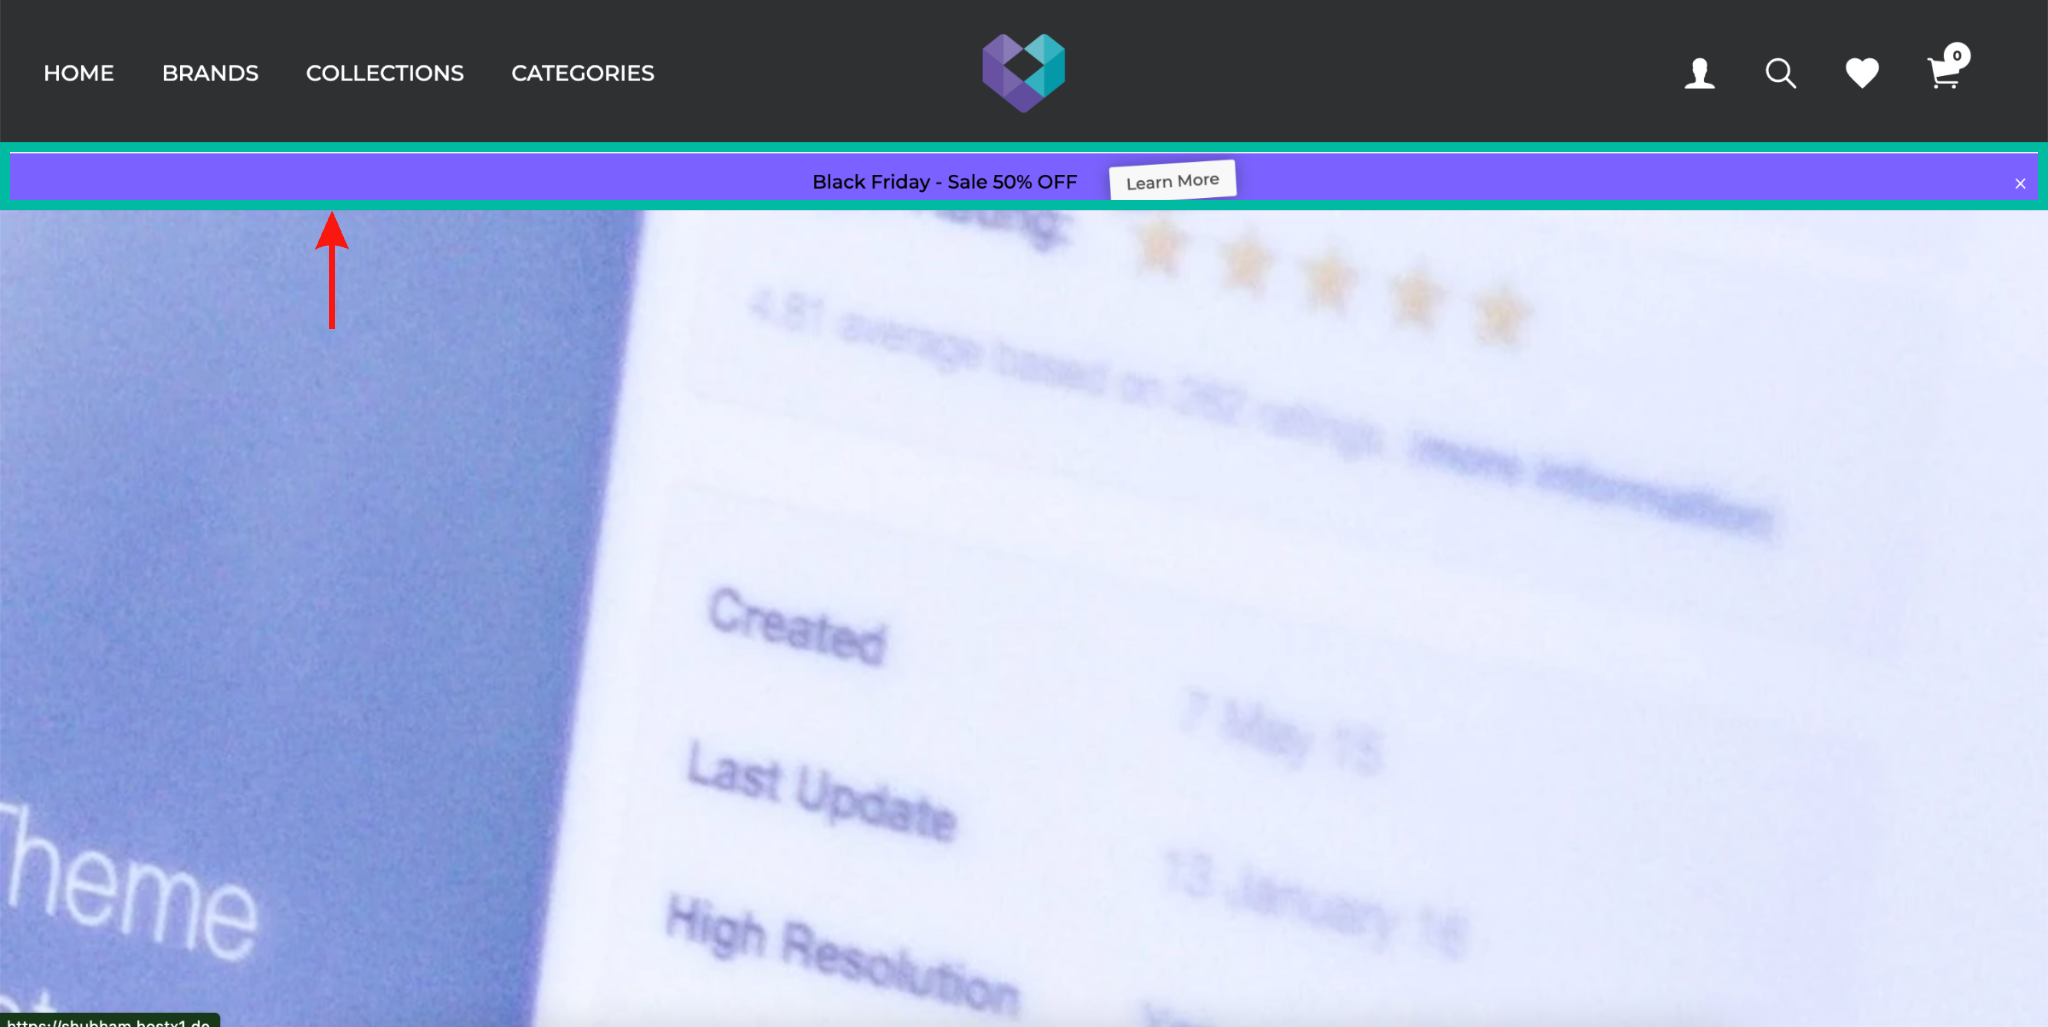
The Announcement Bar extension on the Fynd platform lets you add a customizable bar to the top or bottom of your website. You can use this bar to display upcoming sales and promotional offers or highlight important information like shipping deadlines.
Steps to use Announcement Bar Extension
- Go to Extensions on the Fynd Platform.
- Click on the Announcement Bar Extension.
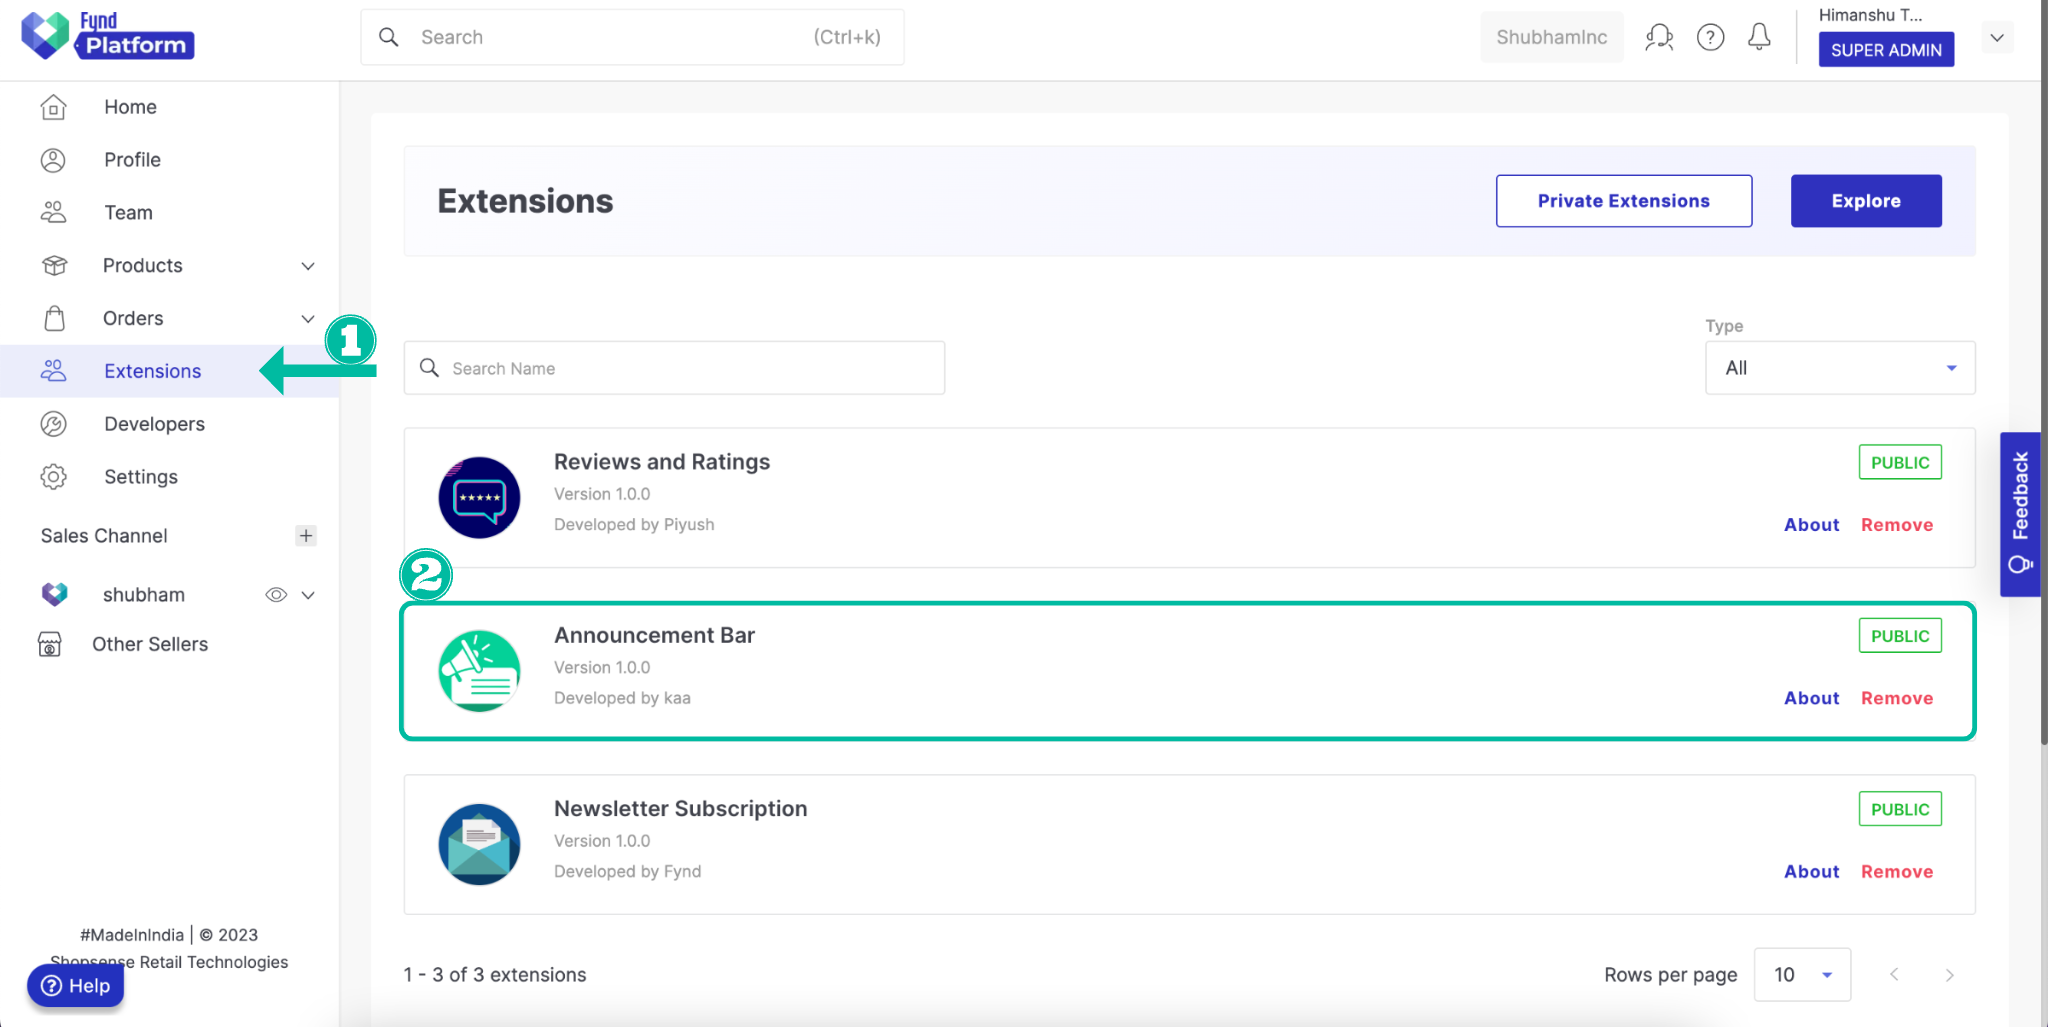
Once you install the extension, it will be available in the extension list.
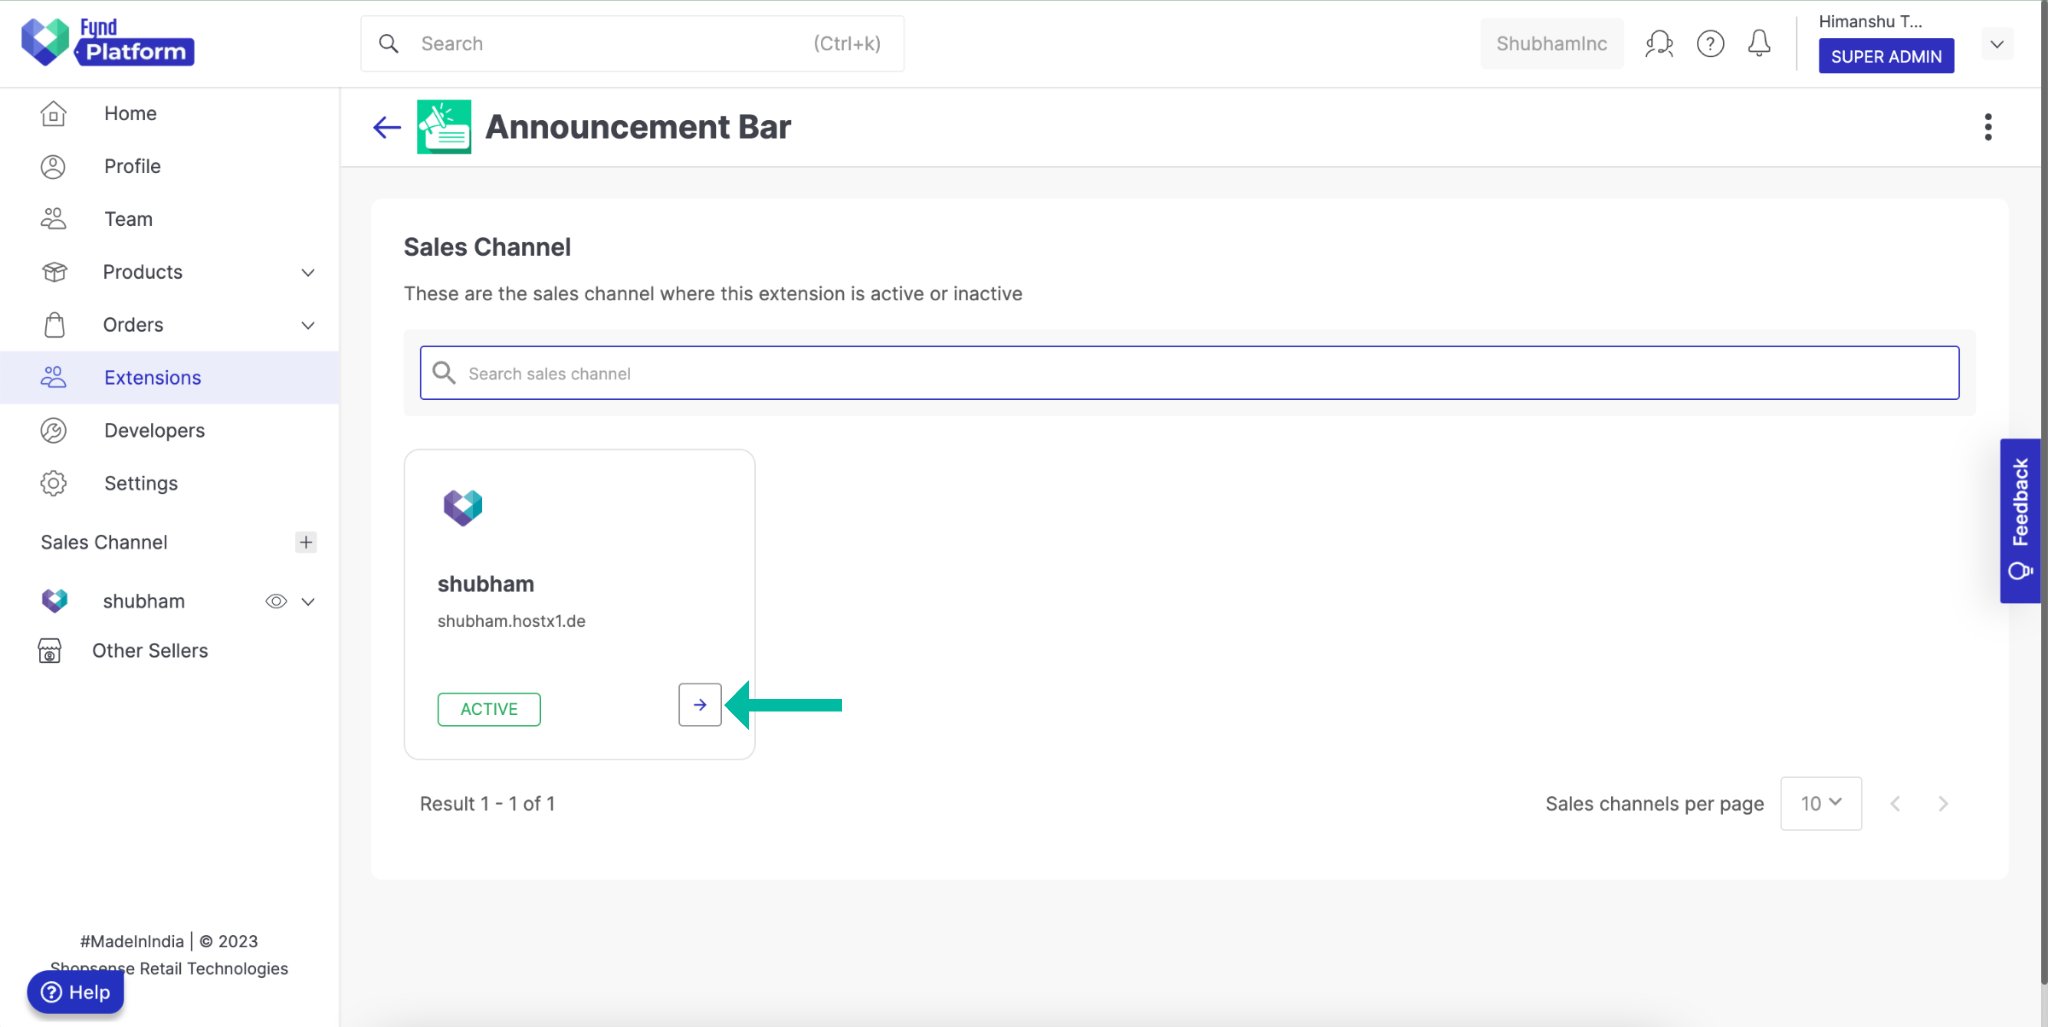
- Select the desired sales channel. Here, we have selected “shubham“.
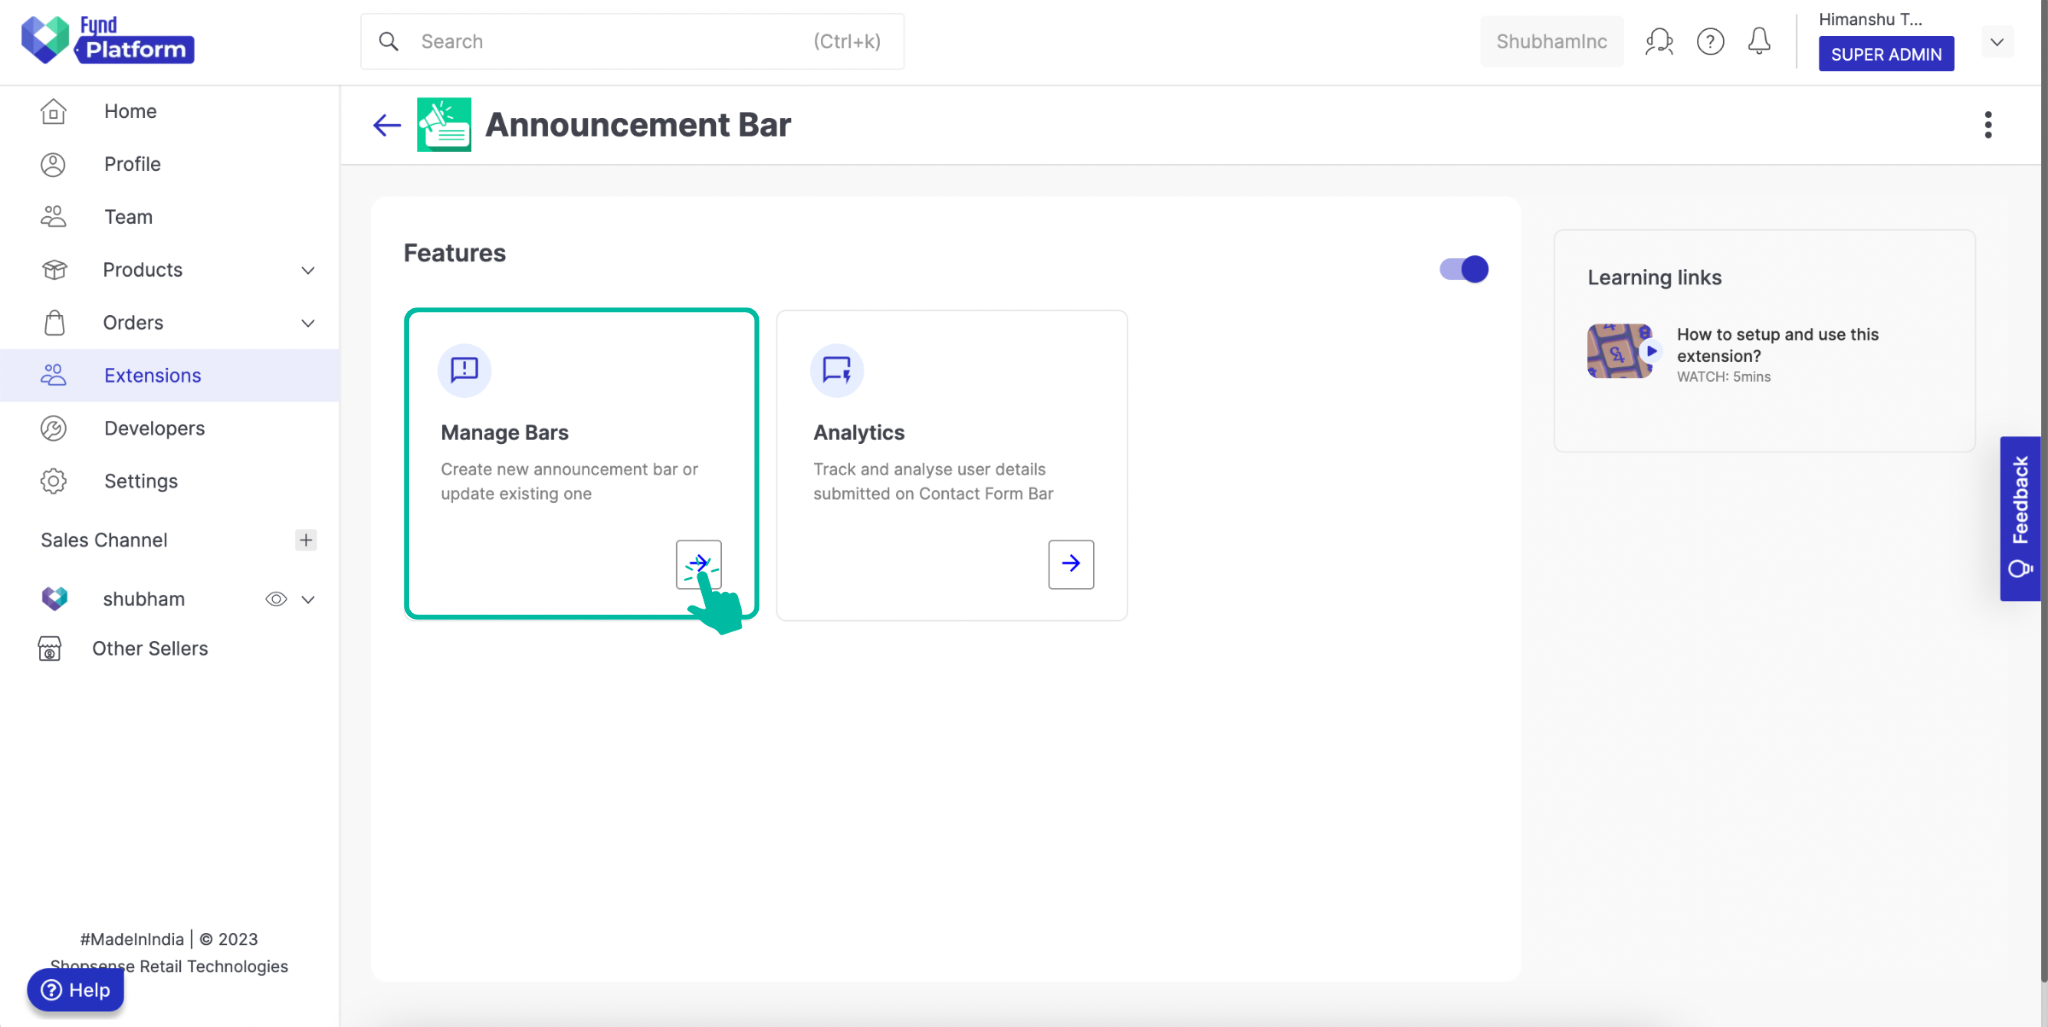
- Click Manage Bar. This is where you will see all the announcement bars that you have configured and saved.
Manage Bars
You can create and customise a new announcement bar, or update an existing one.
- Click Manage Bar. A list of announcement bars will be displayed.
- Click Create New.
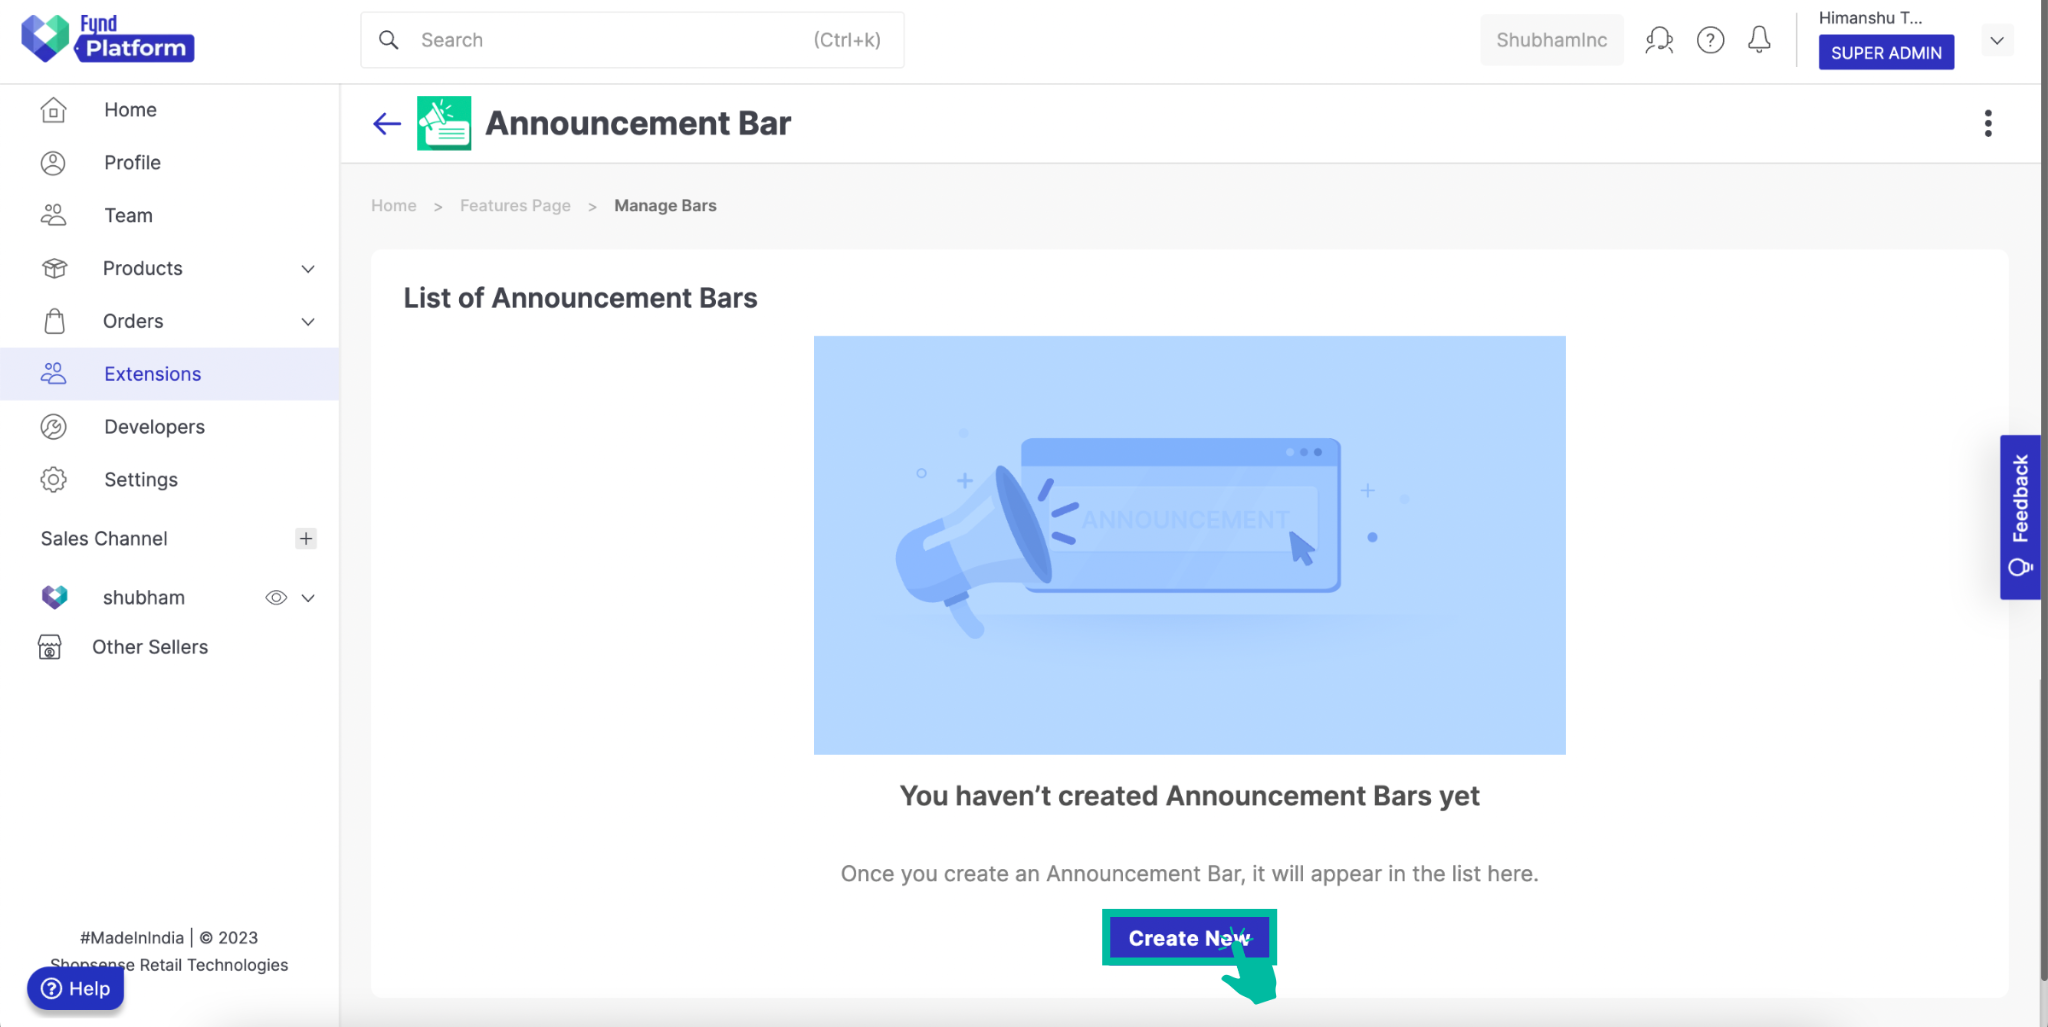
The list will be empty if you haven't configured and saved any announcement bar for your sales channel already.
- Select from the various options available for the Announcement Bar.
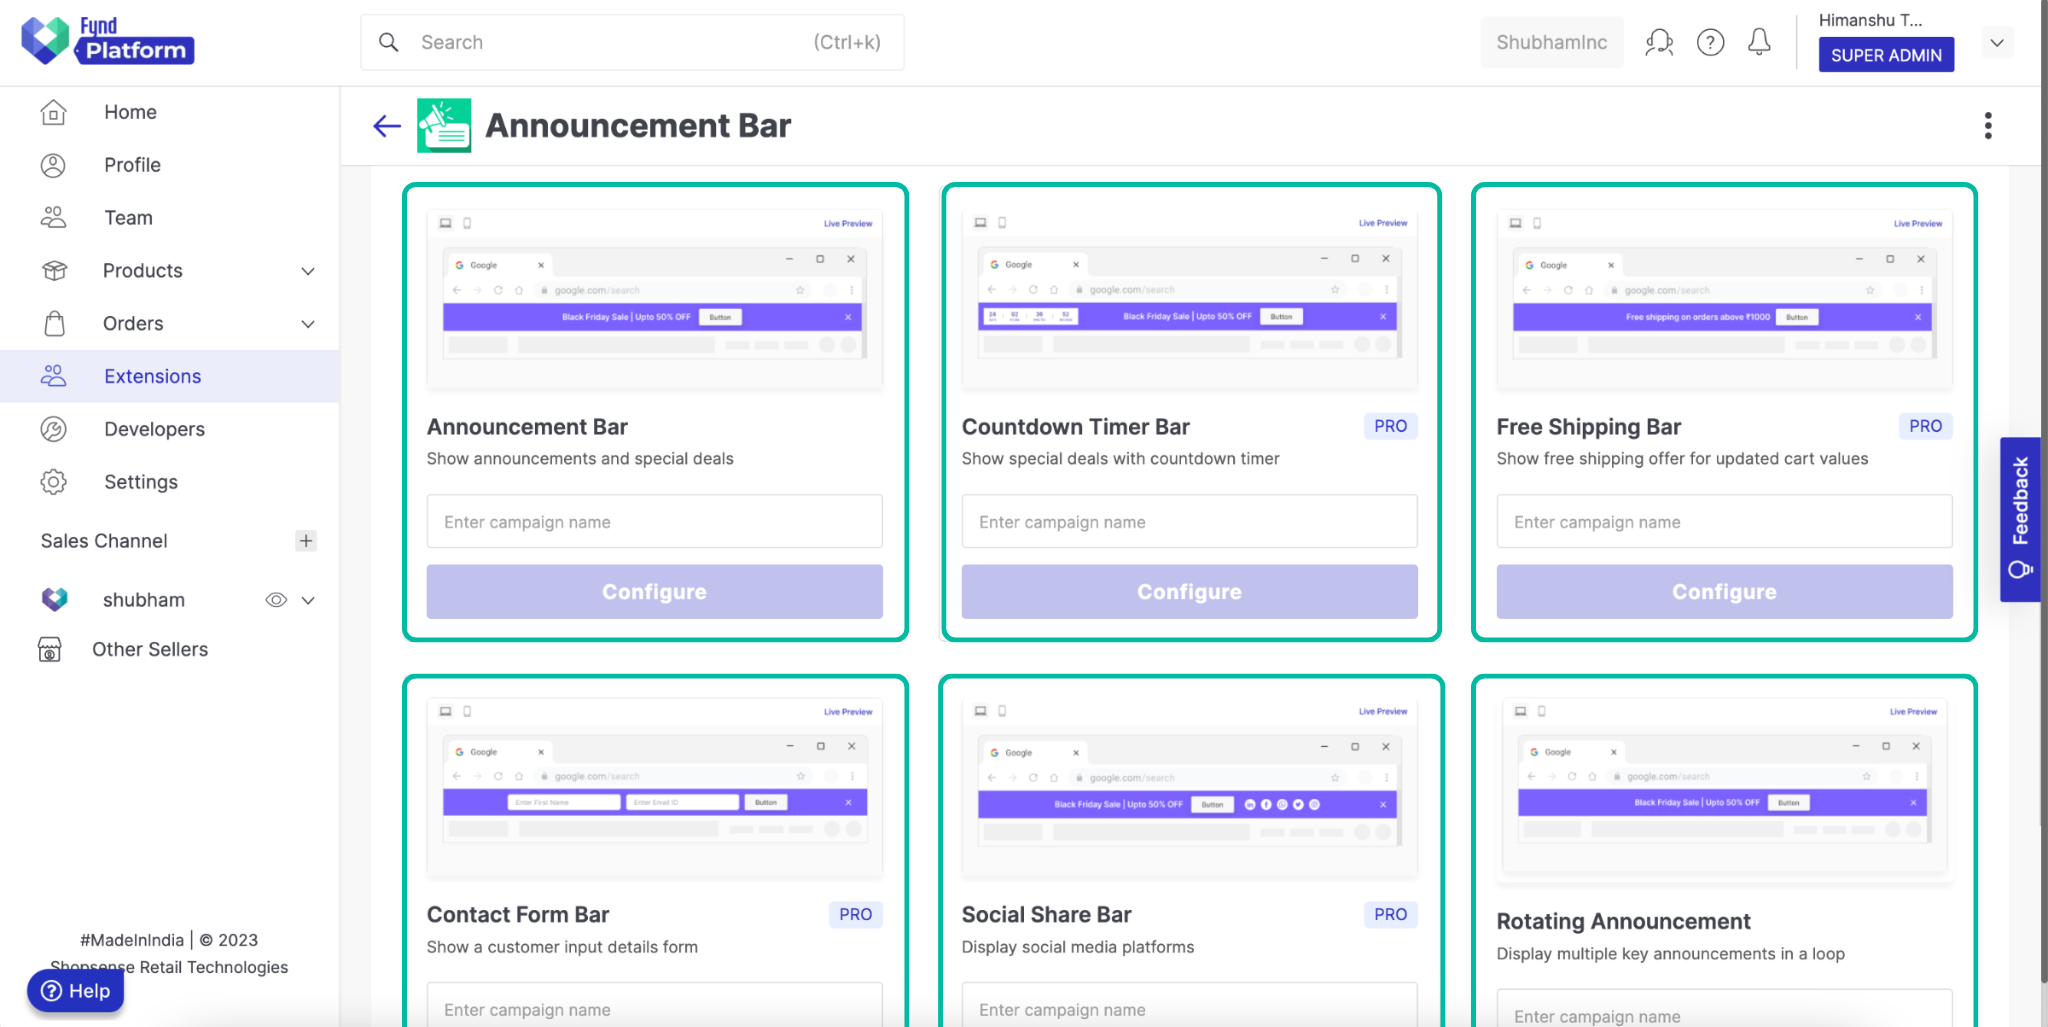
- Announcement Bar enables users to display important announcements or promotions to their website visitors.
- Countdown Timer Bar enables users to display an attention-grabbing timer bar to their website to increase urgency and encourage customers to take action.
- Free Shipping Bar enables users to display notification bar to their website, informing customers of a free shipping promotion or offer.
- Contact Form Bar enables users to add a contact form to their website's announcement bar.
- Social Share Bar enables users to add social media sharing buttons to their website's announcement bar.
- Rotating Announcement enables users to add multiple announcements in a single announcement bar.
- To configure your announcement bar, first, enter a name for it in the text field labelled Enter Campaign name (e.g., Christmas Countdown).
- Click Configure.
While each type of announcement bar has different configurations for you to modify, most configurations are common for all types of bars, this includes:
- Display Configuration
- Content
- Call to Action
- Delay Timer
- Target Page and Platform
Learn more about Common Configurations. Learn more about the configurations that are specific and unique for each bar here, Unique Configurations
Common Configurations
Display Configuration
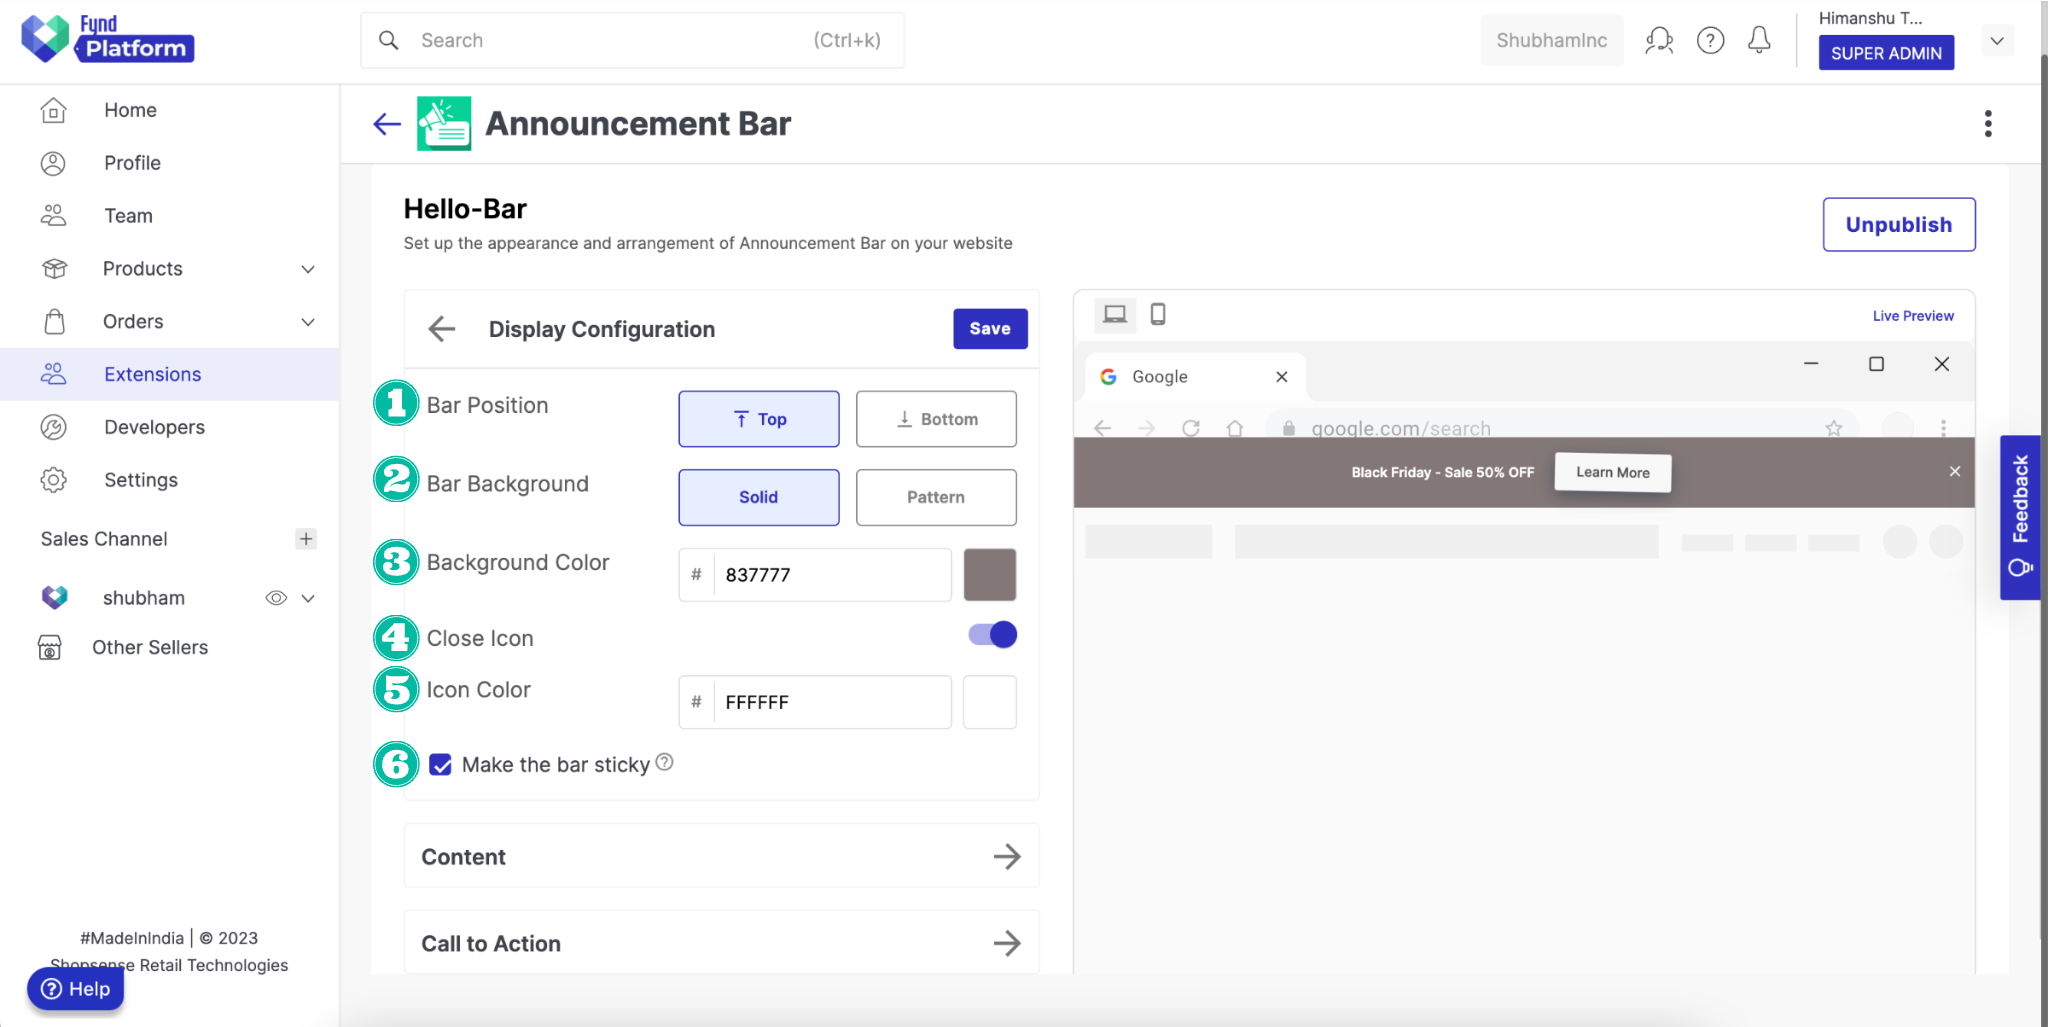
- Bar Position: Choose where to display your announcement bar - Top or Bottom of the screen.
- Bar Background: Select the type of background - Solid or Pattern, for the bar background.
- Solid: Click on it to keep your bar background a solid colour.
- Pattern: Click on it to select the pattern from the drop-down menu for your bar background.
- Background Color: Select the solid colour background for your announcement bar.
- Close Icon: Turn on to display a close icon for users to dismiss the announcement bar.
- Icon Color: Choose a colour for the close icon.
- Make the bar sticky: Enable this option to keep the bar in a fixed position on the page even when the user scrolls.
Content
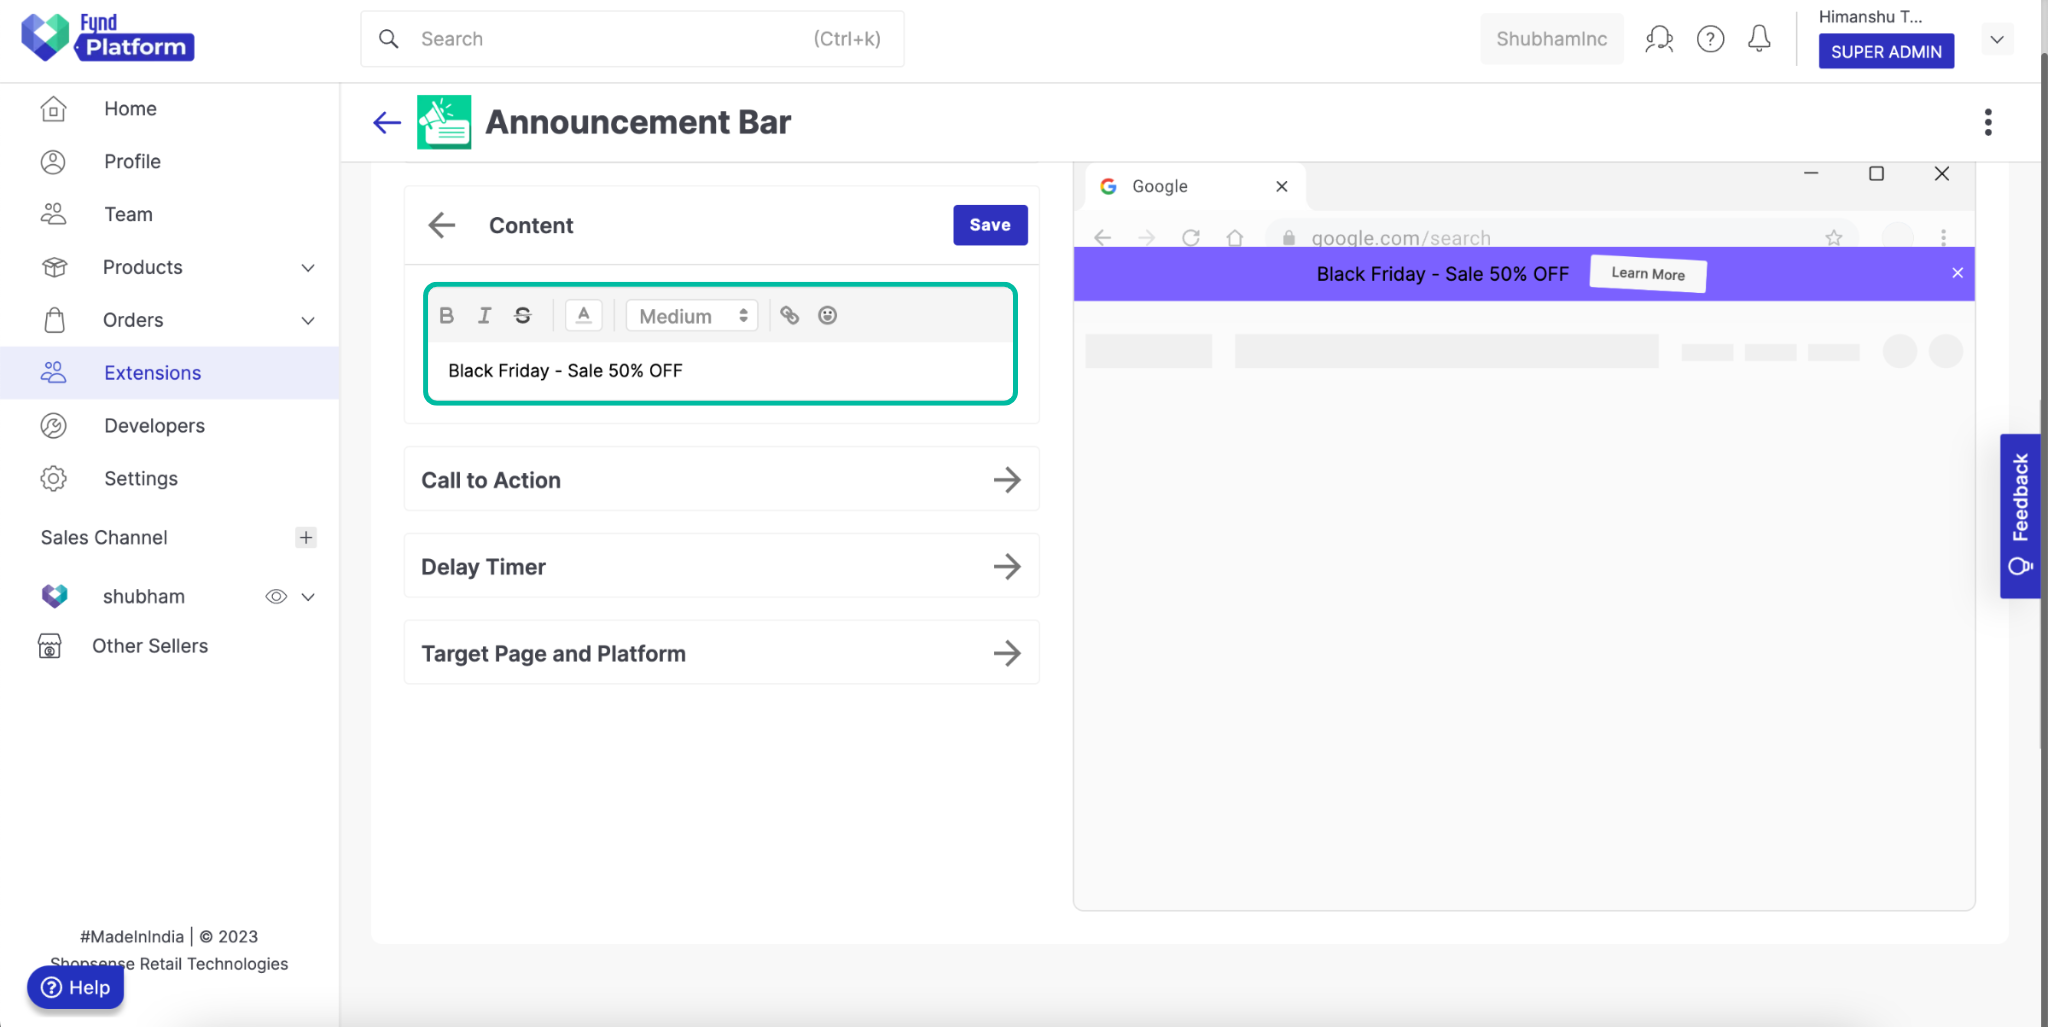
To showcase your message in the announcement bar of your website, enter the desired content in the provided space.
Call to Action
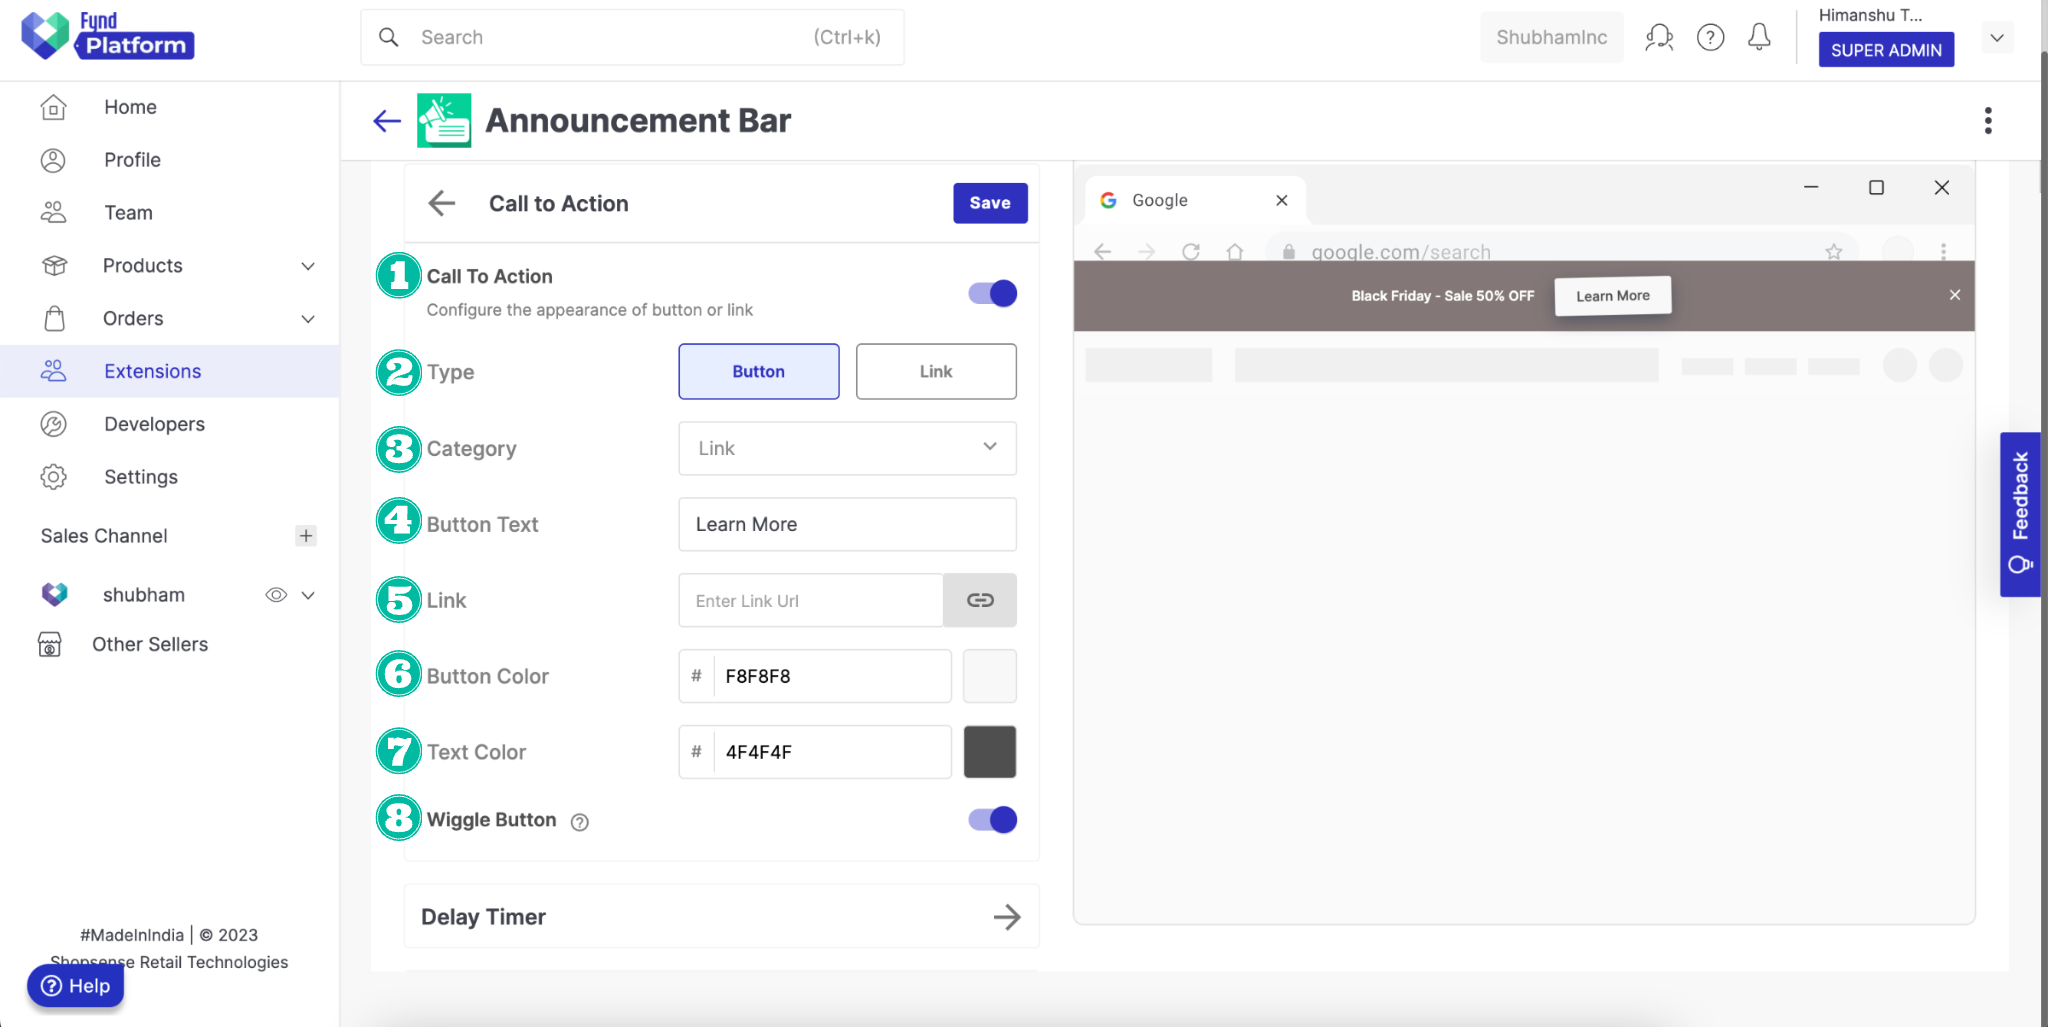
- Call To Action: You can turn on or off by toggling this button - to add or remove CTA.
- Type: Select the suitable type of call to action from the options - Button and Link.
- Category: Select the desired category for your CTA.
- Link: When someone clicks on the link, it will redirect the user to that web page.
- Email: When someone clicks on the Email, it will redirect the user to the compose email screen.
- Mobile Number: When someone clicks on the Phone number, it will redirect the user to the call screen.
- Button Text: Enter the desired text for your button or link, which will appear as a button text or link text, respectively.
- Link: Enter the relevant input based on the category you have selected.
- Button Color: Choose the colour of the button.
- Text Color: Choose the colour of the text on the button.
- Wiggle Button: By enabling this feature, your Button Text will be accompanied by a three-second shake animation. This animation can help draw attention to the button and add a dynamic element to your announcement bar.
Delay Timer
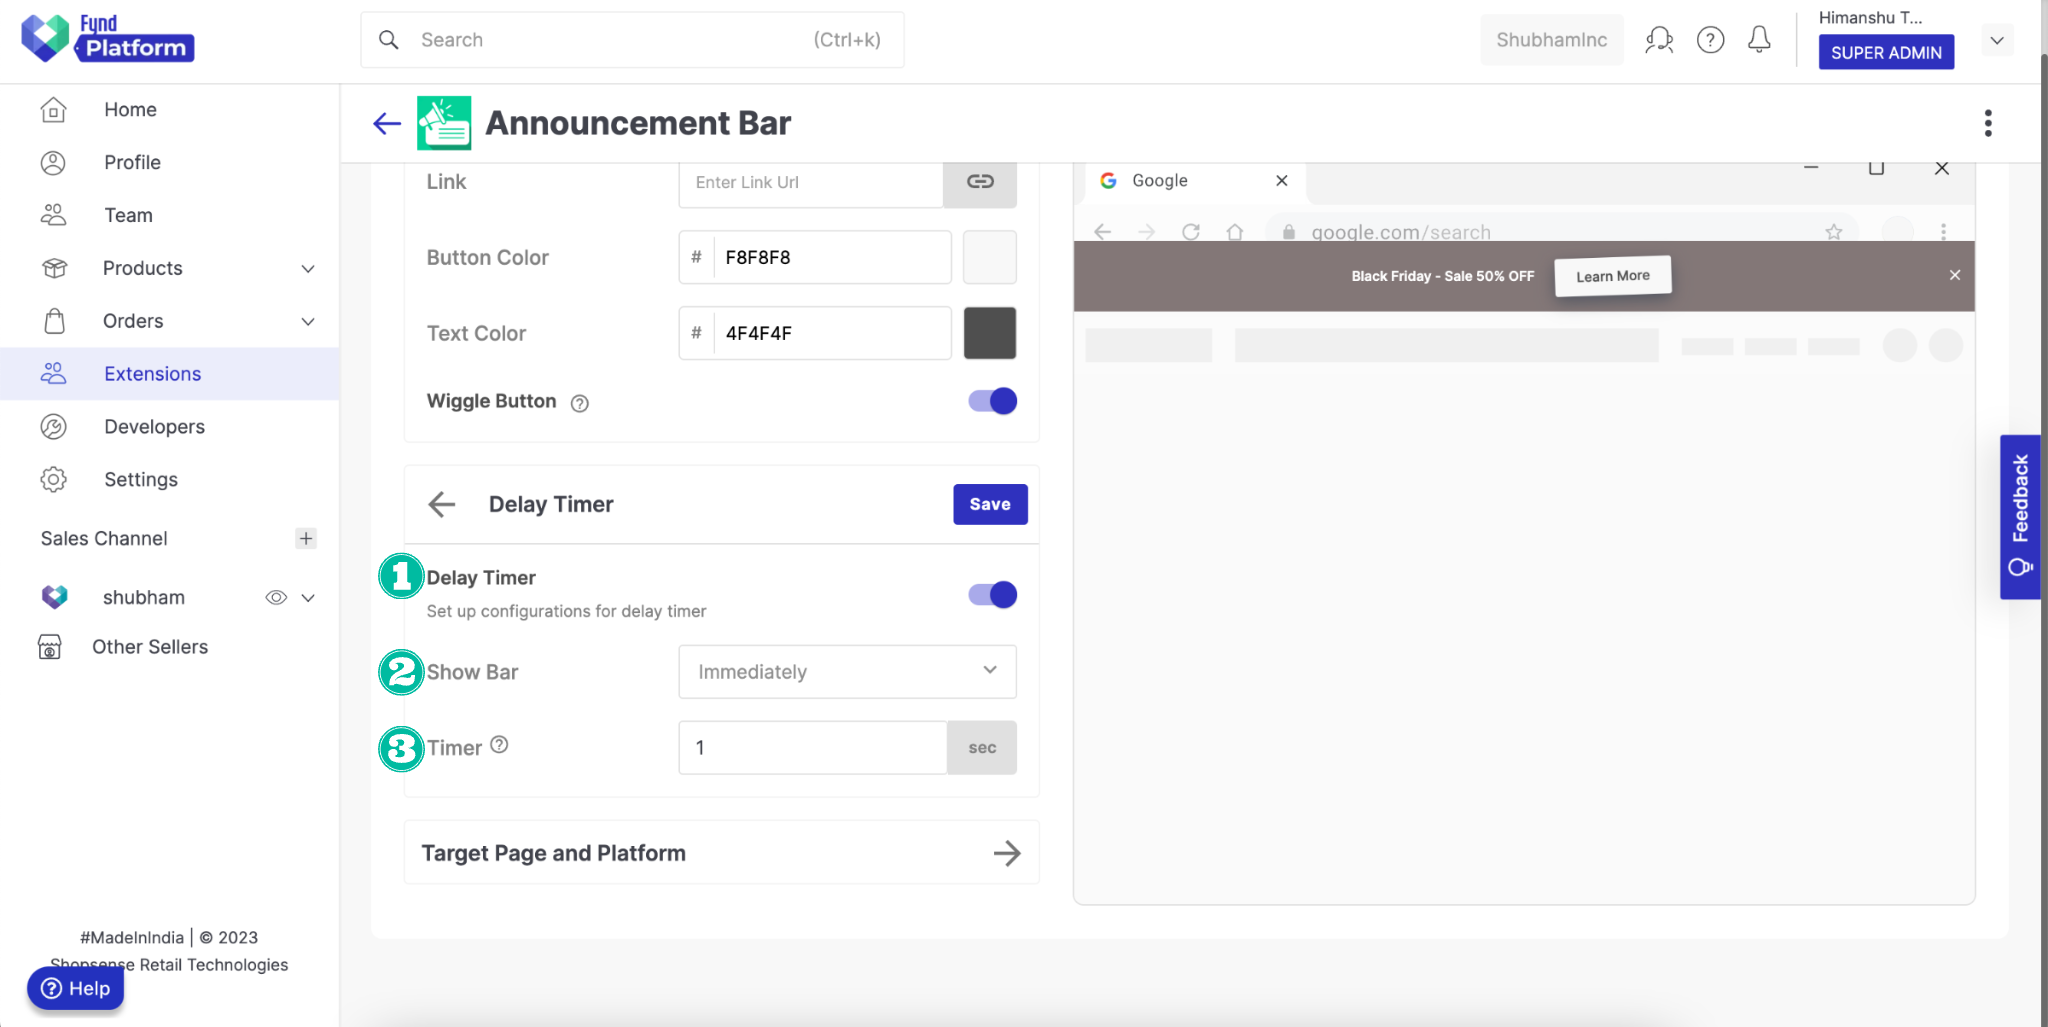
- Delay Timer: Enabling this feature allows you to control the delay time for displaying the announcement bar on your website.
- Show Bar: Select the delay duration for when the announcement bar should appear on the page when it is loaded for the first time.
- Timer: Please input the desired time in seconds for the announcement bar to reappear after the user has closed it.
Target Page and Platform
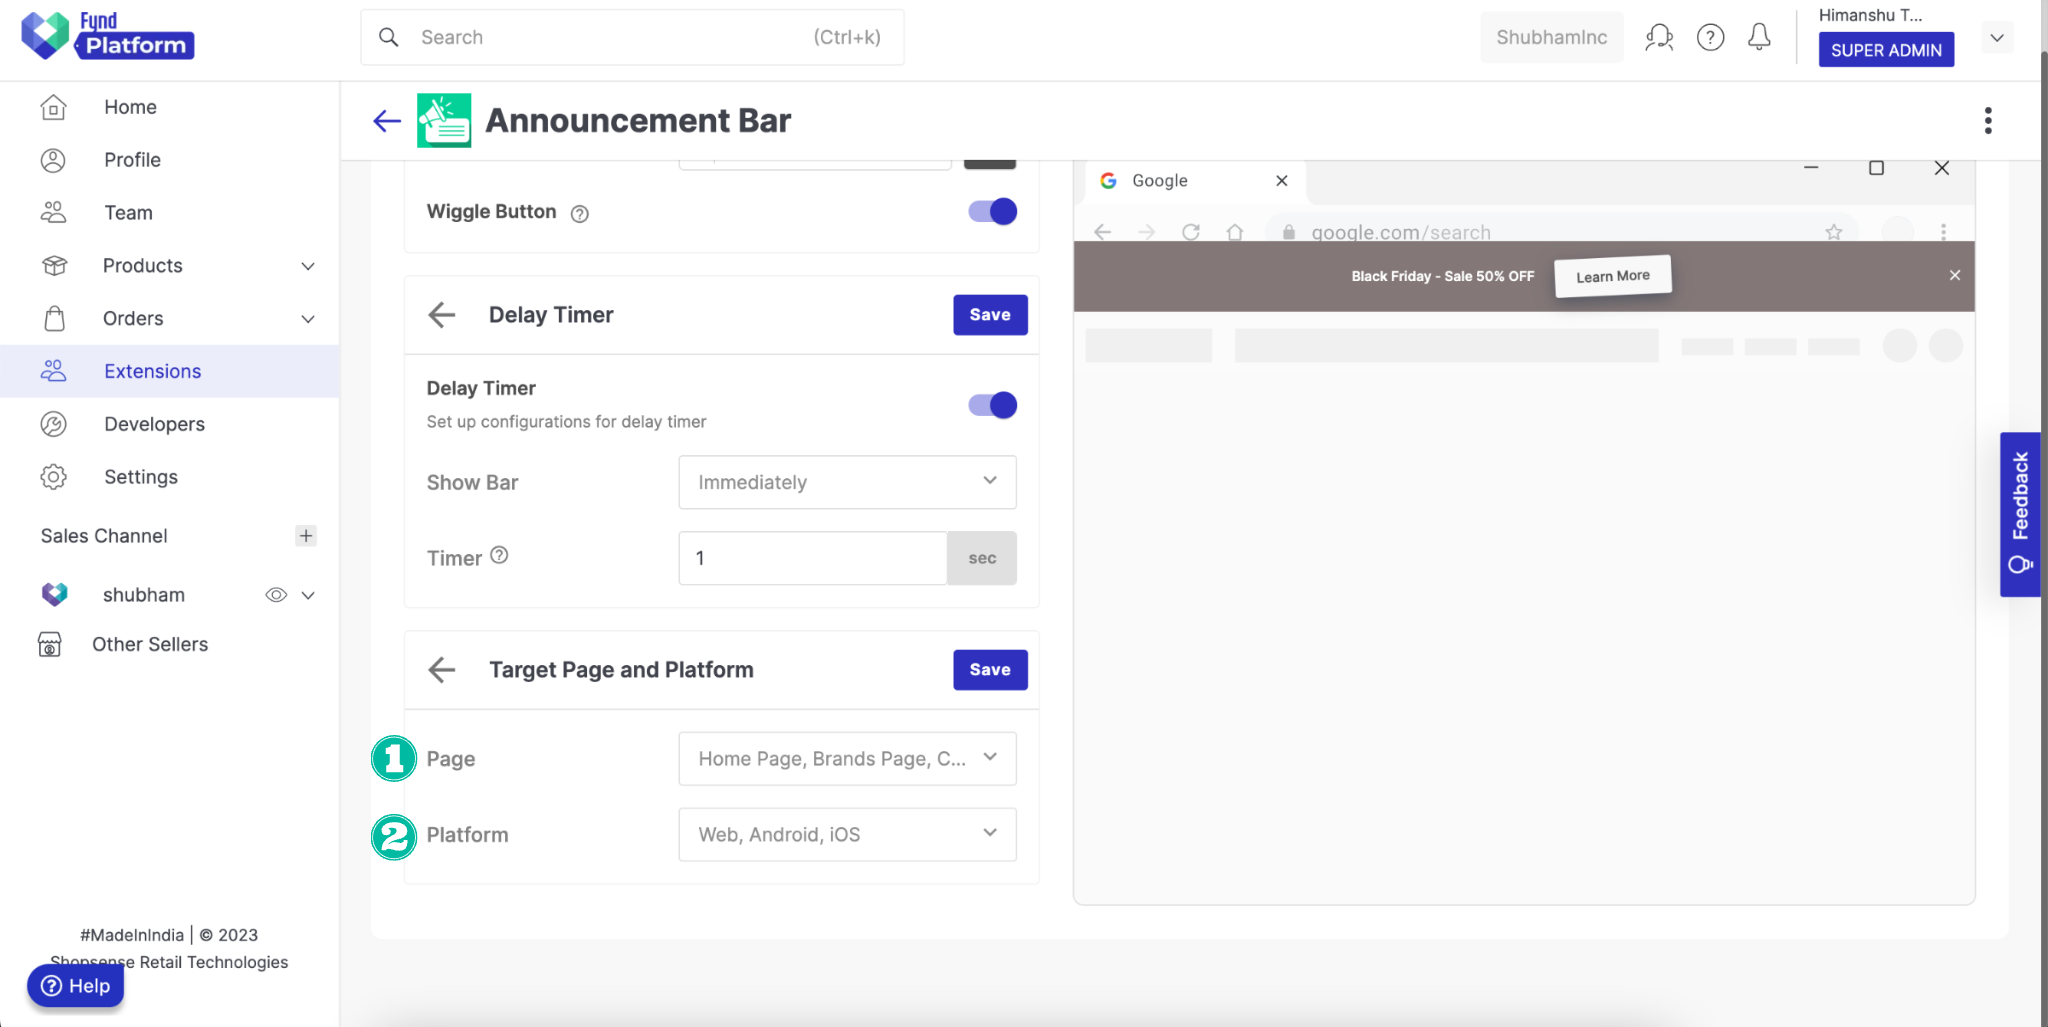
- Page: Select the web pages where you would like your announcement bar to appear on your website.
- Platform: Select the platforms where you want to display your announcement bar.
Unique Configurations
For Announcement Bar
The Announcement Bar does not contain any unique configurations. Only refer to Common Configurations.
For Countdown Timer Bar
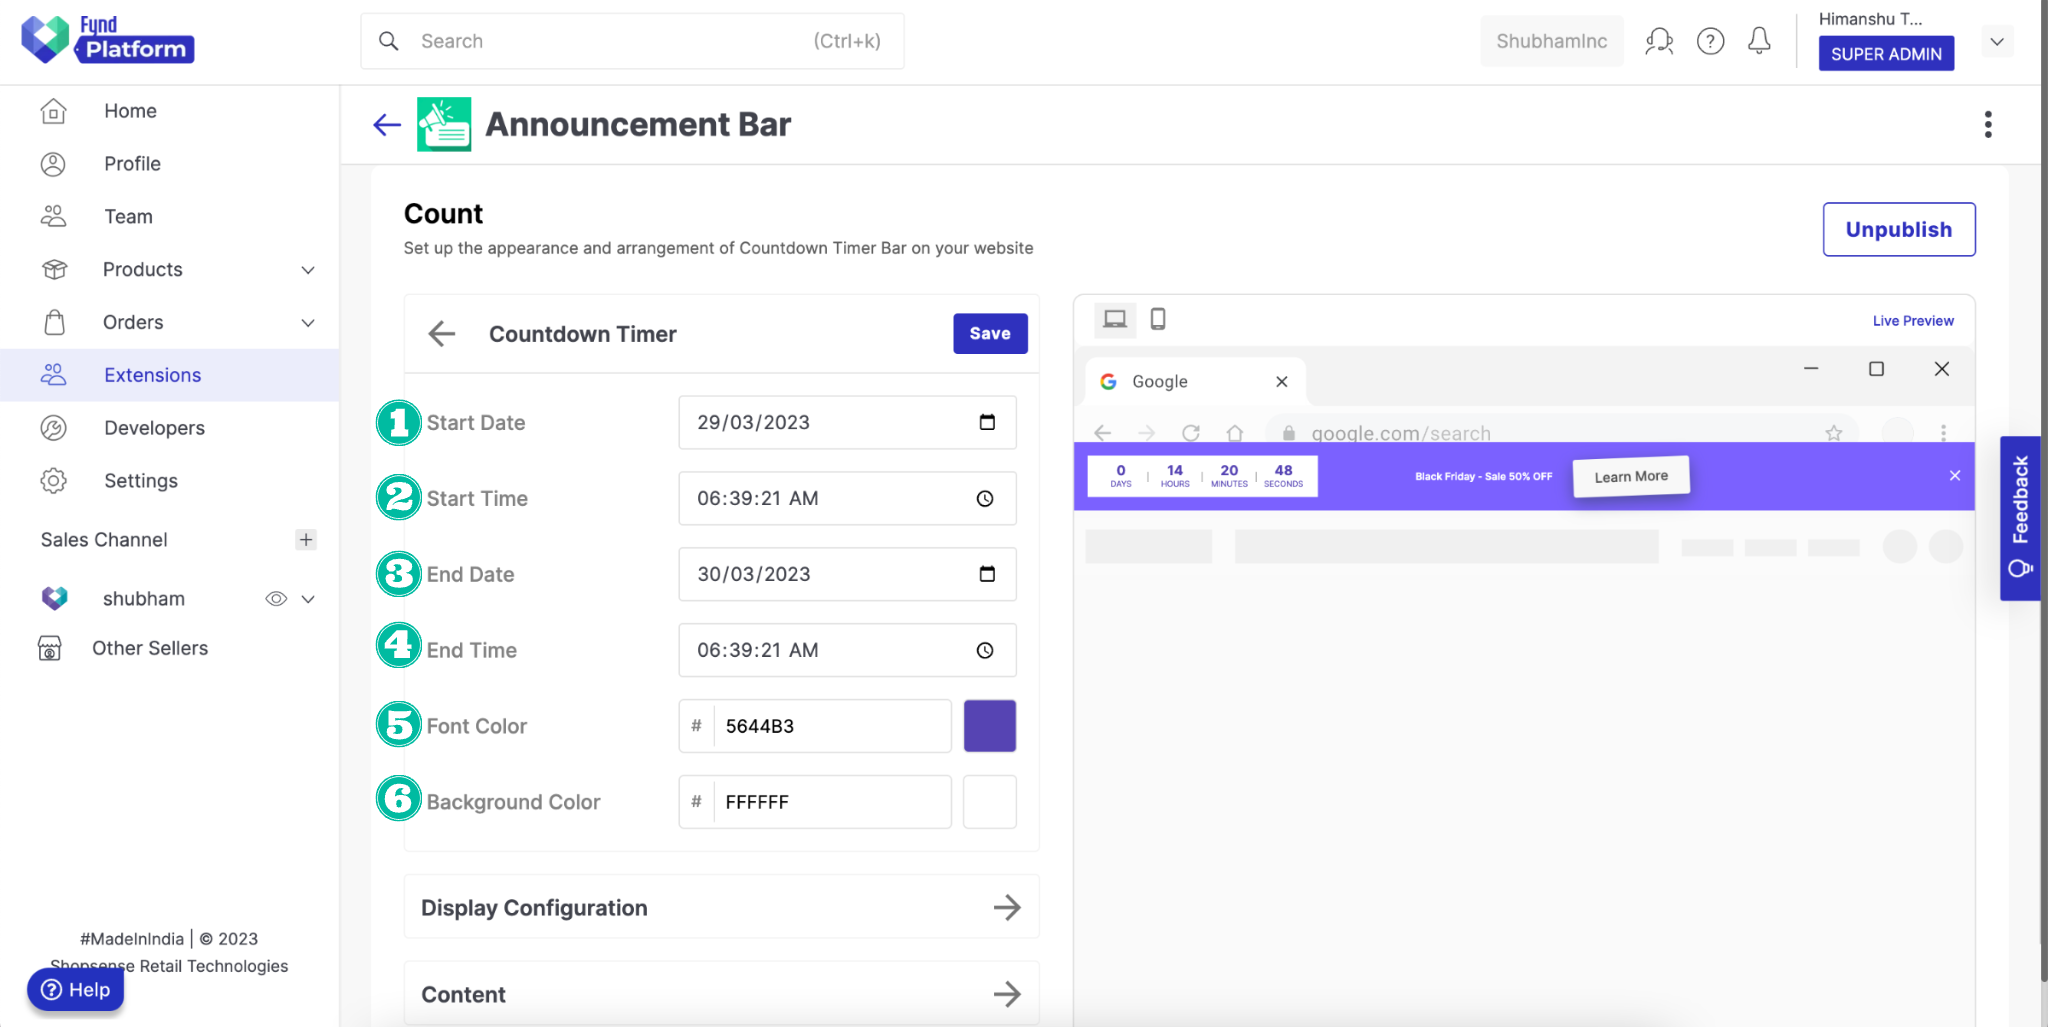
- Start Date: Select the start date for your announcement bar.
- Start Time: Select the start time for your announcement bar.
- End Date: Select the end date for your announcement bar.
- End Time: Select the end time for your announcement bar.
- Font Color: Select the colour for the countdown timer.
- Background Color: Select the colour for the background colour of the countdown timer.
The announcement bar will become visible on your storefront after the start date and time you set are reached. Similarly, the bar will disappear from your storefront once the end date and time set by you are reached.
For Free Shipping Bar
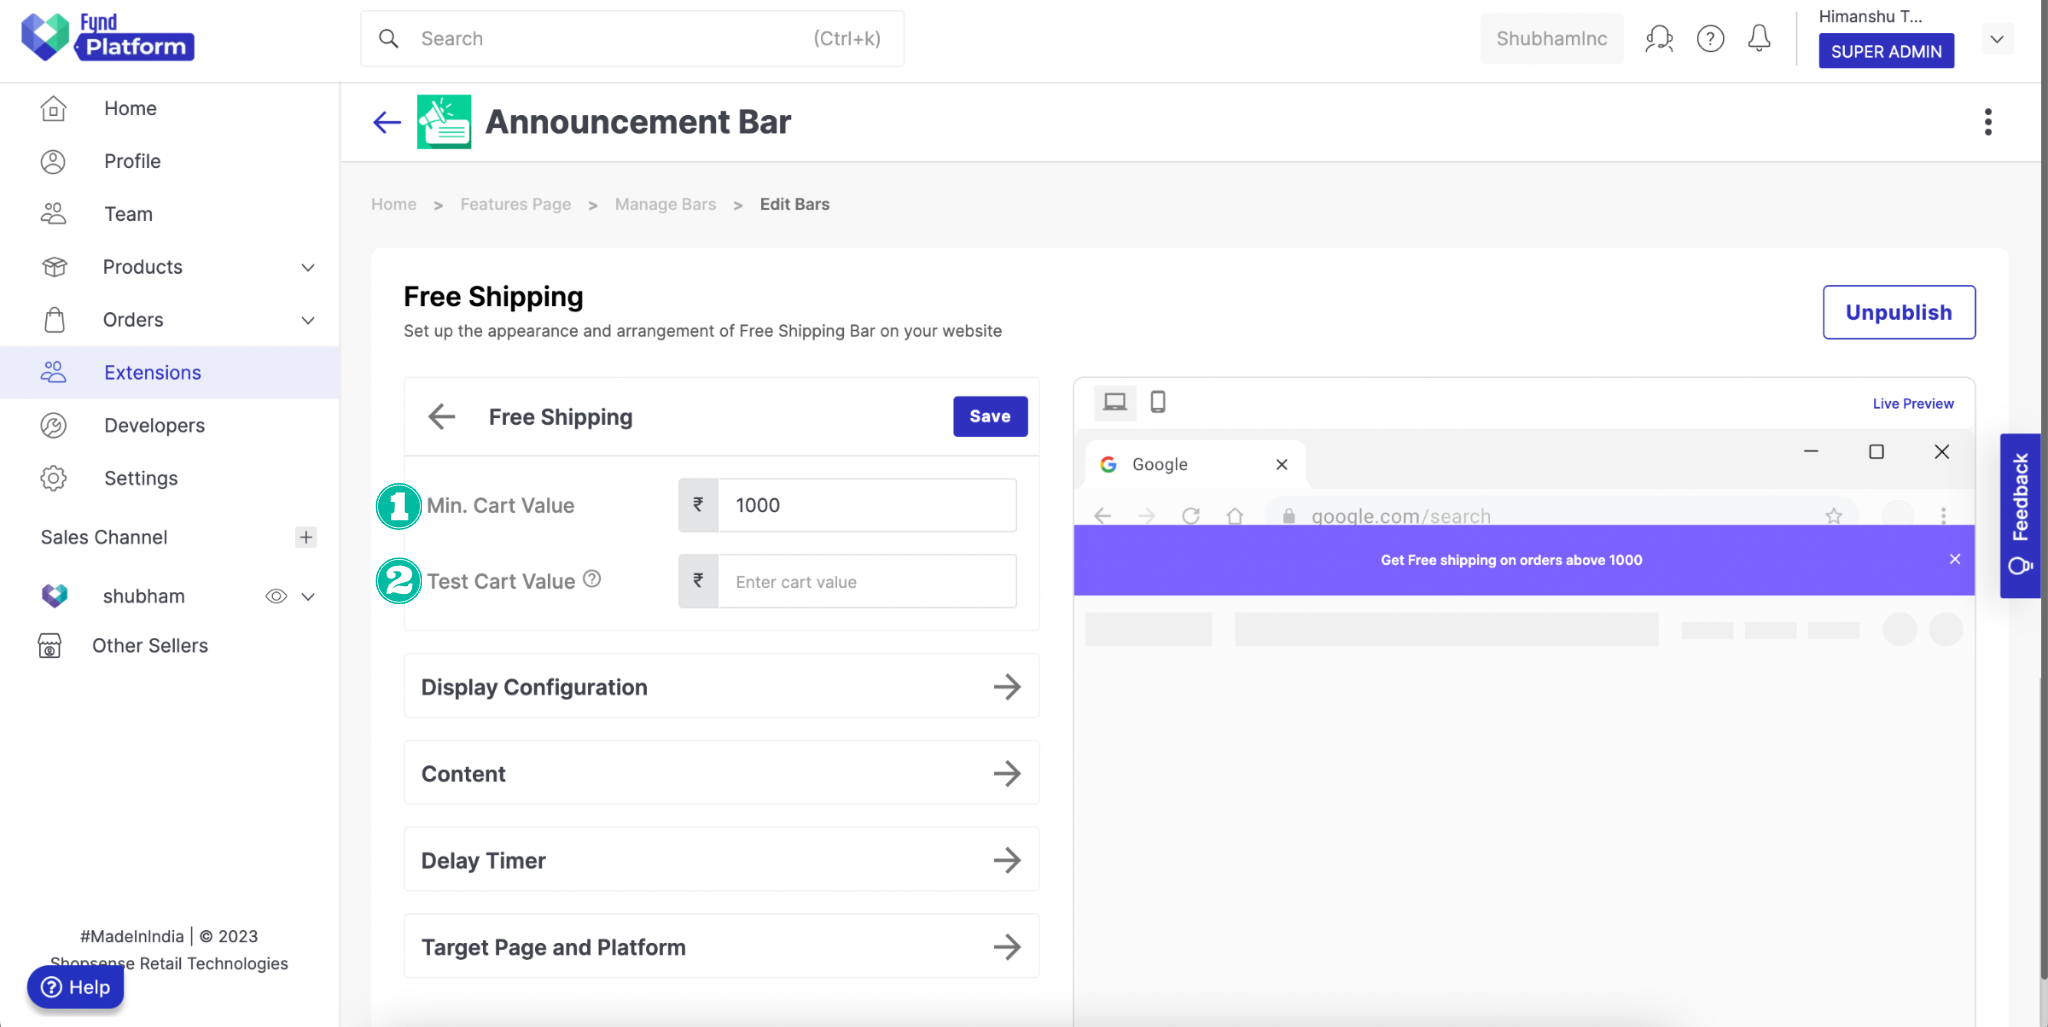
- Min. Cart Value: Enter the minimum cart value required to avail the free shipping offer.
- Test Cart Value: You can track your free shipping bar behaviour using this (testing-only).
This field is simply for you to try and simulate the addition of products to the cart. It will not have any impact on your actual website.
You need to create a free shipping promotion under your desired sales channel under Marketing followed by Promotion in the platform too.

- Start Message: Enter the message that will be displayed when the announcement bar commences and the cart value is zero. Once the customer adds an item to their cart, the start message will be replaced by the progress message.
- Progress Message: Enter the message that will appear when a user adds an item to their cart.
- Success Message: Enter the message that will appear when a user has added enough items to meet the free shipping threshold.
For Contact Form Bar
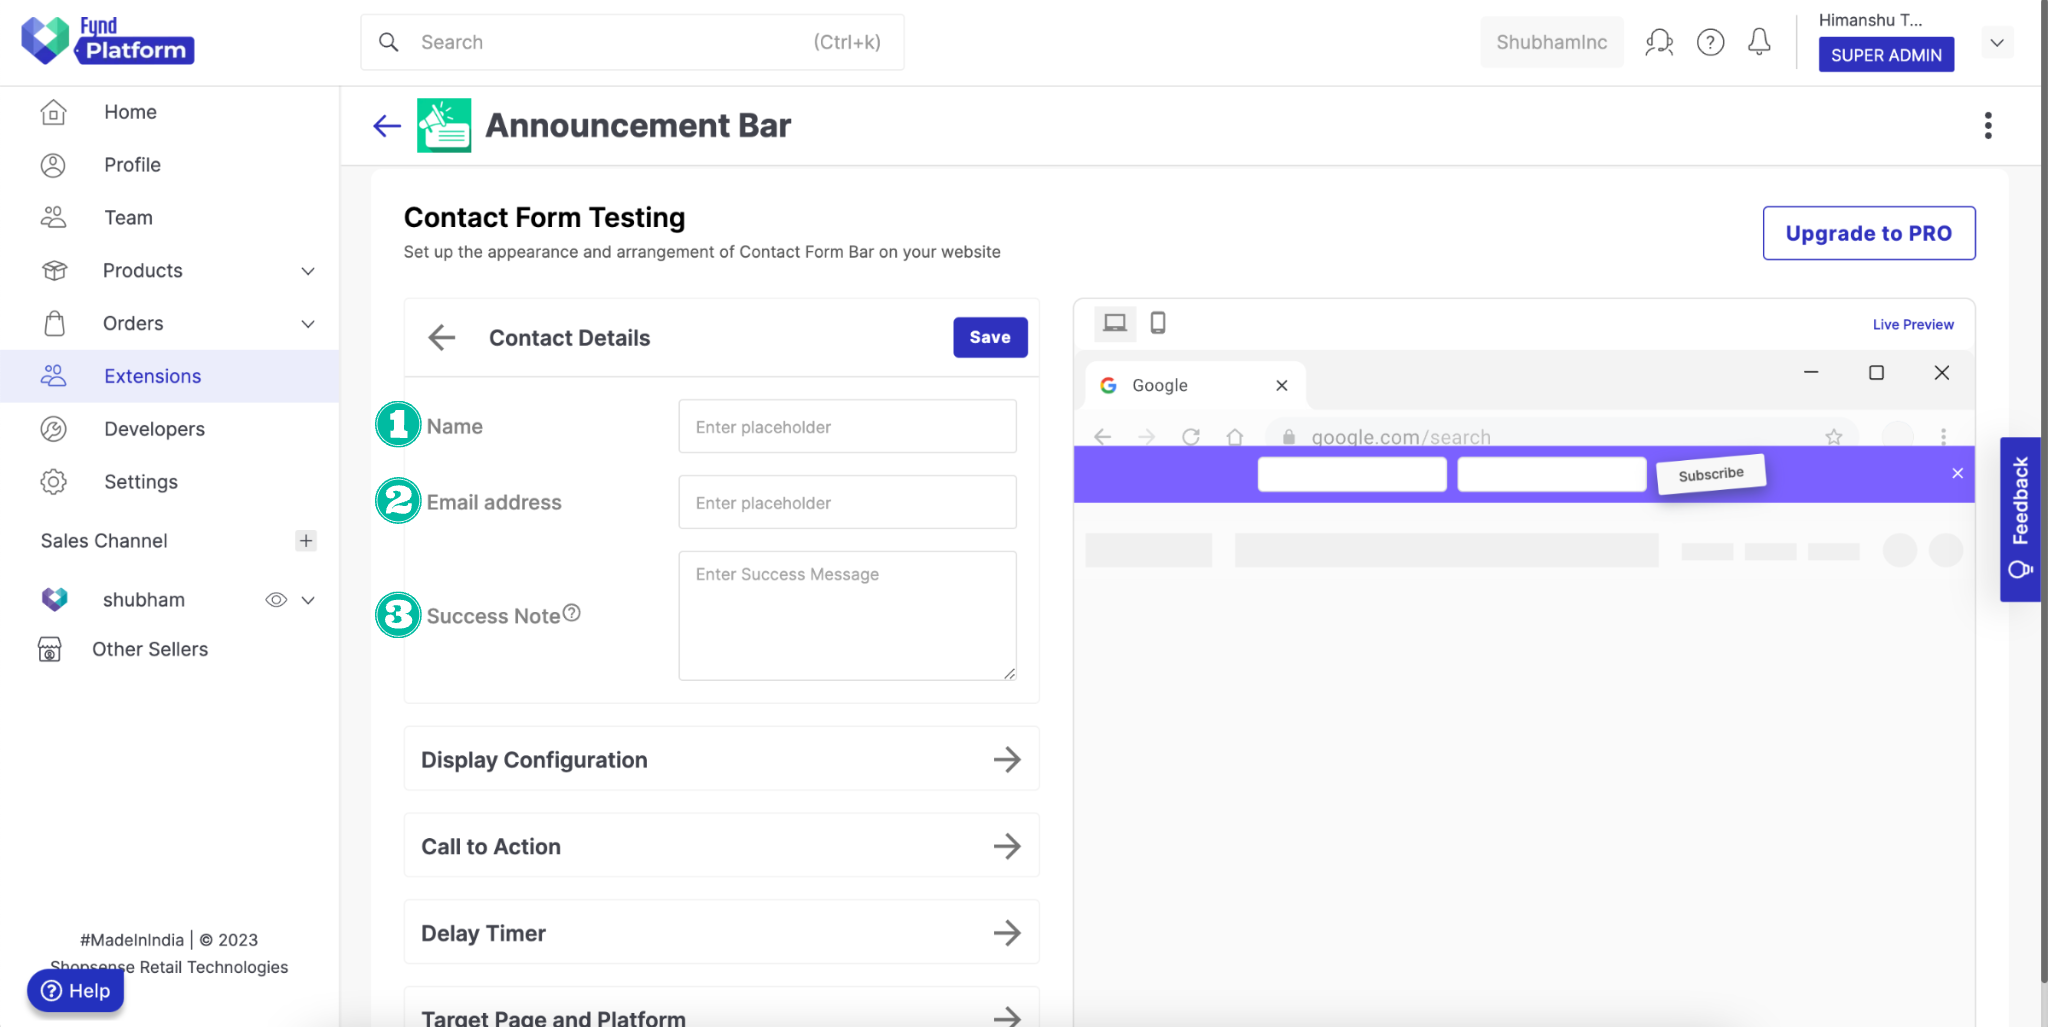
- Name: Enter the placeholder text here. For eg. Enter Your Name or Enter Your First name.
- Email address: Enter the placeholder text here. For eg. Enter your email address.
- Success Note: Enter the success message here. This message will display when the user has submitted the contact details on the contact form bar.
Any data collected from the Contact Form Bar will be stored in the Analytics section.
For Social Share Bar
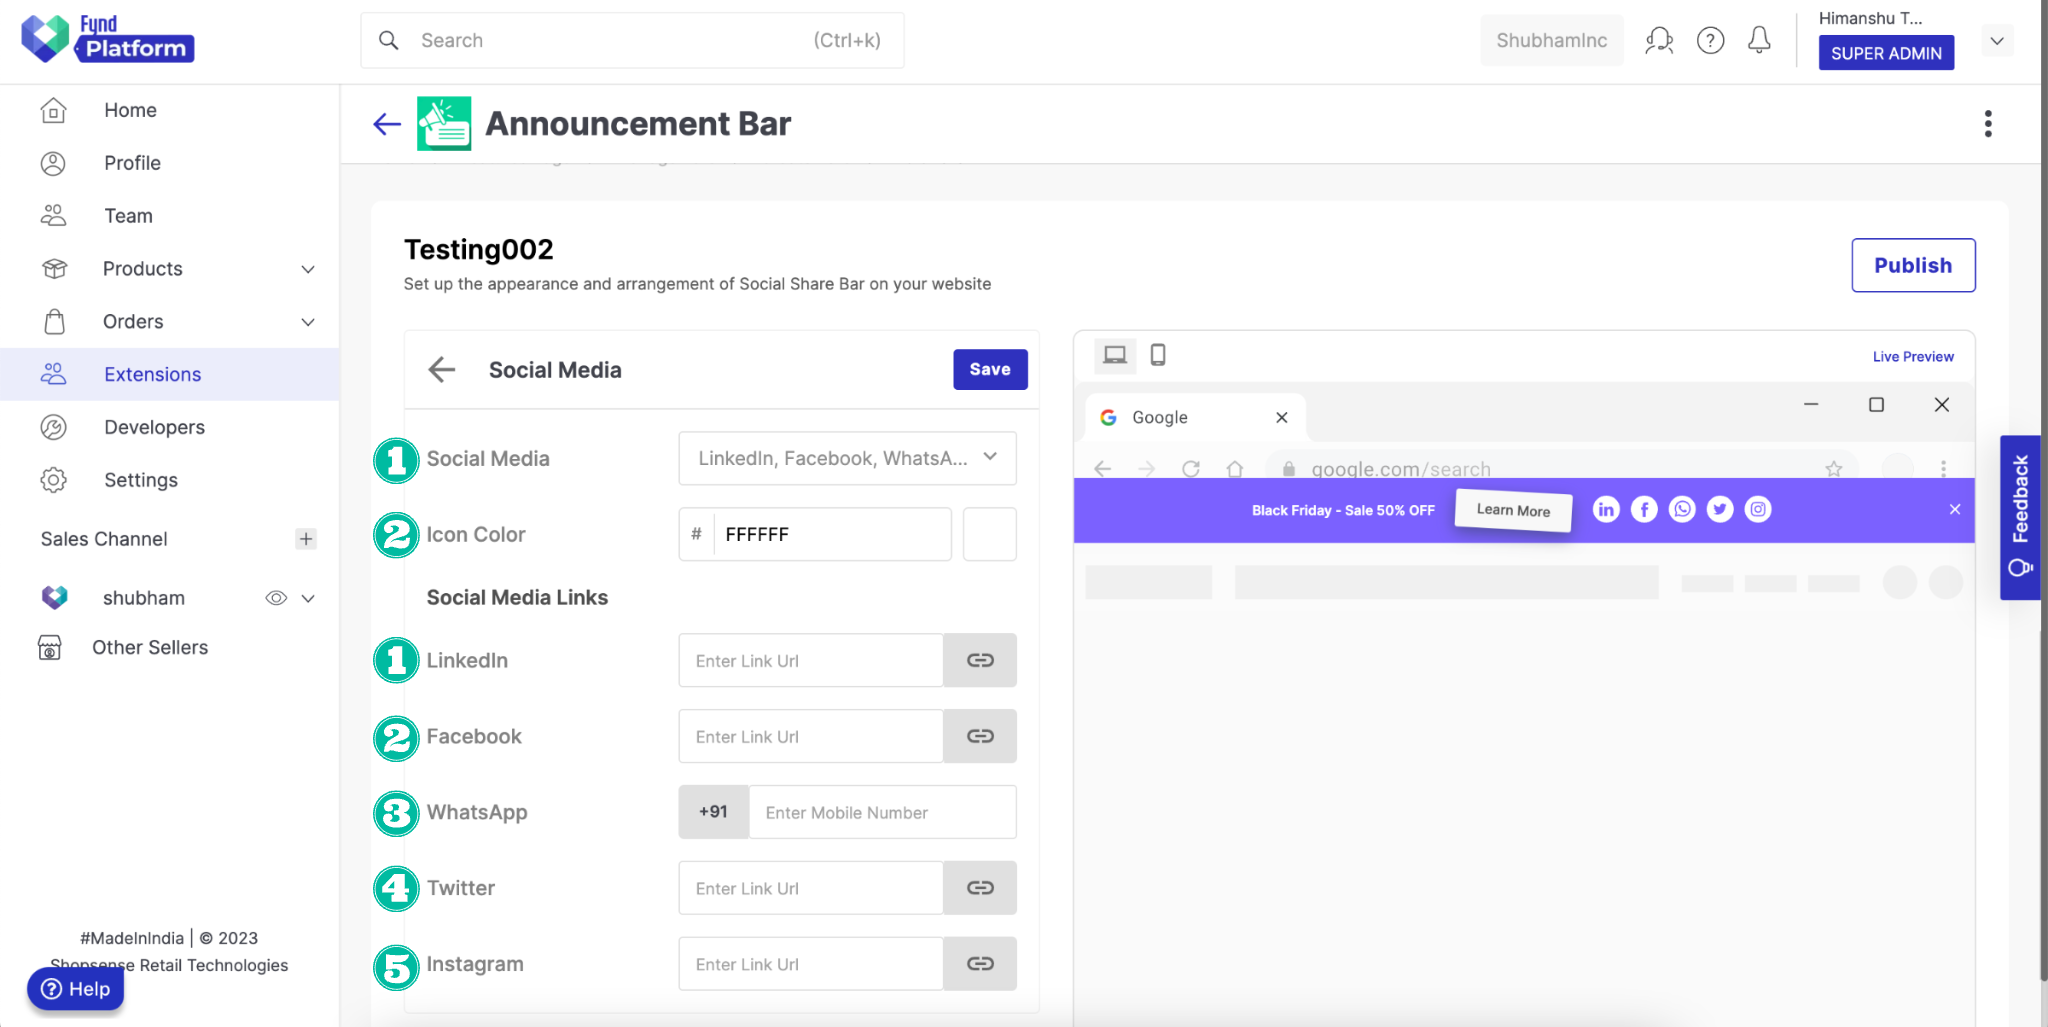
Social Media:
- Social Media: Select the social media icons you want to add to your announcement bar.
- Icon Color: Choose the colour of your social media icons.
Social Media Links:
- LinkedIn: Enter URL of the LinkedIn account where you want to redirect your users.
- Facebook: Enter URL of the Facebook account where you want to redirect your users.
- WhatsApp: Enter URL of the WhatsApp account where you want to redirect your users.
- Twitter: Enter URL of the Twitter account where you want to redirect your users.
- Instagram: Enter URL of your Instagram account where you want to redirect your users.
For Rotating Announcement
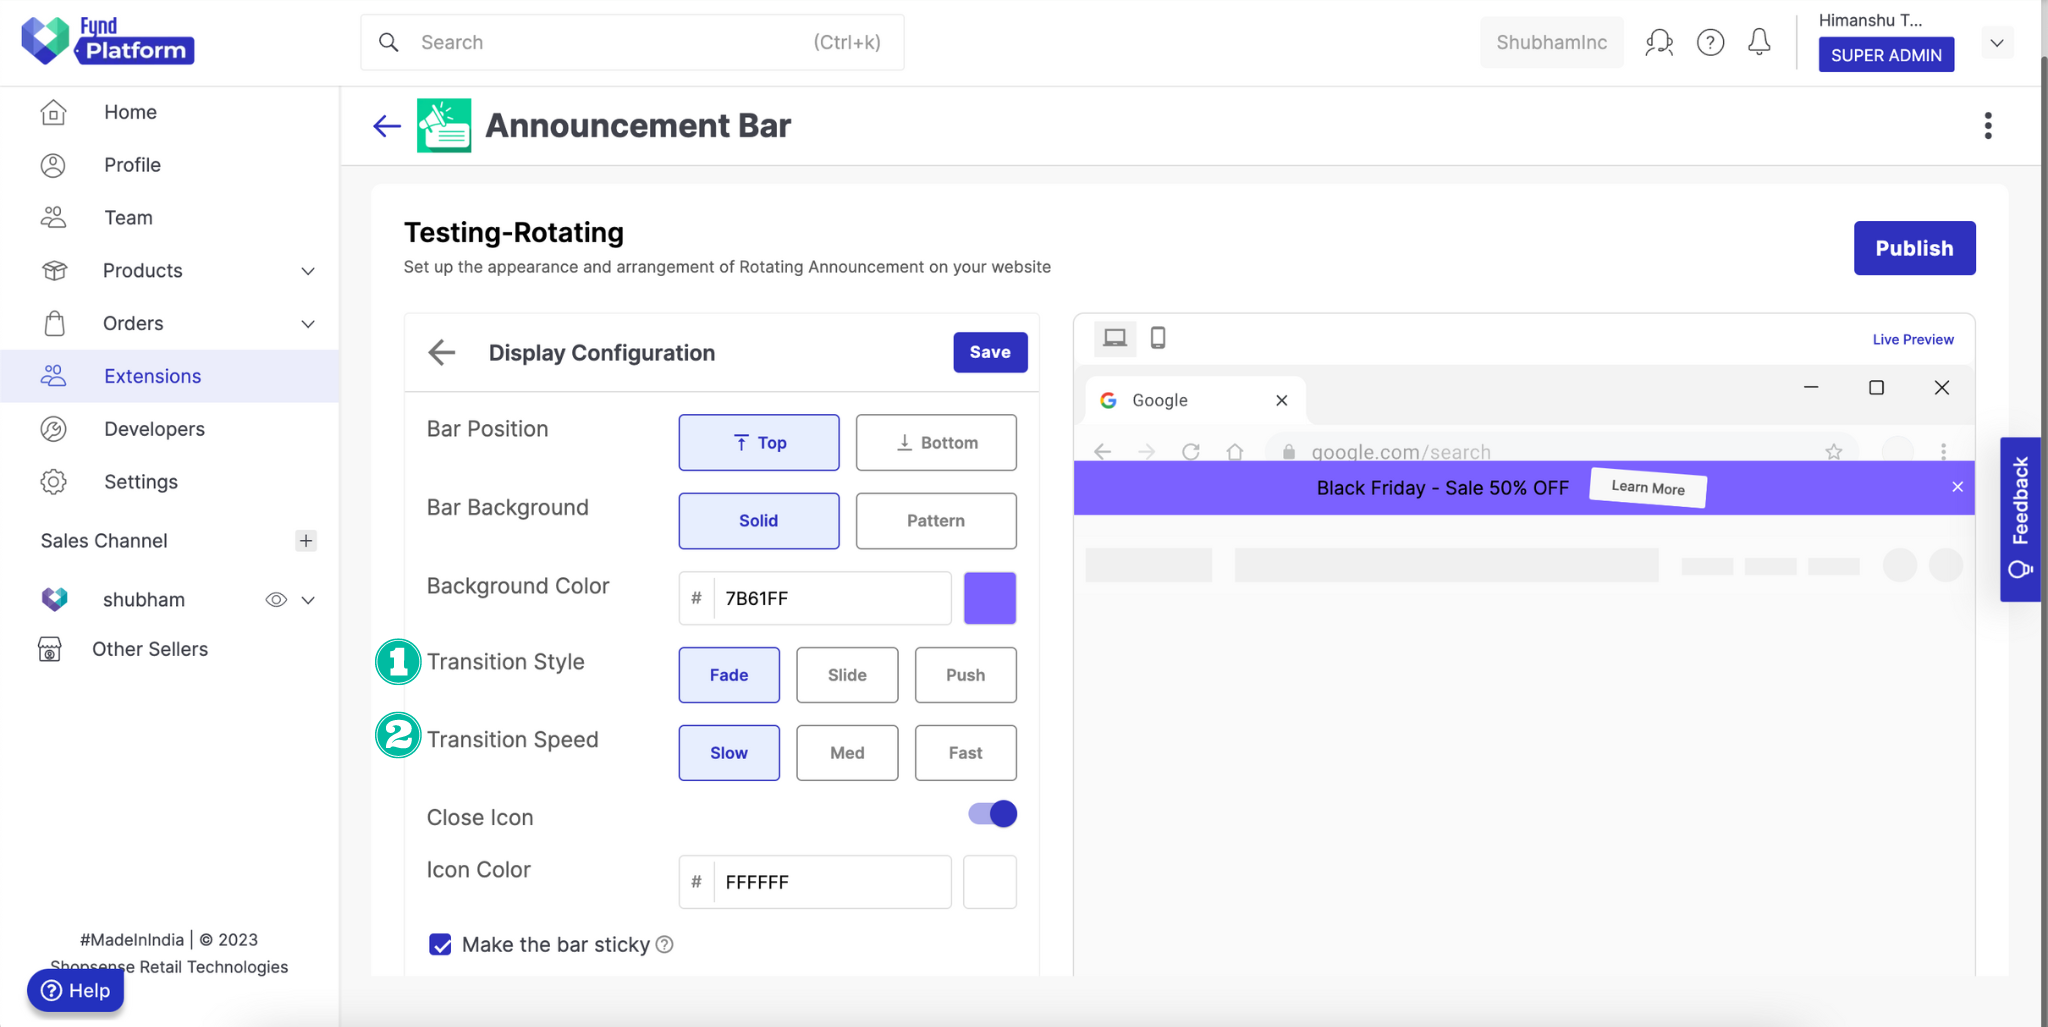
- Transition Style: Select the suitable transition style from the option - Fade, Slide, Push.
- Transition Speed: Select the suitable transition speed from the option - Slow, Med, Fast.
.png)
By default, one announcement bar is already added. You can make modifications to the default bar.
To add more announcement bars, follow the steps given below:
- Click on the three dots in the Add Bar button.
- Select the type of bar you want to add from the menu.
- Click on the selected bar and configure it.
- Click Save.
Adjust the priority of the bars by sliding them up or down, which determines the order in which they will appear on the storefront.
Activating/Deactivating Announcement Bar
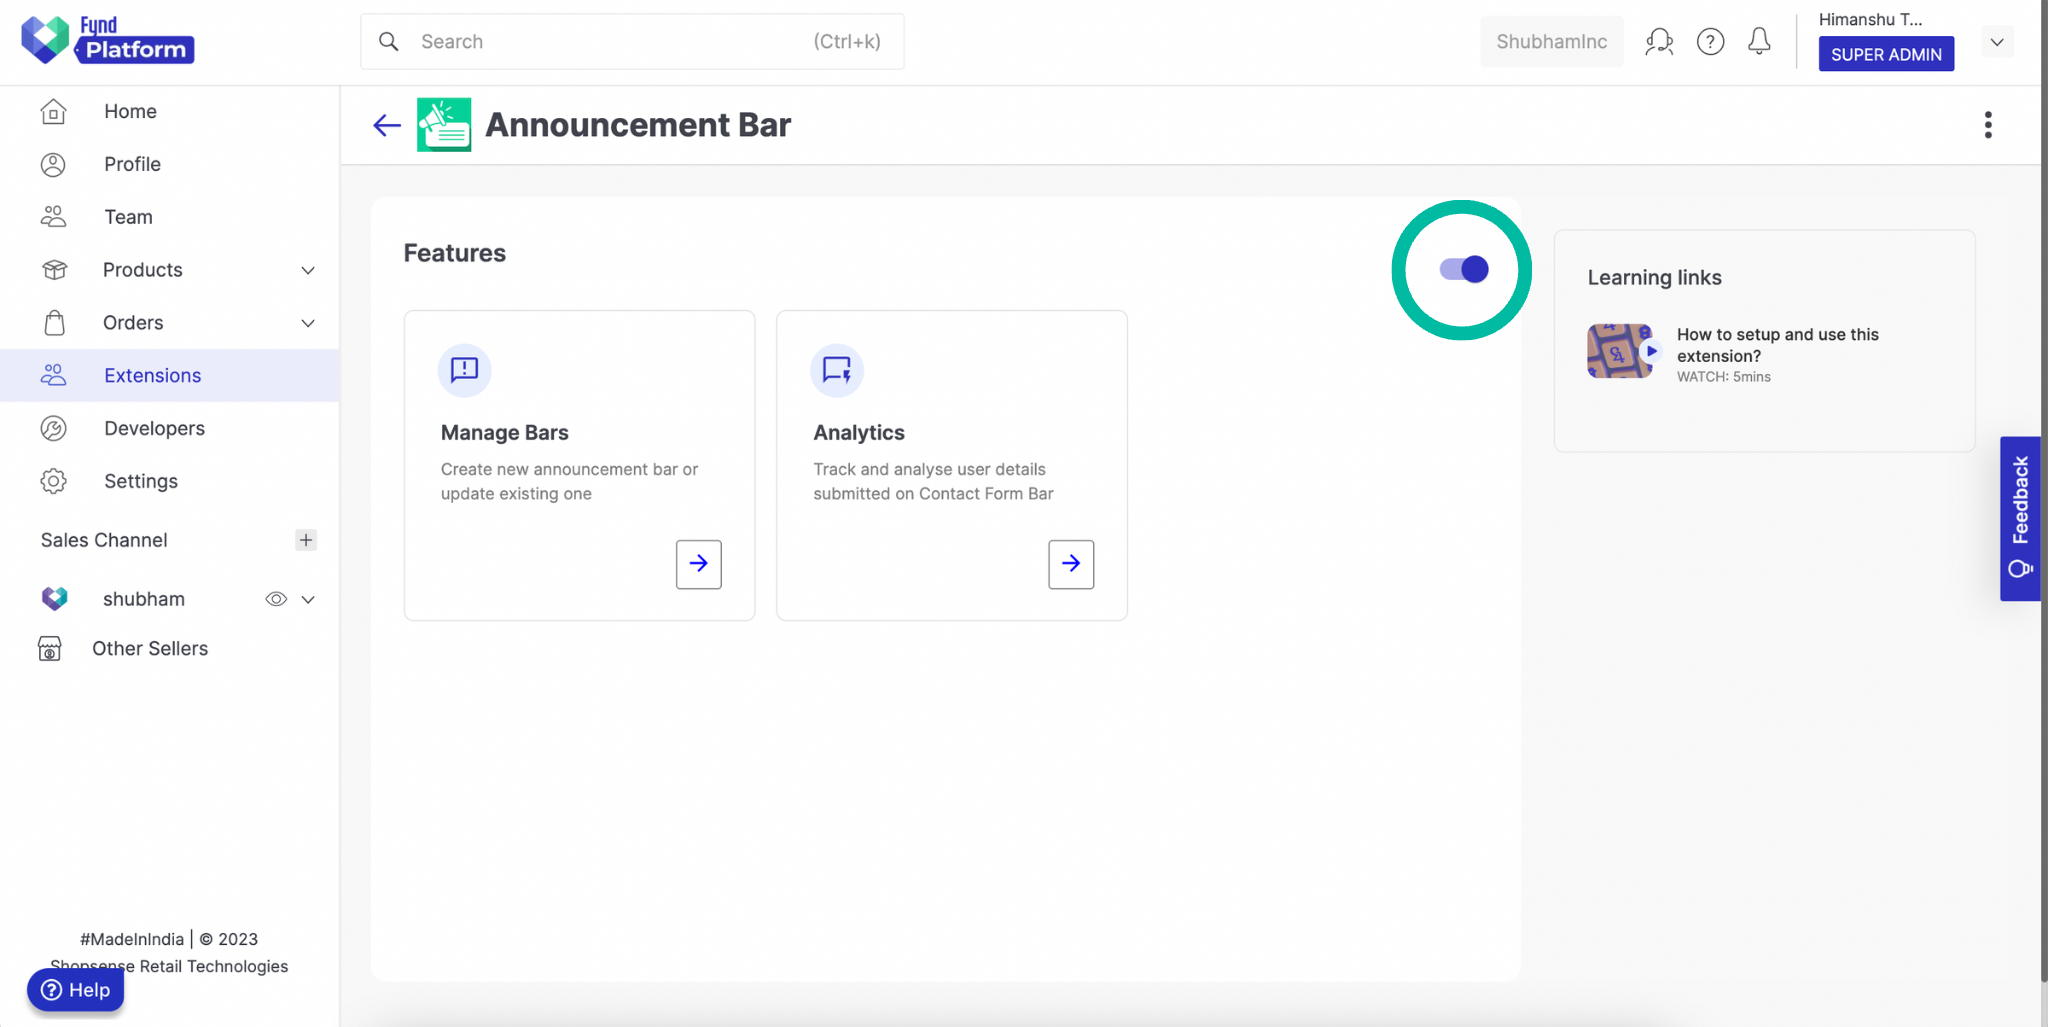
- To Activate the announcement bar, open the extension and turn ON the toggle button (present on the features page) after selecting the sales channel.
- To Deactivate the announcement bar, open the extension, select the sales channel, and turn OFF the toggle button.
Analytics
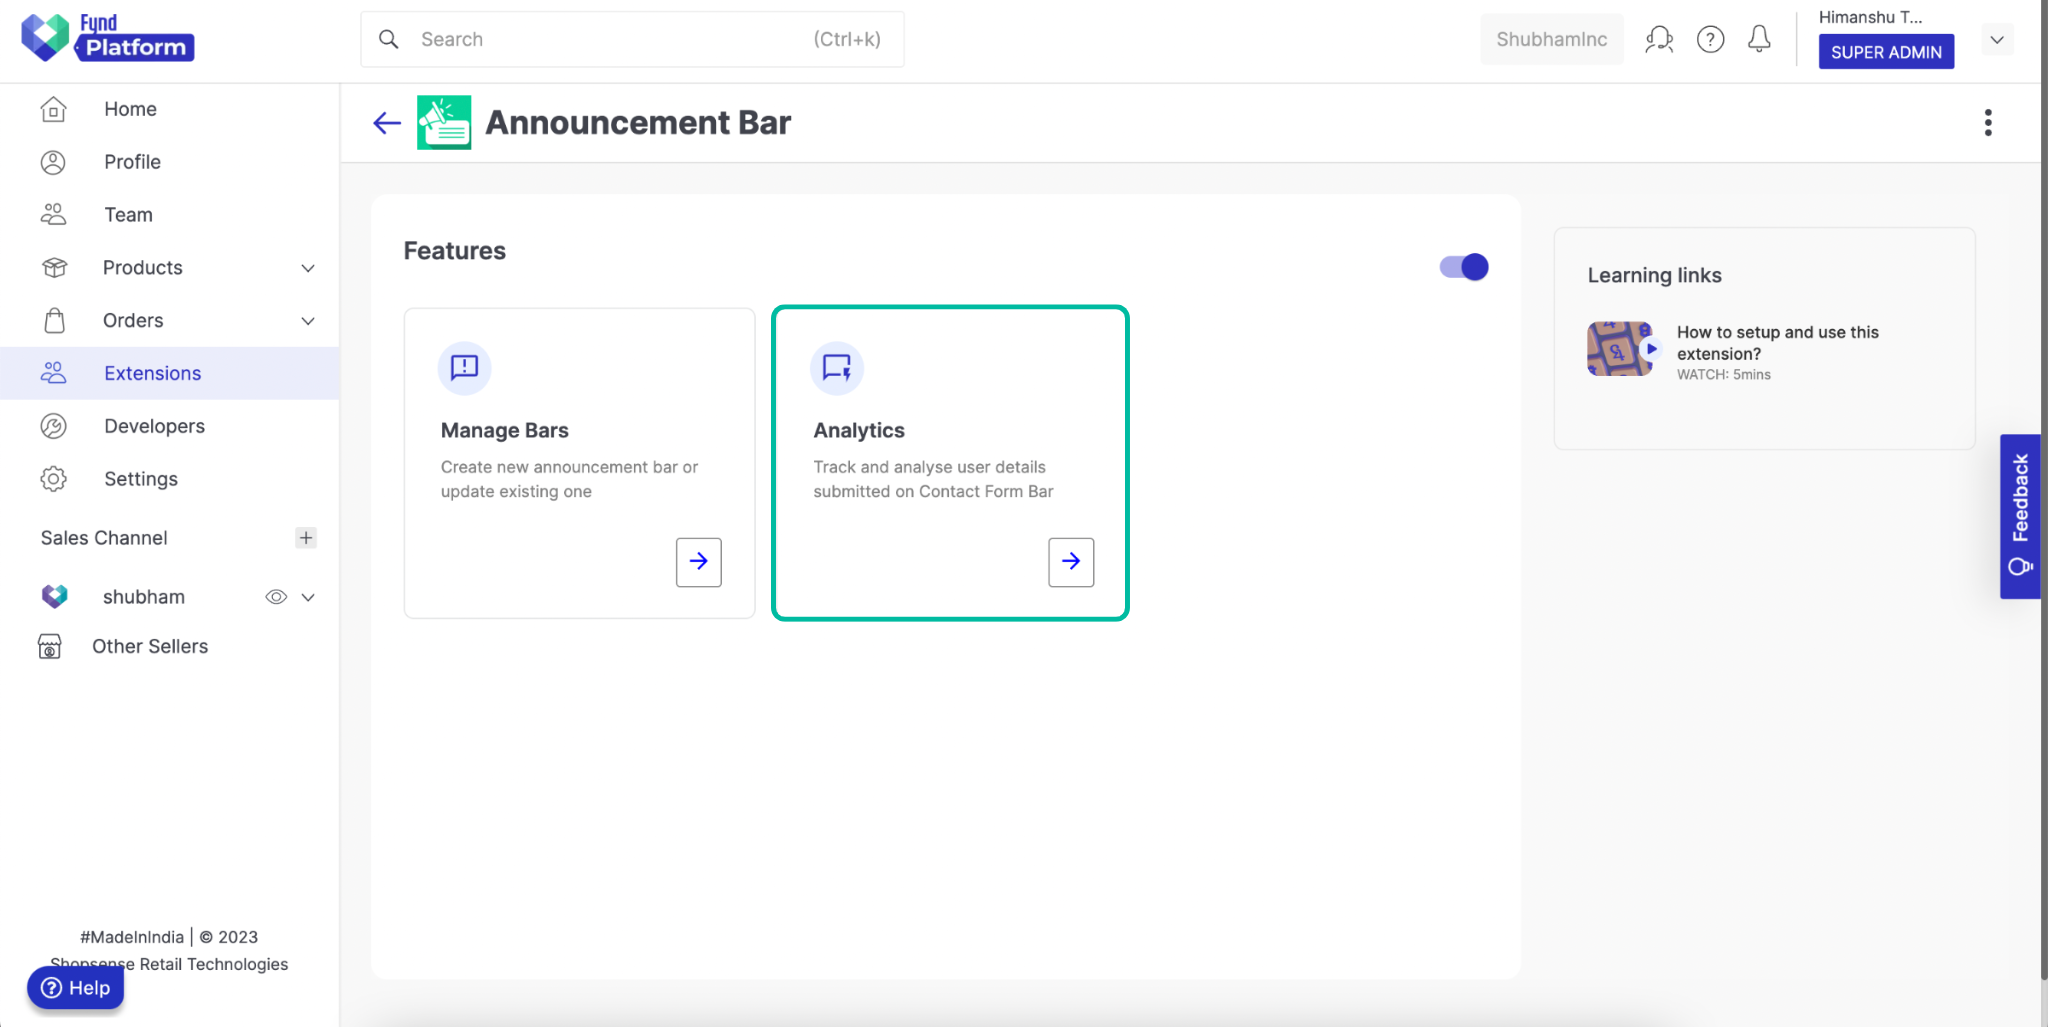
.png)
Analytics is a feature that collects and presents all the data that is collected from Contact Form Bar.
To search for a person, simply enter their name in the designated field. You can also narrow your search by selecting a start and end date range to view those who joined on specific dates. You can export the data to your system by clicking on the Export button.
Adding Announcement Bar Extension in Theme
To attach the Announcement Bar extension to your storefront, follow these steps:
-
Click Themes in the Appearance section of your sales channel on Fynd Platform.
-
Click Edit to open the theme editor.
-
In the theme editor, click Settings and then select General.
-
Scroll down to Extension Position and choose where you want to add to display your Announcement Bar. You can choose from the following positions:
- Header Bottom: Displays the Announcement Bar below the header.
- Footer Bottom: Displays the Announcement Bar below the footer.
- To add the extension, click on the Add icon and select the Announcement Bar extension from the drop-down menu.
- Select the wrapper placement for your announcement bar, as shown below from the second dropdown;
- Select Announcement Bar Header in Header Bottom
- Select Announcement Bar Footer in Footer Bottom
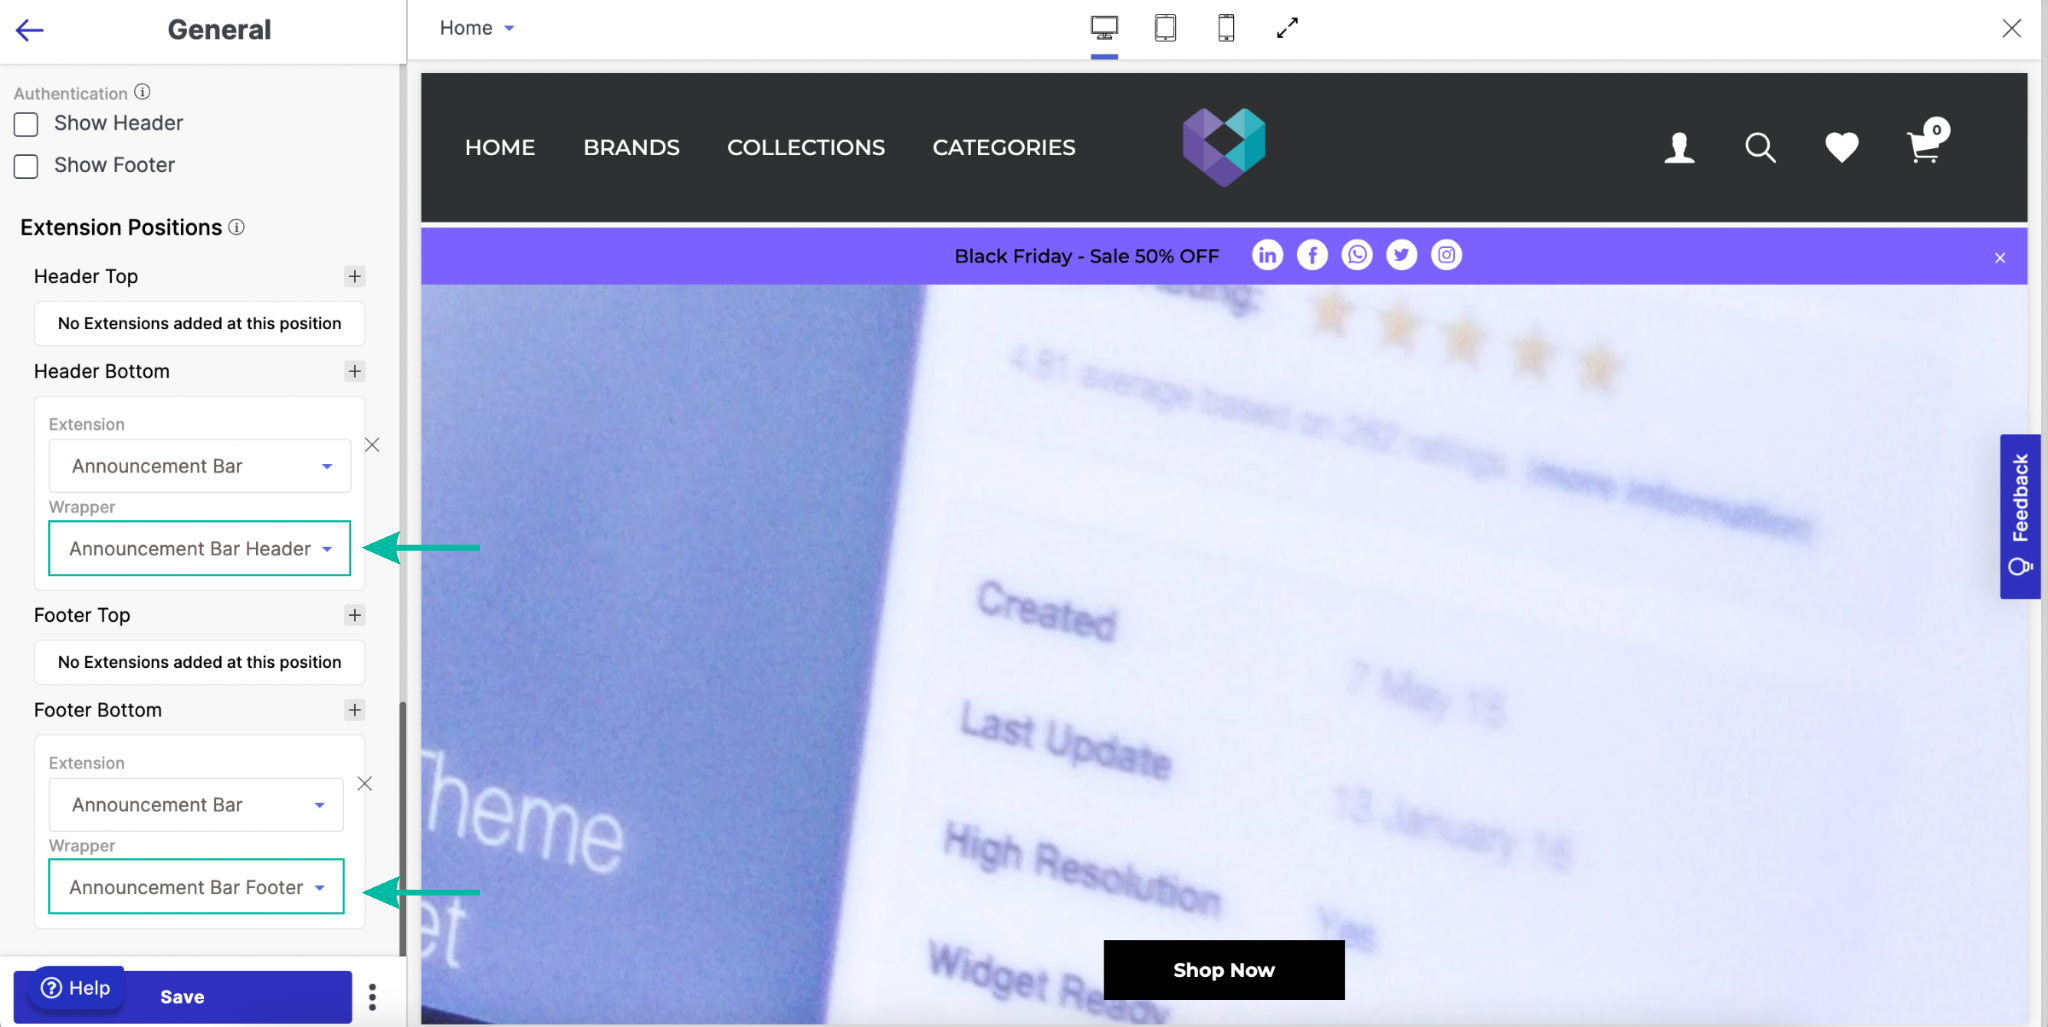
Figure 21: Extension Position
- Once you have made the necessary adjustments, click Save.
Final Output