SFTP
Introduction
The SFTP Extension project is a reliable tool designed to assist sellers in securely and swiftly transferring files online. It simplifies inventory management by utilizing a powerful SFTP protocol with extensive configuration options. Additionally, it allows sellers to customise their inventory management according to their specific business requirements.
Pre-requisites to use this extension
- Your entire product catalogue should be available on the Fynd Platform. Proceed only if you have uploaded your catalogue. For a tutorial, watch How to Upload Product Catalogue.
- Add selling locations in the Fynd Platform. Refer to Add Selling Locations for details. For a tutorial, watch How to Add Selling Locations.
Ensure that the stores have been enabled and are active on the Fynd Platform.
Installation & Setup
For first time installation, you are required to setup an inventory job. Follow the steps shown below:
- Navigate to your Fynd Platform account and go to Extensions.
.png)
- Select Explore.
.png)
- Select the extension from the list and click Install.
.png)
- Click Accept & Continue to proceed.
.png)
- Now we will proceed with configuring the extension.
.png)
1.1 Installation - Authentication
- A seller can set up SFTP Job in the following ways:
- Username and Password
- SSH Key
- Password and SSH Key both
.png)
-
Enter your desired username.
-
The extension will then provide a username defined by the system using the above value.
-
Set the Password and click Submit.
.png)
- The seller will get the SFTP path and SSH Key if chosen after Job Creation.
1.2 Installation - File
-
Select the File Type from CSV or Excel or JSON, you can download a sample file for each.
-
If CSV, select the delimiter to continue.
.png)
- If Excel, it will read all sheets by default.
.png)
- If the seller disables this toggle then they will have to mention the Sheet Name to read from.
.png)
- If JSON, it will read the data being shared in JSON format.
.png)
1.3 Installation - Configuration
Select the configurations for the incoming inventory file.
- Inventory Frequency:
-
Low Frequency (default): Select this option if your inventory is updated infrequently, such as every few hours OR Select this option if you are not sure what frequency to select.
-
High Frequency: Select this option if your inventory is updated frequently, such as every hour.
-
.png)
- Inventory Type.
.png)
The 'Parent Child' inventory type consists of a hierarchical structure with a 'Parent' article and associated 'Child' articles forming a product set.
Example: A 5-seater sofa consisting of 3 units, each with its unique article code, while the entire sofa has a single parent article code.
In each of these examples, the parent article code would be used to track the inventory of the entire product set, while the child article codes would be used to track the inventory of each individual component. This allows businesses to more easily manage their inventory and track sales data.
The 'Made to Order' inventory type is used for products manufactured after an order is placed. If an article is disabled for inventory tracking, its quantity won't update. The system will rely on the default configured quantity from the backend.
Example: A seller of eye optic items, like lenses, can simplify inventory tracking by setting the quantity to the maximum limit available in the catalogue. This allows them to sell lenses without concerns about running out of stock.
Normal: This is the standardised format that contains the required headers and values.
-
Execution Type:
- Full Inventory: This file contains the complete inventory with all the line items.
- Delta Inventory: This file contains only the modified (updated) line items.
-
The Price Toggle will be off by default. If you want the item price to be powered by the catalog file then you can enable this button.
1.4 Installation - Advance
The next step is to enable/disable some advance configuration settings.
- Compressed File: By enabling this, you can share compressed zip files.
.png)
- Character Encoded File: Here you can select the encoding for the CSV or Excel file. For more information on UTF, refer to UTF Encoding.
.png)
- Header Row: Enable this if the file contains a header to provide Header Row Number and Data Row Number.
.png)
- Edit the file's header row.
- Map the mandatory header columns from your file.
- Fill in the fields according to your inventory file.
-
Click the “Submit” button after entering all the data.
-
You can preview your selection, if everything is according to requirements then click Confirm & Save.
.png)
.png)
-
The configured hostname will appear along with the SSH key, you need to download this key.
-
The authentication details for the Job created and the configuration details will be visible to the seller in the Job Settings section which they can later edit and save if required.
.png)
.png)
Once you have installed this extension, it will be available in the Extensions section on the Fynd Platform.
After setting up the SFTP extension for the first time, two sync operations need to be performed.
- Catalogue Sync - This operation will sync the catalogue present on the Fynd Platform to the extension.
- Location Sync - This operation will sync all your selling locations on the Fynd Platform to the extension.
Once the sync is completed, you have to opt-in selling locations so that you can then proceed to use the extension to send inventory updates and accept orders via the SFTP panel.
Any changes made to the catalogue or locations on the Fynd Platform after the initial setup will be communicated to the extension via webhook events, ensuring that the extension is always up to date.
To accept and update your inventory using SFTP, use the below configurations.
Selling Location
Opt-in selling locations to send inventory updates via the SFTP panel. Use bulk action to opt-in multiple selling locations at once.
- Open Selling Location widget is present on the homepage of this extension.
.png)
- Search for a particular location by entering its 'Location Code' in the search box.
.png)
- Click on the edit icon present under the Action column.
.png)
- Turn ON the toggle button to start receiving the inventory from this location (push inventory data to Fynd).
.png)
- You can set a buffer on a selling location, it will be applied to all the articles mapped to that selling location.
.png)
- Click the ✔ icon to save the changes.
.png)
Upon successful opt-in, a unique username and token will be generated for the selling location. These credentials must be used to send inventory and receive order updates from the Fynd Platform.
After opting out of a selling location, you must wait for at least 10 minutes before re-opting into the same selling location.
After applying a buffer to any selling location, you need to manually sync inventory for that specific location or all locations for the updated inventory (Inventory received from SFTP - Buffer Quantity) to be pushed to the Fynd Platform. OR the updated inventory (Inventory received from SFTP - Buffer Quantity) will be pushed to the Fynd Platform automatically upon receiving new inventory updates from SFTP.
Click Set Buffer to set a global buffer for all selling locations. This buffer will be applied to all active and inactive selling locations.
Opt-in Selling Locations in Bulk
- Click Bulk Action.
.png)
- Choose the status of locations from the dropdown. Here, we have selected All Locations.
.png)
- Choose either EXCEL or CSV from the Download dropdown. Save the file in your system.
.png)
- Make the following changes in the downloaded file.
_(1).png)
- Opt-in selling locations by marking Status as ACTIVE.
- Opt-out of selling locations by marking Status as INACTIVE.
- Set Buffer Quantity for multiple selling locations.
- Reset inventory to 0 for any location you marked as Active/Inactive by marking the Reset Inventory column as Yes.
-
Save the file.
-
Click Choose File to upload the saved file. Please wait until its status changes to COMPLETED.
.png)
.png)
In this way, you can opt-in to the selling locations in bulk.
If there were any errors during upload, an error file will be generated. Download the file, fix the errors mentioned, and re-upload the file.
Inventory
To track inventory updates, check acknowledgement logs of inventory flow from SFTP to Fynd Platform, manually sync inventory from extension to Fynd Platform, and trace a product.
- Click Inventory on the SFTP home page.
.png)
- This tab provides a snapshot of your latest inventory updates on SKUs, with detailed information about:
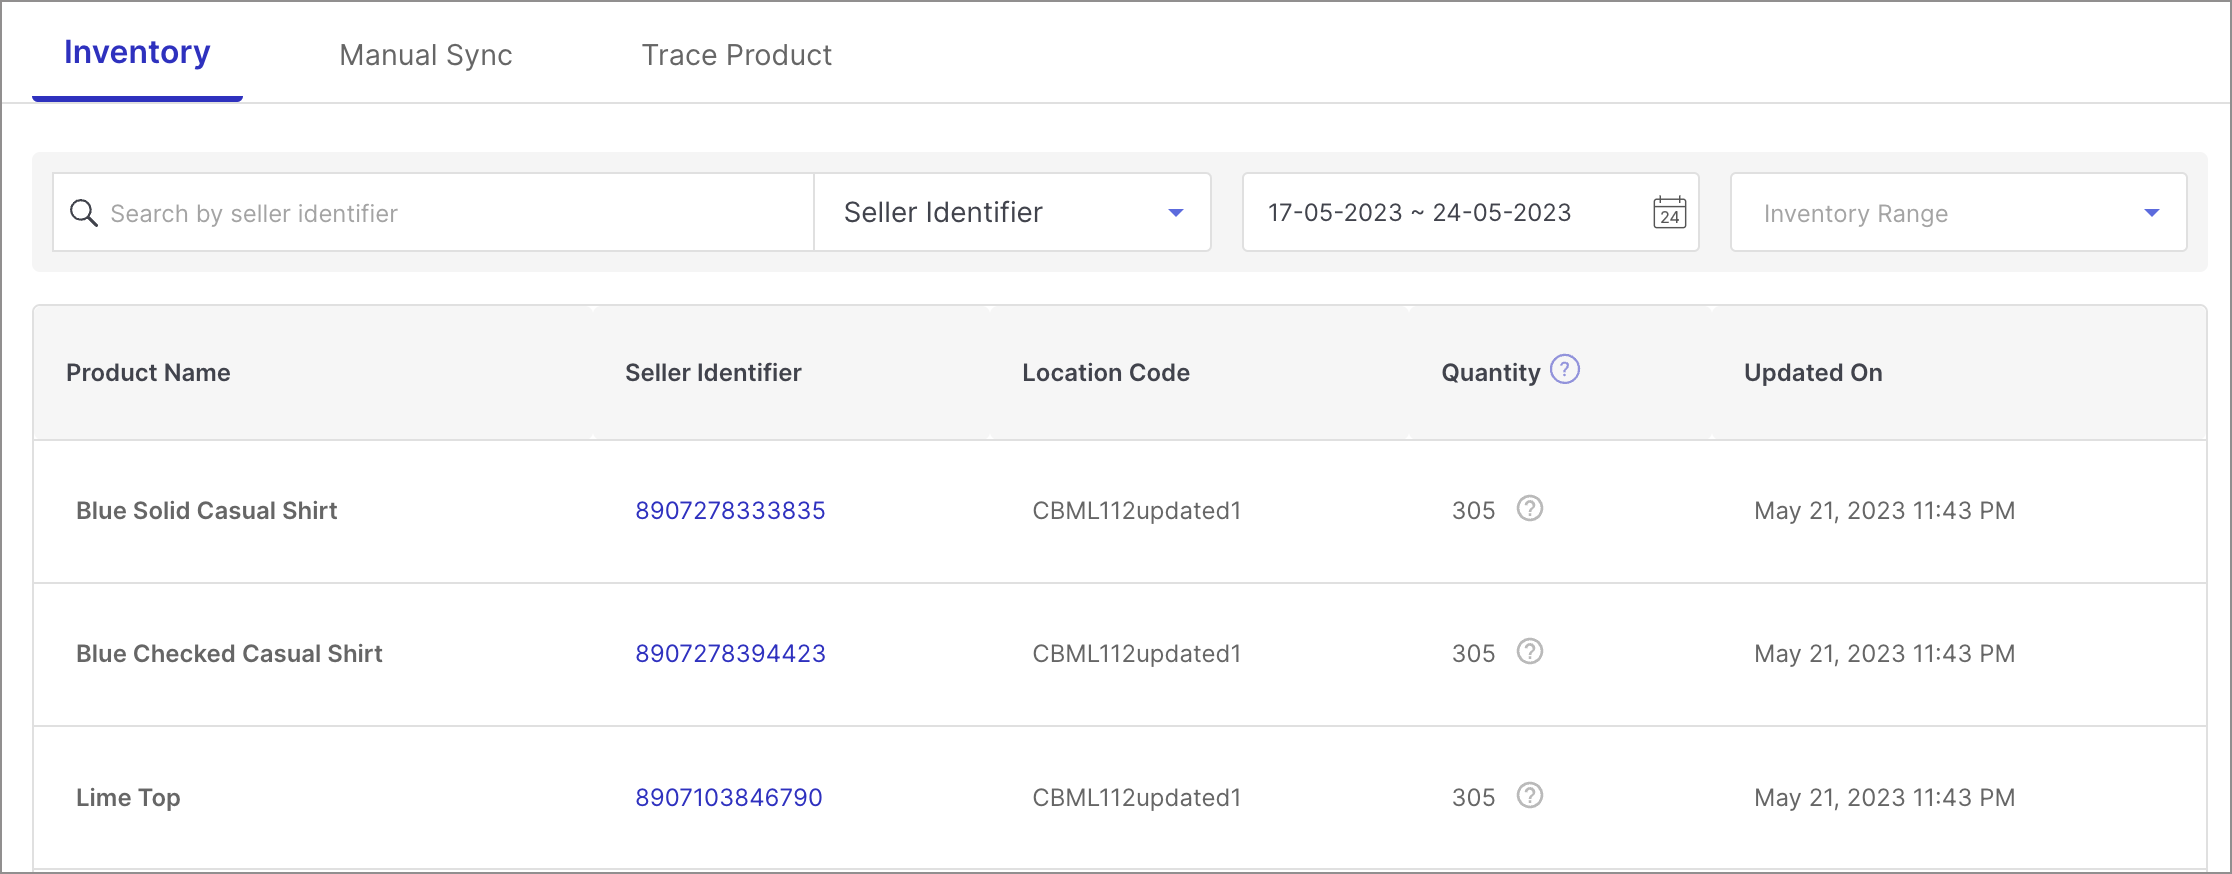
You can see the following if you hover over the quantity tab:
- Received Inventory - Inventory received from seller via SFTP.
- Buffer Quantity - Buffer applied on Selling Location x Article on SFTP extension.
- Pushed Inventory - Inventory pushed to Fynd Platform after applying the buffer.
- Sellable Quantity - Live inventory on the Fynd Platform.
- Orders Committed - Orders received on the Fynd Platform for an SKU.
The date filter allows you to track inventory updates for up to one year.
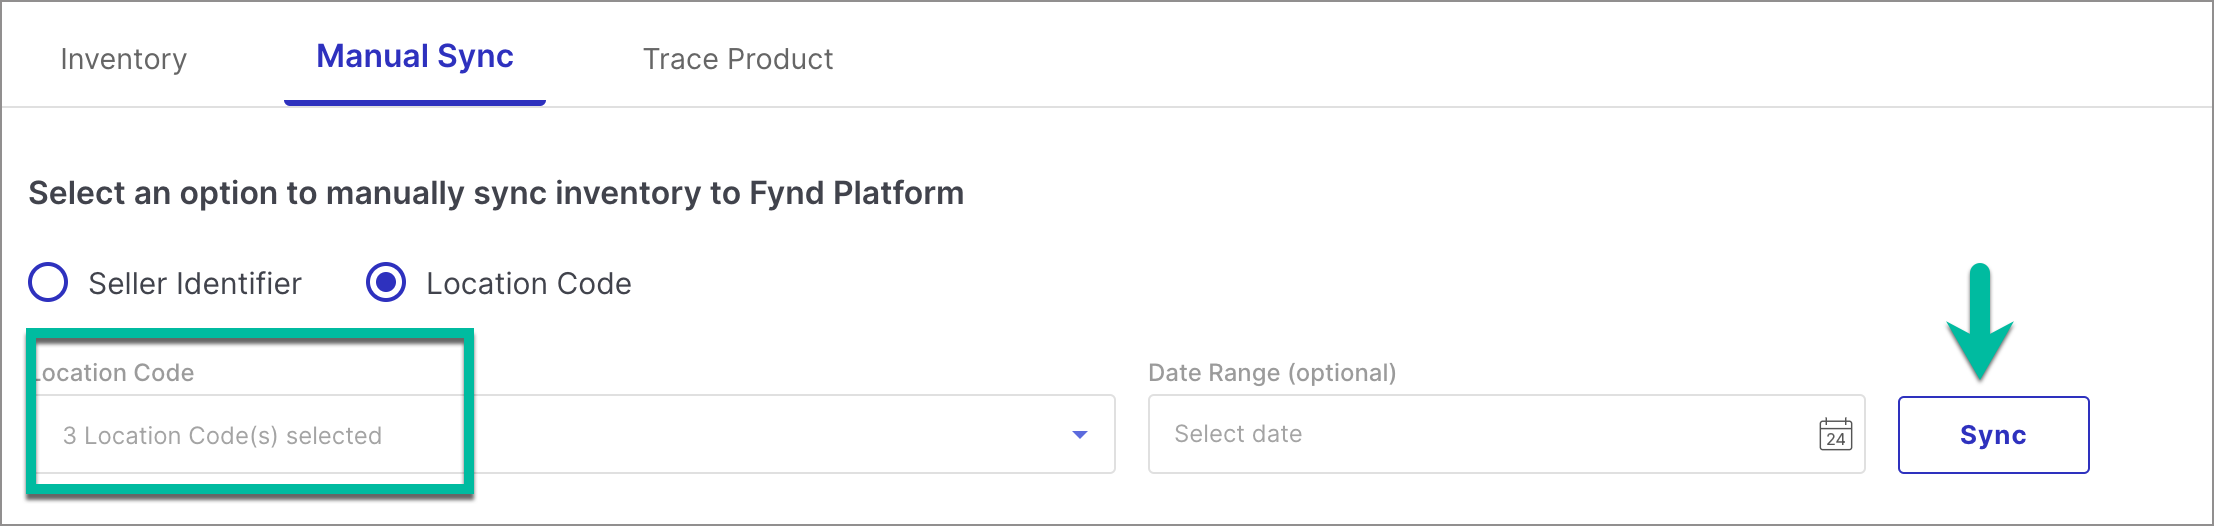
Manual Sync
If there is any mismatch in quantity or price in the Fynd Platform and SFTP extension, use the Manual Sync to synchronize the inventory to the Fynd Platform.
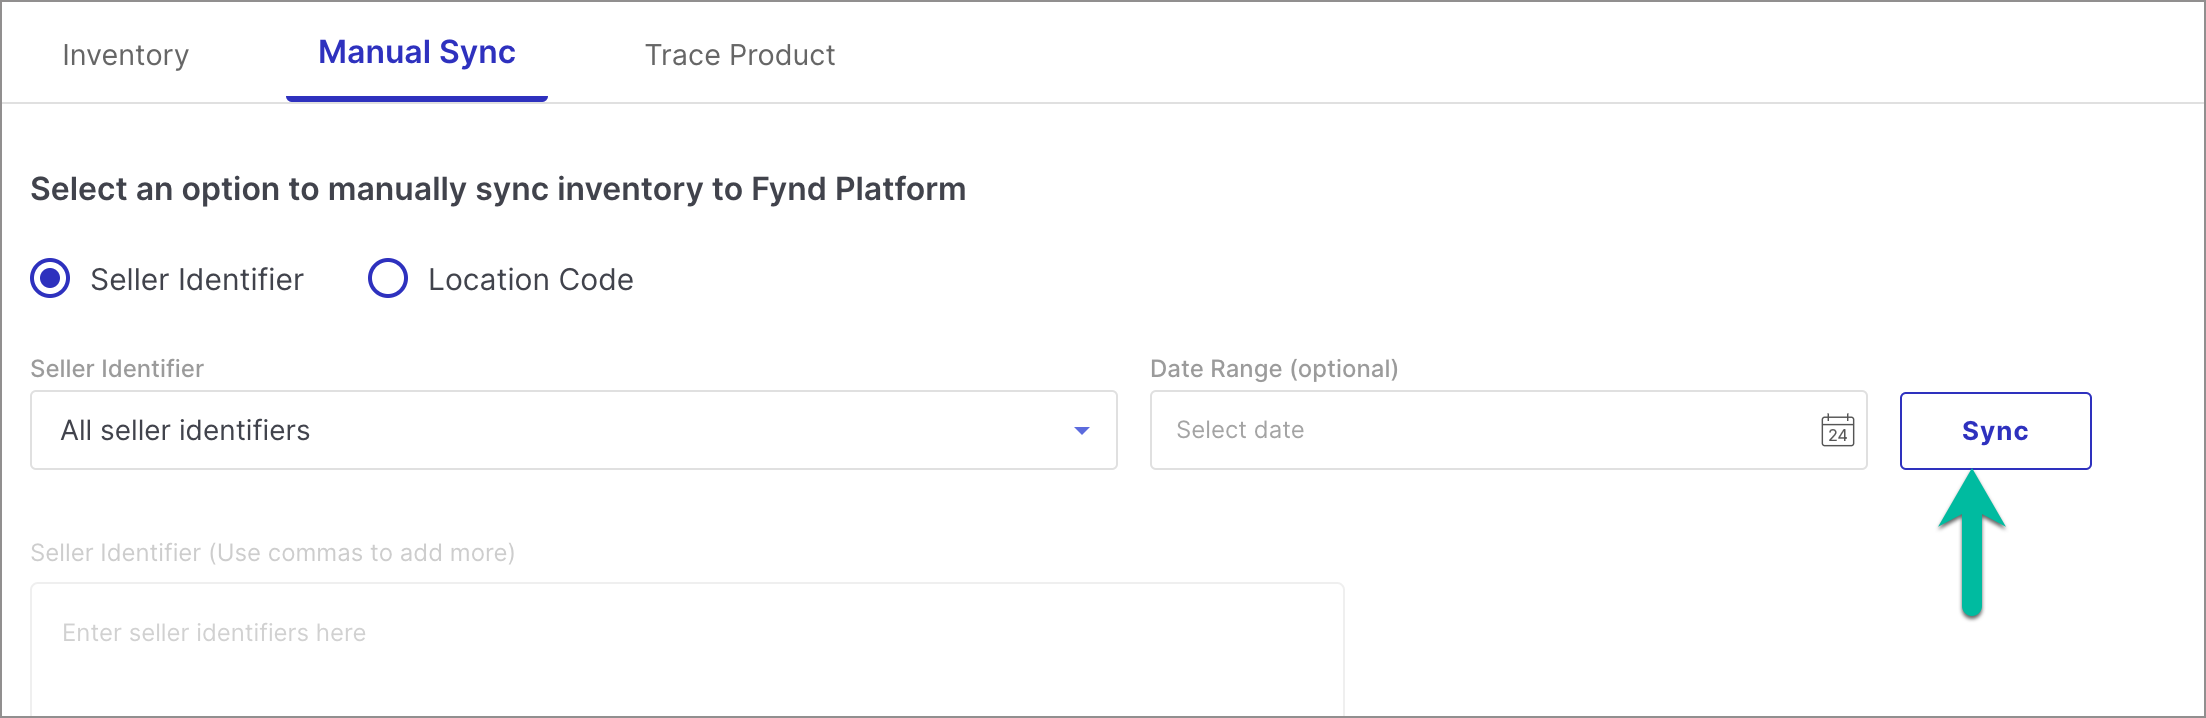
This eliminates any mismatch between the extension and the Fynd Platform in either quantity or price.
Do this after applying the buffer so that inventory flows to the Fynd Platform after subtracting the buffer quantity.
Once the sync is completed, the changes would reflect on your selected sales channels.
You can sync Inventory manually to Fynd Platform by using:
Seller Identifier
- All seller identifiers - This will sync the inventory for all SKUs.
- Add Seller identifiers manually - You will need to manually select SKUs across all the selling locations.
Location Code - This will sync the inventory for all SKUs present in these selling locations.
- All active location codes.
- Selected location codes.
When catalogue or location sync jobs are in progress, the extension will not be usable.
Trace Product
This tab lets you know whether an article’s inventory push was successful.
-
Copy the seller identifier of the desired product from the Inventory tab. E.g., 8903861231571 (Black Solid Tee).
-
Go to the Trace Product tab.
-
Paste the seller identifier in the search box.

- Click Get Logs. Here, you will get the status of inventory updates of a product for up to a month.
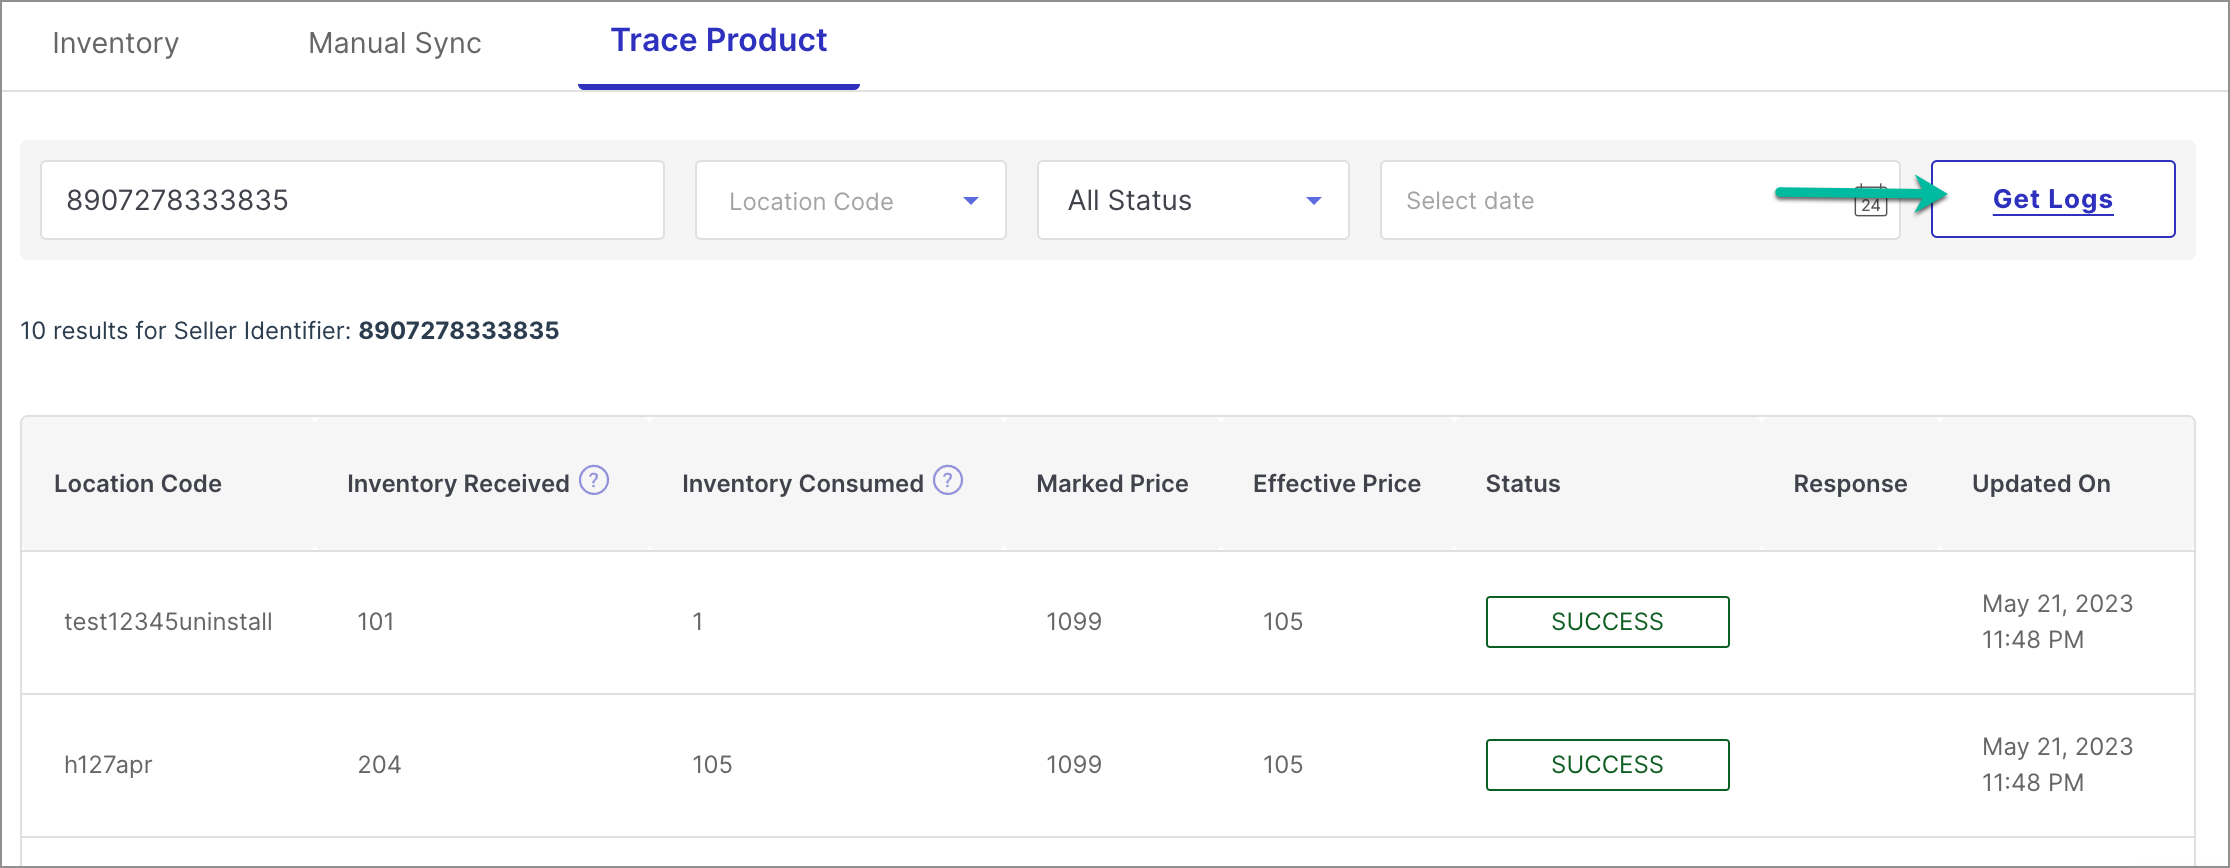
- Inventory Received - The total inventory of products pushed into the Fynd Platform by SFTP.
- Inventory Consumed - The total inventory of products accepted by Fynd Platform from SFTP after applying buffer quantity.
For unsuccessful inventory push, the failure reasons could be: article not available, store mapping not found, discovered duplicate batch record, SKU missing for a store, location not available, and so on.
Job Settings
This feature allows the user to view the list of Jobs Created and to edit settings configured during first-time installation.
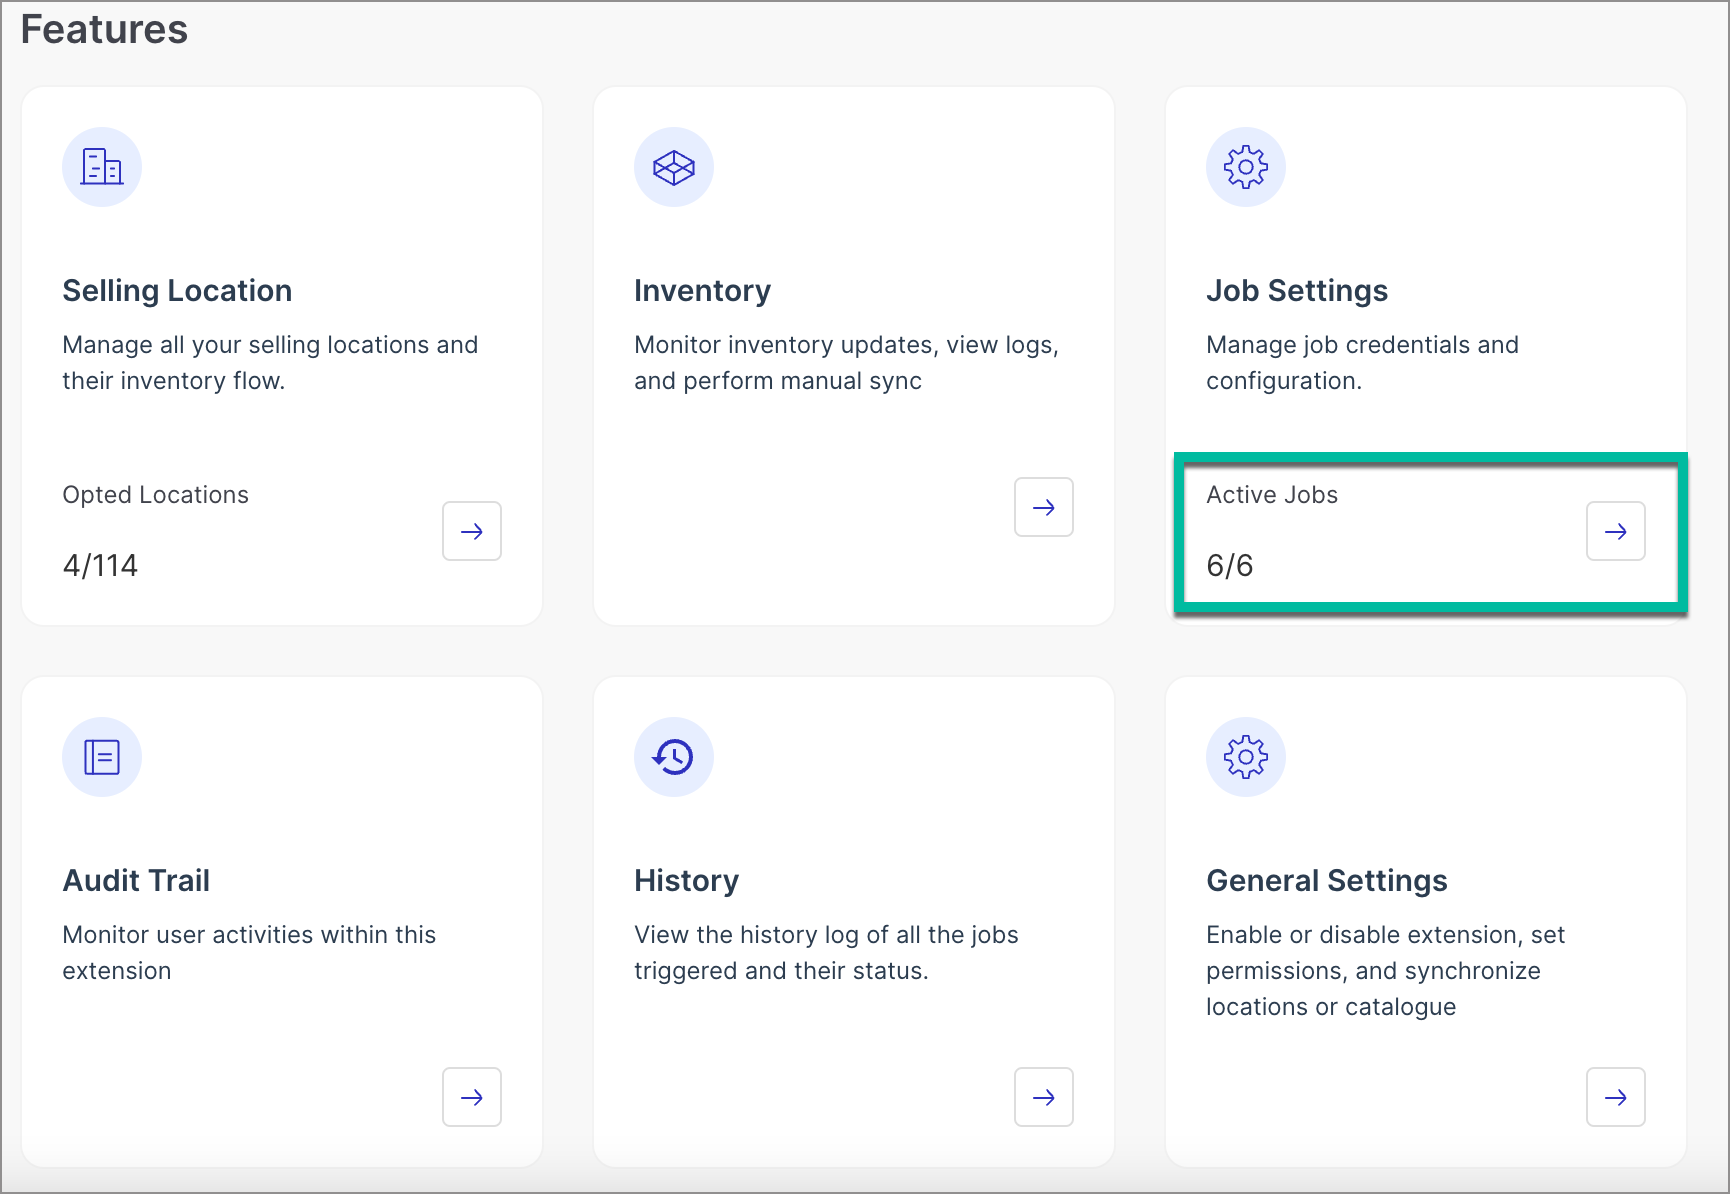
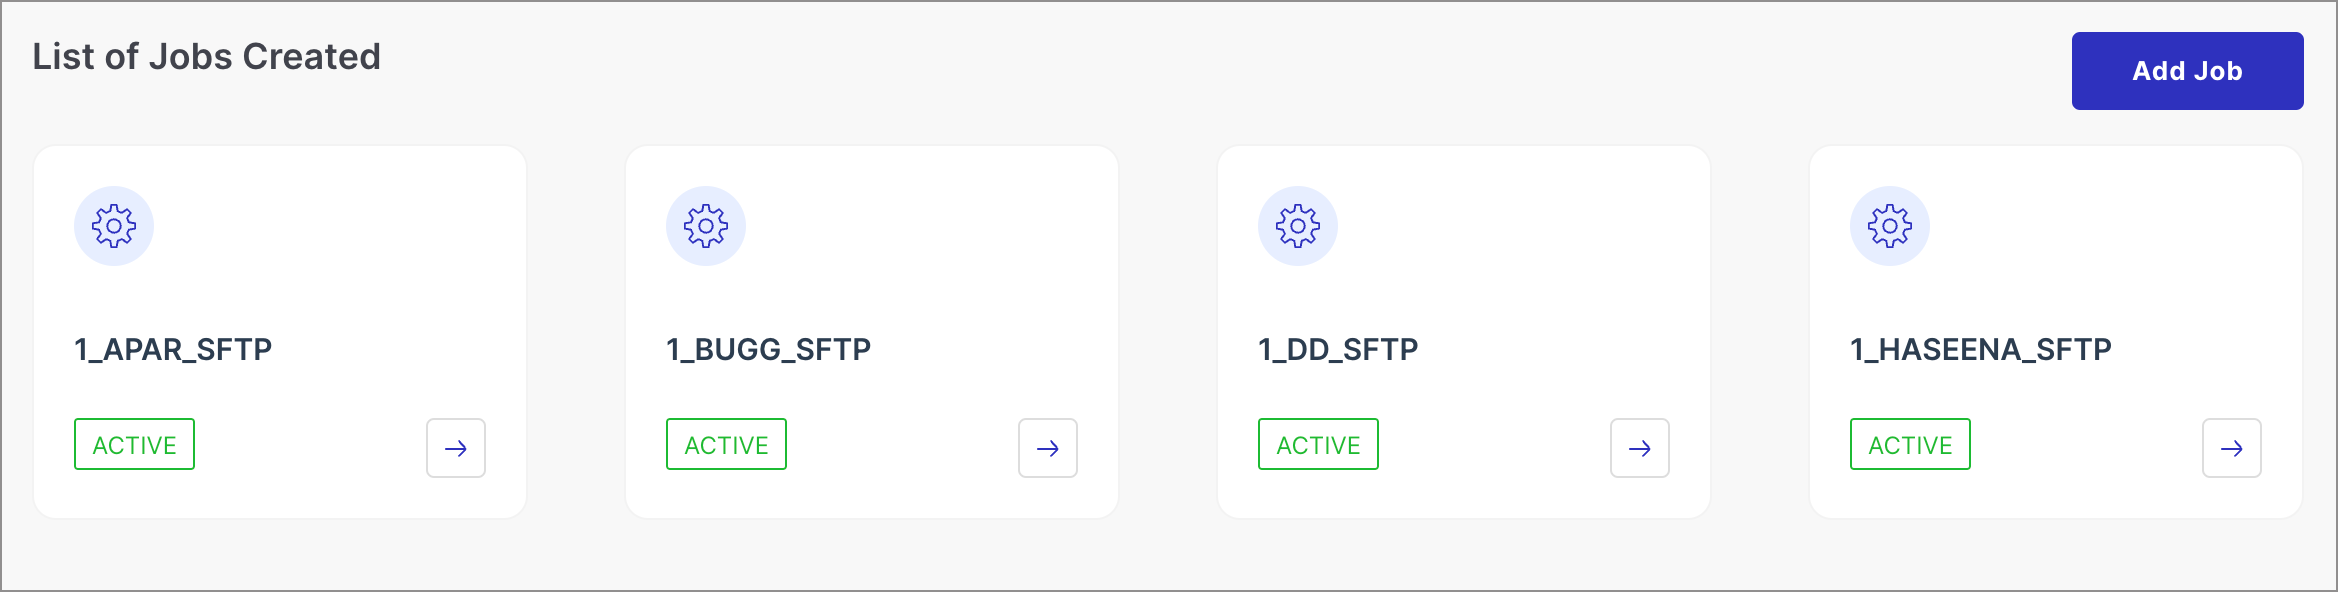
Once you select any job by clicking on the → button, now you can edit it as per your requirements.
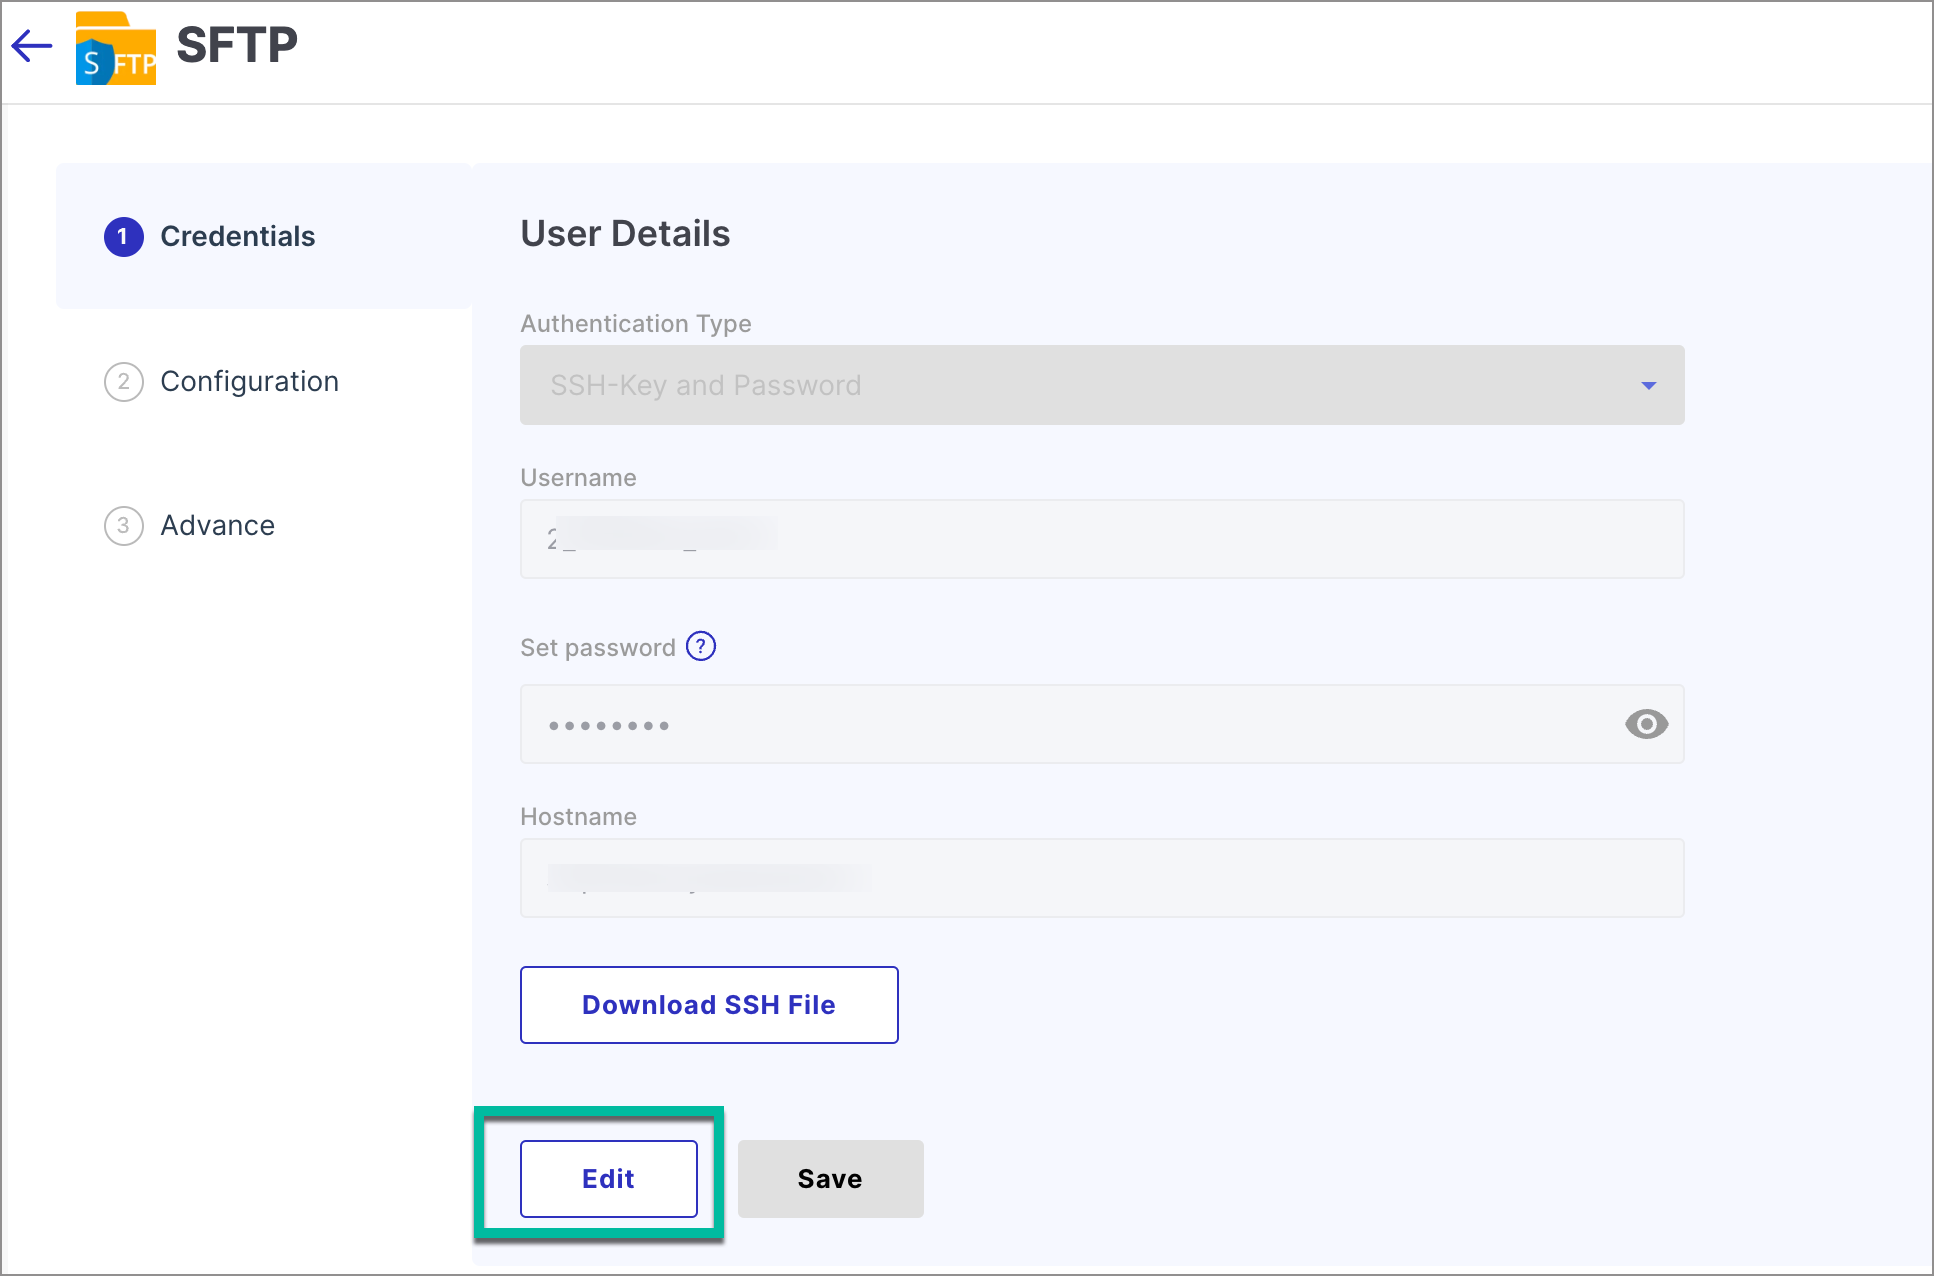
Refer to First-time Installation Setup for available options.
Audit Trail
Audit Trail tracks all the actions performed by the user in the SFTP extension.

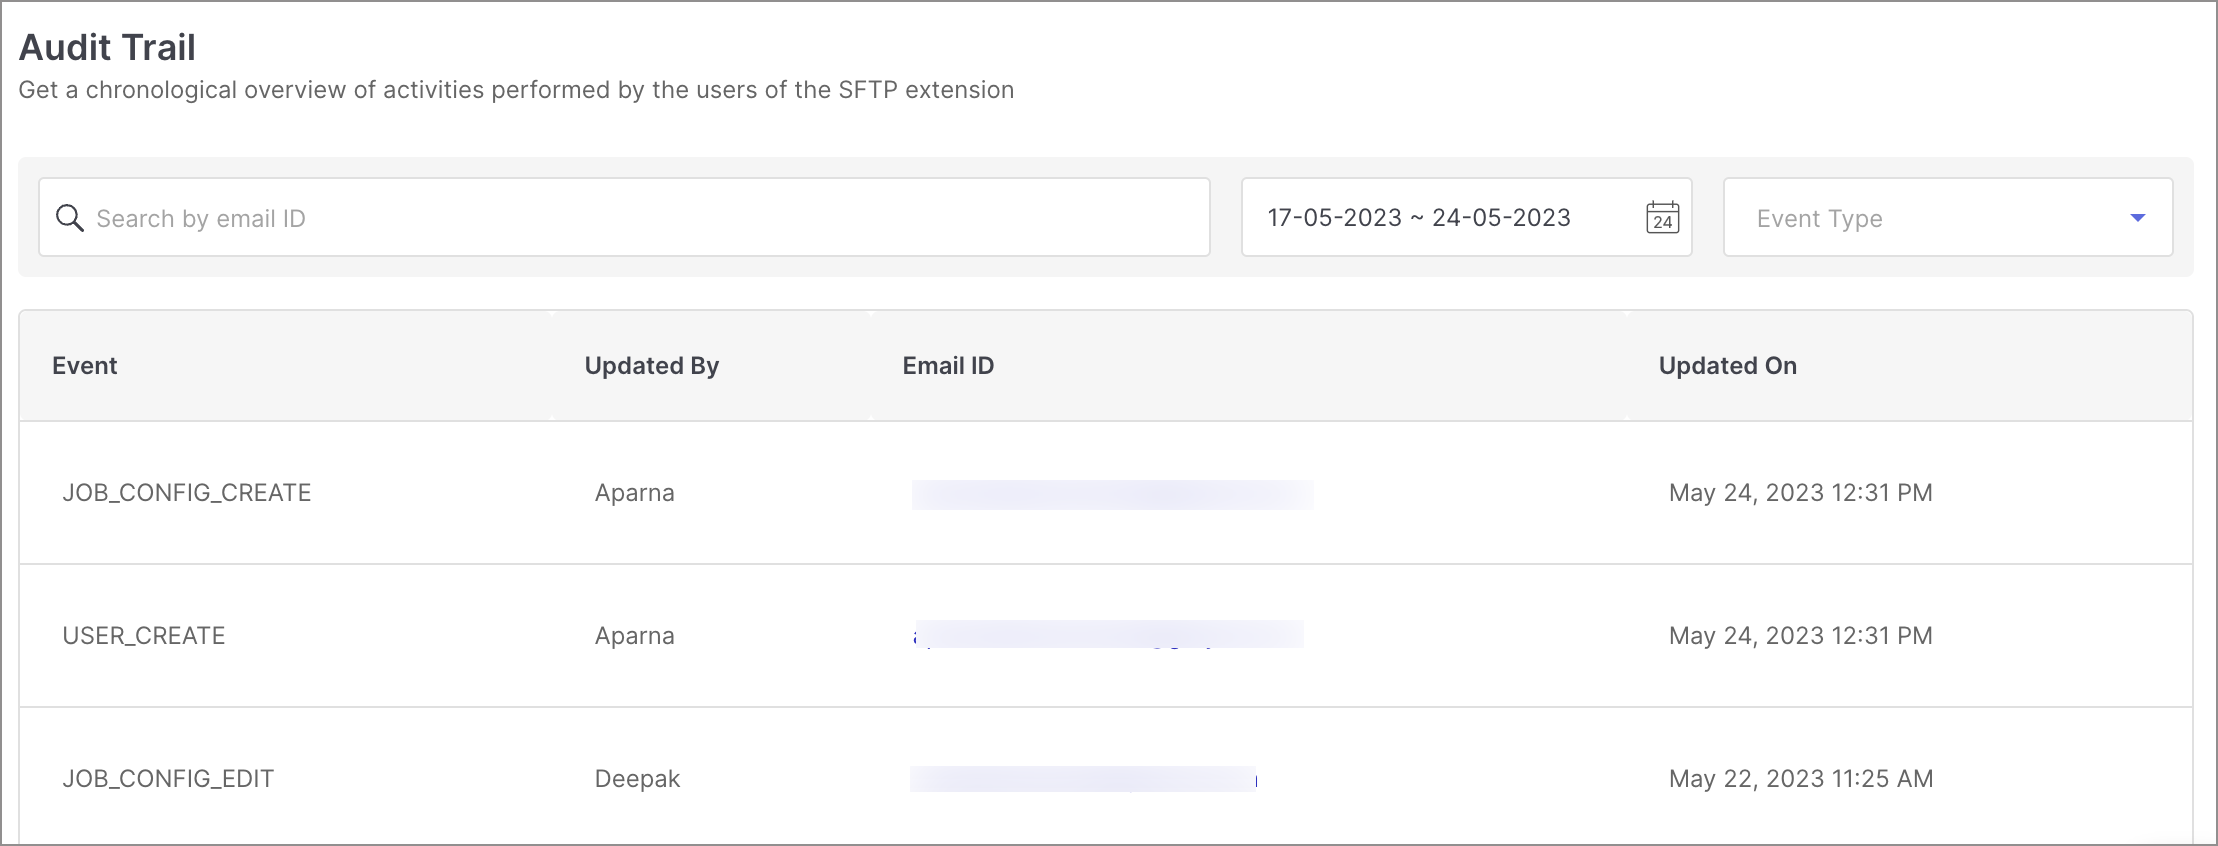
It helps you pinpoint the exact source of a problem in case someone unsolicitedly does something unexpected within the extension.
List of events that get captured: Extension Install, Extension Uninstall, Extension Enable, Extension Disable, Inventory Manual Sync, Catalogue Sync, Locations Sync, Location Edit, Enable Inventory Permission, Disable Inventory Permission, Enable Order Permission, and Disable Order Permission.
History
This feature shows historical logs for inventory jobs sent, their status and the option to download records.
.png)
The page will contain the following information:
- A list of jobs that have been executed from the date of inception till the current date, along with their status (Success, Partial Success, and Failed).
- You can filter jobs using Date Range, Status, and Job Code.
- You can download a log report for the following tasks:
- Initial: Total number of records received.
- Processed: Number of records processed and synced.
- Deleted: Number of records deleted.
General Settings
.png)
Manually sync your catalogue and selling locations from Fynd Platform to SFTP, customise your Order and Inventory permissions, and enable or disable this extension according to your preferences.
Activating/Deactivating SFTP Extension
.png)
Upon deactivating this extension, You will get a popup asking if you want to reset the inventory of all active selling locations to 0 in the Fynd Platform.
.png)
-
If you choose yes, inventory for all articles mapped to the selling locations will be reset to 0 in the Fynd Platform.
-
If you choose no, the current existing inventory will be retained.
-
No tabs and functionalities will be accessible. Only the Settings widget will be enabled so that you can re-enable the extension.
-
Inventory flow from SFTP to the Fynd Platform and orders syncing from Fynd Platform to SFTP will be stopped.
Enable/Disable Inventory Permissions
.png)
.png)
Both order and inventory permissions will be enabled by default if the extension is enabled.
- Inventory - If you remove the permissions for inventory, the inventory flow from SFTP to the Fynd Platform will be stopped.
- If you select the reset Inventory checkbox, the inventory will be reset in the Fynd Platform and you will stop receiving new orders.
- If you do not select the reset Inventory checkbox, the inventory will stay as it is in the Fynd Platform and the seller will continue receiving orders.
For any issues/queries, raise a ticket to Fynd Platform Support:
- Navigate to Fynd Platform > Customer Support > Create Ticket
- Or you can email at: help@fyndplatform.com