Product Subscription
Introduction
The Product Subscription extension on the Fynd platform allows the customer to maintain ongoing access to the product or service for as long as they continue to pay a subscription fee. Subscribers pay a recurring fee at regular intervals (such as weekly, monthly or annually) based on the subscription plan to access a product or service provided by a sales channel, rather than making a one-time purchase.
Steps to Use Product Subscription Extension
- Go to the Extensions section in the Fynd Platform.
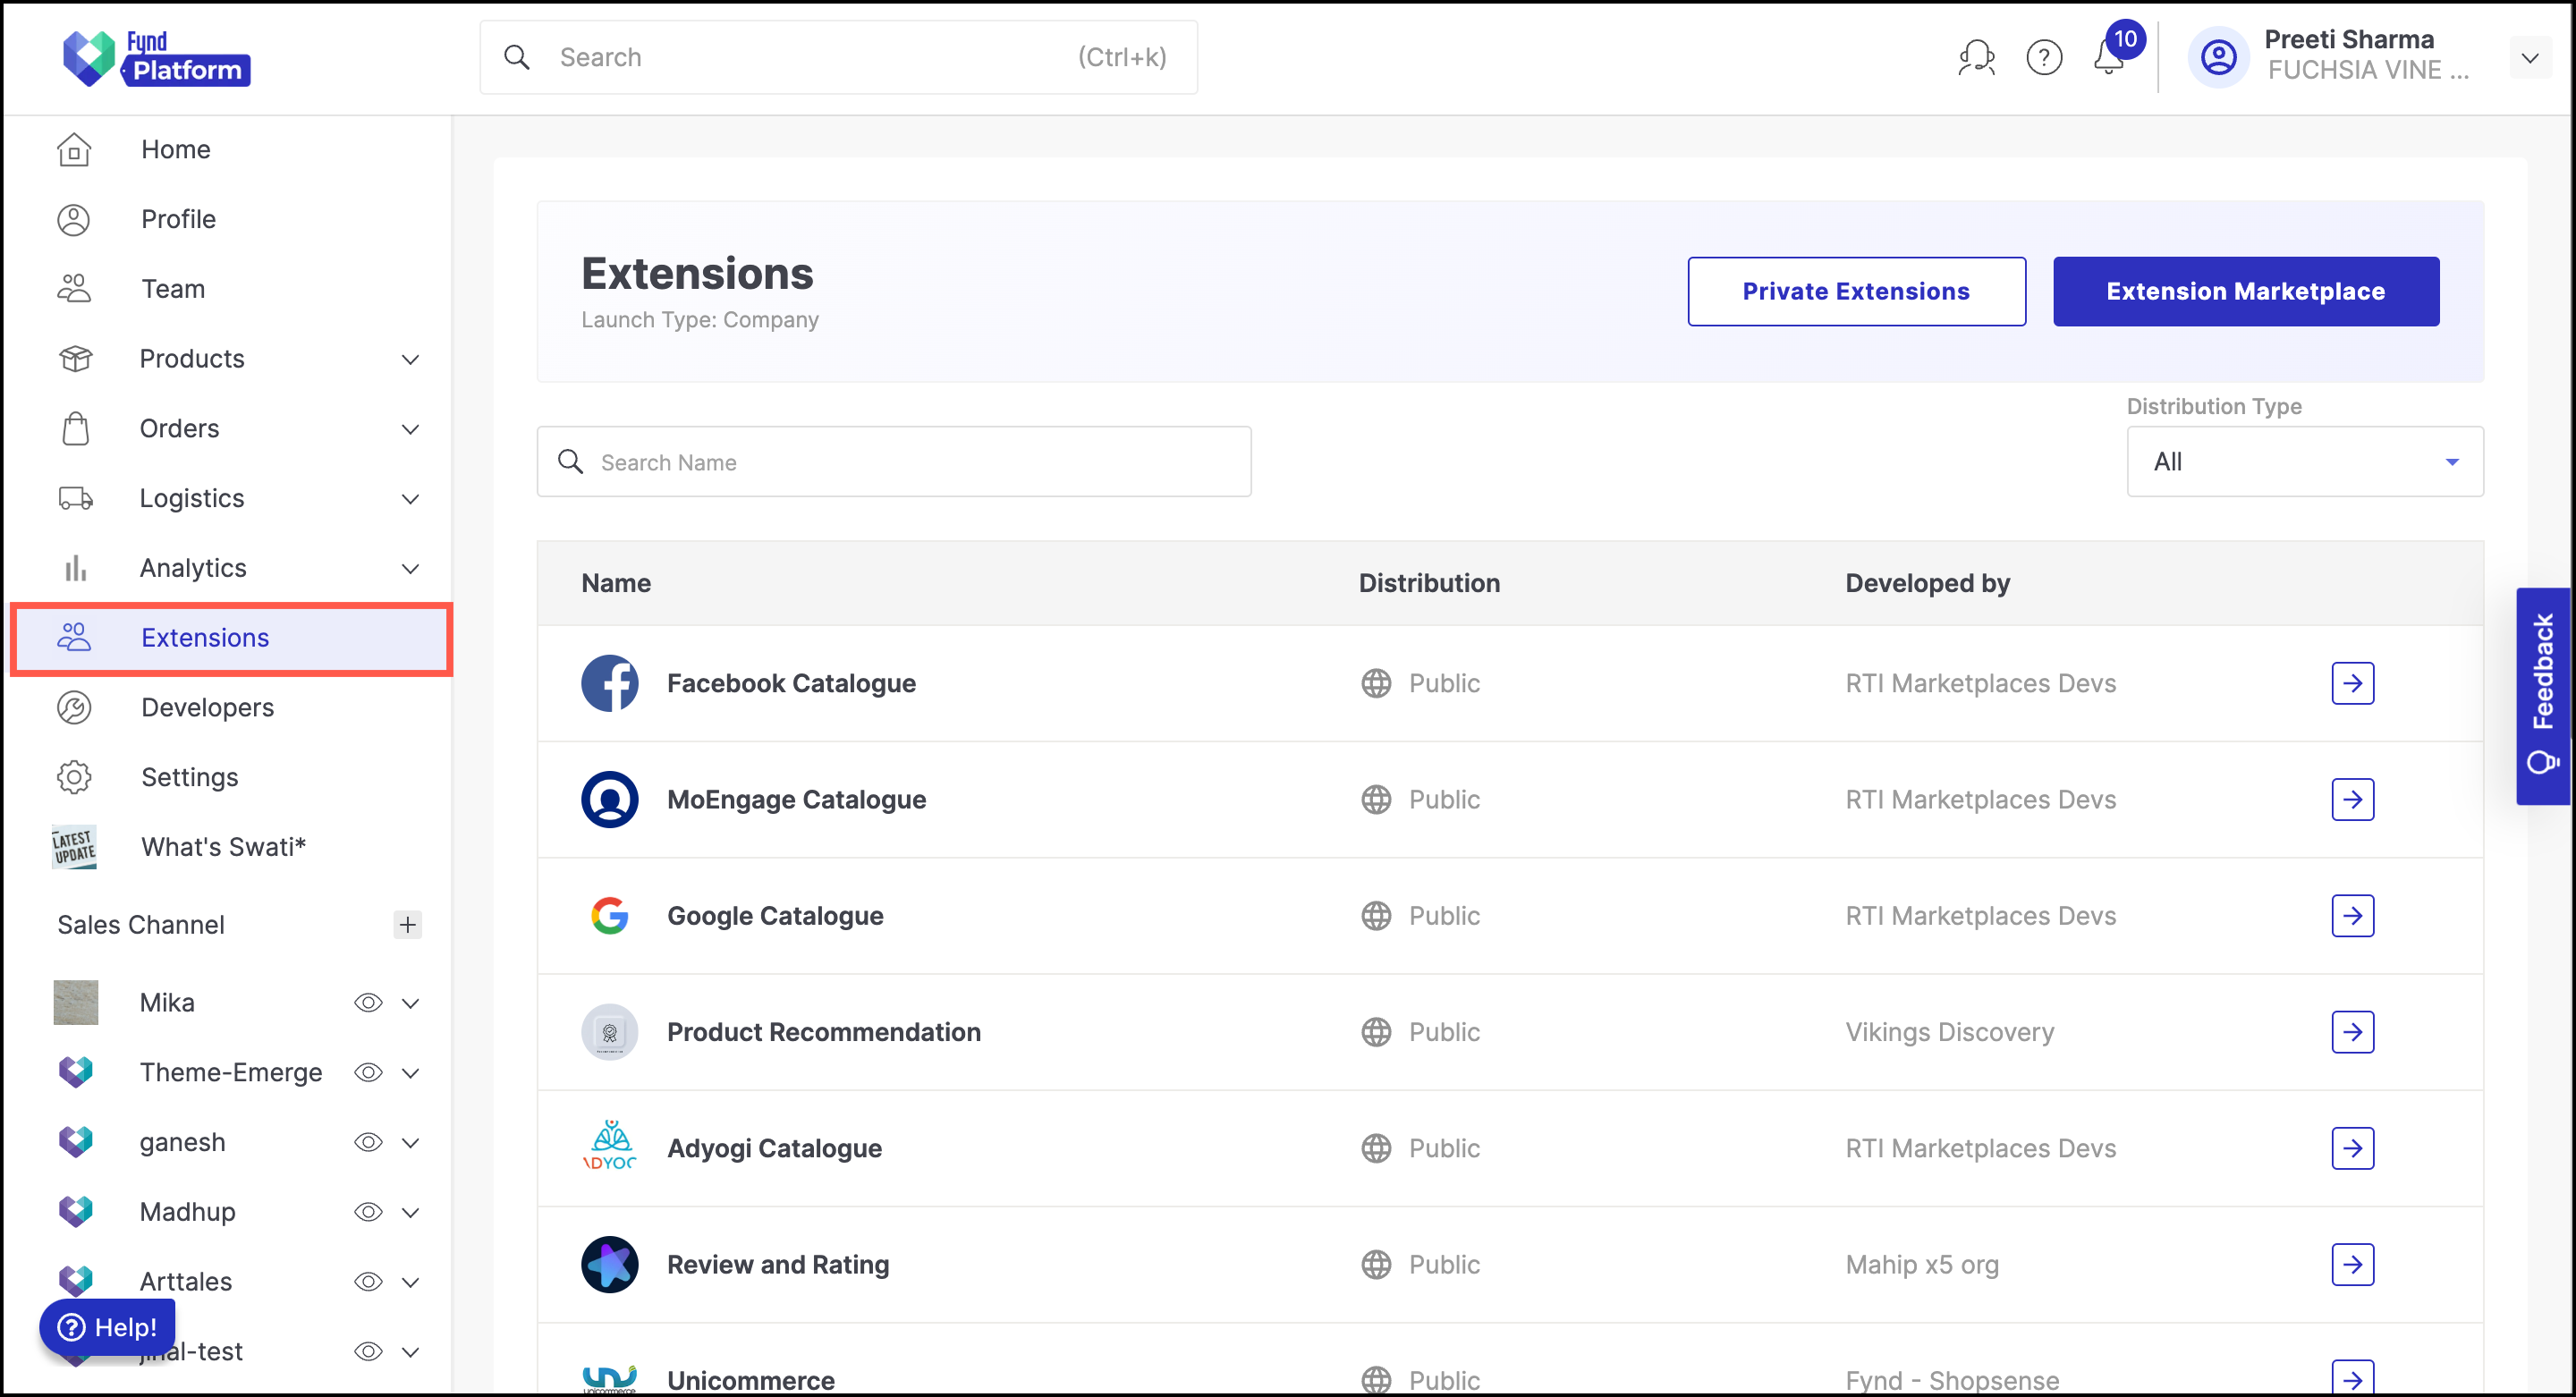
- Select Product Subscription extension.
.png)
Once you have installed this extension, it will be available in the Extensions section on the Fynd Platform.
- Go to the desired sales channel for which you wish to enable the extension by clicking the arrow. Here, we have selected test-pages.
.png)
- Activate the extension by toggling the master button located at the top-right corner.
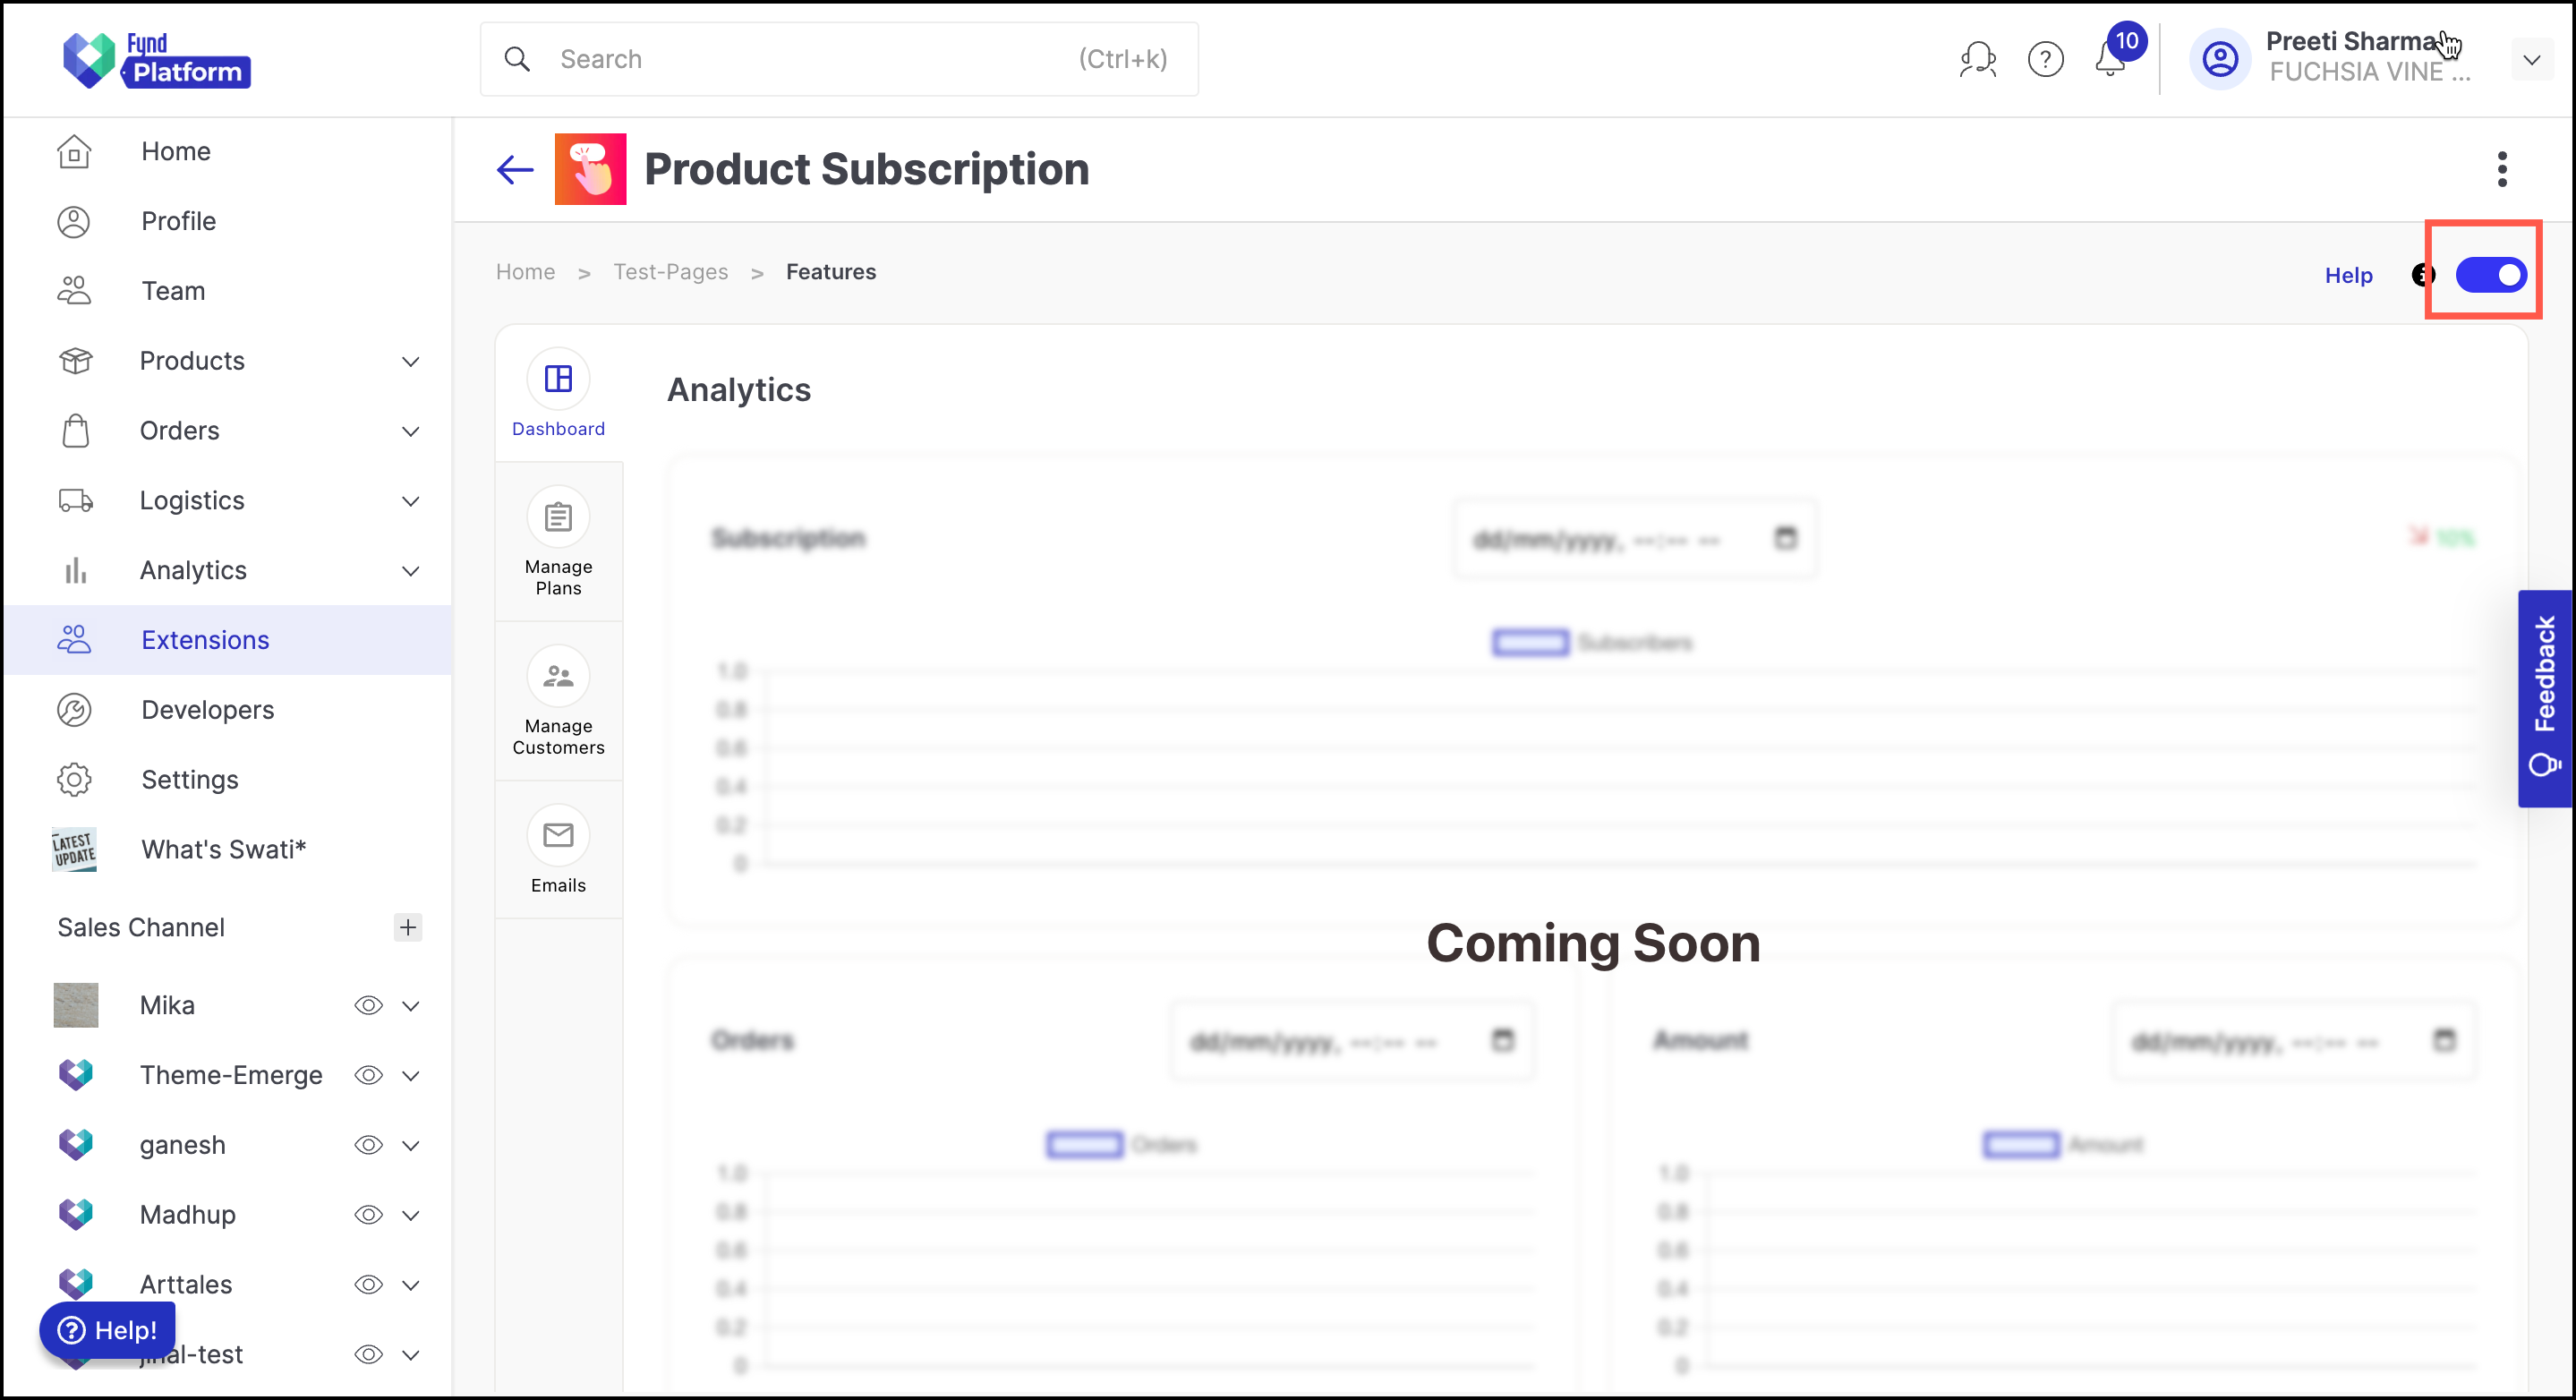
Enabling the extension on a sales channel will result in a corresponding status update of "active" or "inactive".
The Product Subscription extension has been successfully enabled. In the following sections, you will be guided through the configuration pages for the complete setup of product subscription. The extension offers three distinct features, each designed to address various functionalities.
- Manage Plans
- Manage Customers
- Emails
- Dashboard (Coming Soon)
Manage Plans
In this section, sellers can create a subscription plan for a list of products and offer a discount on recurring purchase to subscribers. All the available plans will display as a list. Sellers can review the type, start date, and status of each plan. Additionally, sellers have the option to activate or deactivate any plan directly from this section.
.png)
-
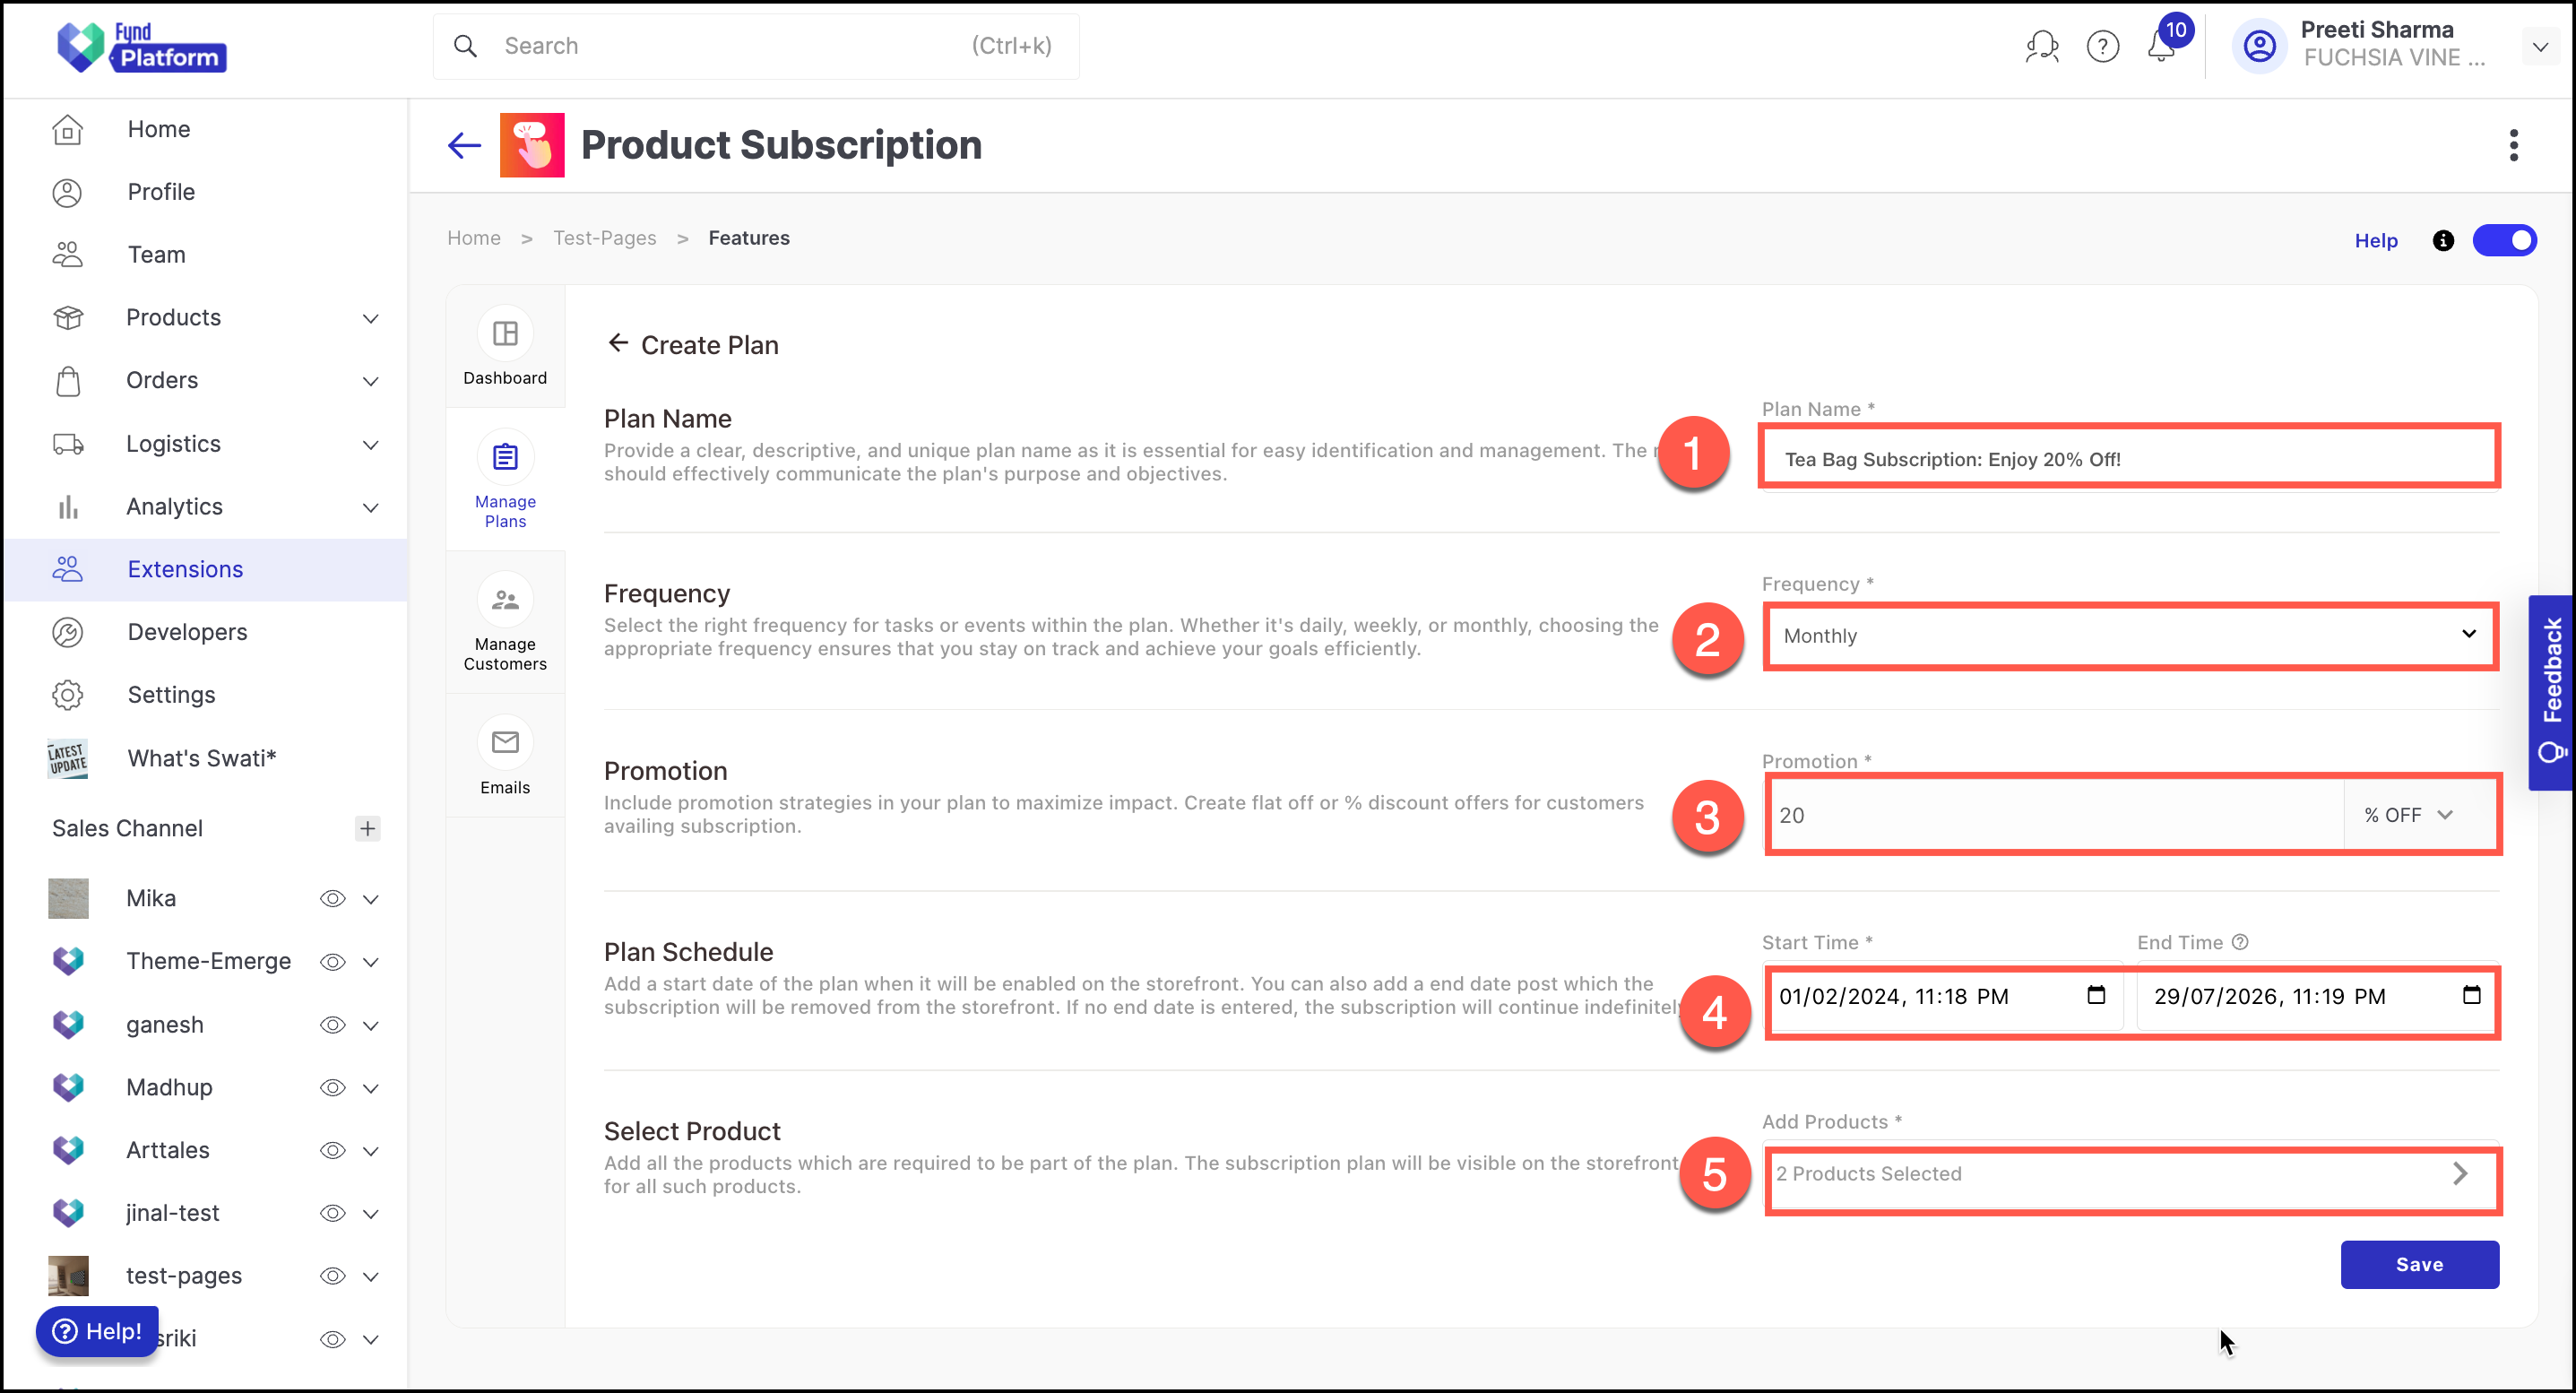
Plan Name: Provide a clear and descriptive title for your plan that effectively communicates its purpose and ensures easy understanding. This is for seller’s reference and is not shown to the customer.
For instance, if you're creating a subscription plan where customers can receive monthly tea bag deliveries at a 20% discount on MRP, you can name the plan "Tea Bag Subscription: Enjoy 20% Off!". -
Frequency: Select the frequency based on your subscription model which will create recurring order for your customers. Whether it's daily, monthly, or quarterly, selecting the appropriate frequency is crucial to align with the subscription plan.
For the monthly plan, customers are required to renew their subscription every month. Therefore, the frequency is set to "Monthly." -
Promotions: Add a promotion to your subscription plan to offer lucrative offers and discount for subscription purchases. The promotion can be offered as a flat off or percentage discount. This will be applicable to all the recurring orders.
For example, the subscription offers 20% discount on every recurring order. (as shown in the screenshot below) -
Plan Schedule: Establish a schedule by setting definitive start and end dates for the plan. If the end date is not defined, the plan will be visible on the storefront without any set termination date. The new customers will be able to purchase the subscription during this duration only. The existing customers who have made a purchase already will continue to receive orders even after the end date.
For example, the subscription offer will be valid for one year, running from 01 February 2024 to 29 July 2026 09:01 PM IST. (as shown in the screenshot below) -
Select Product: Select the appropriate products for which the plans are applicable on the sales channel. The plan will be available for the selected products as per the plan schedule (Point 4) on the sales channel.
-
Click Save to create your plan.
A plan named with Tea Bag Subscription: Enjoy 20% Off! will be available in the list of available plans.
Manage Customers
This section provides sellers with a clear overview of subscriber’s details and purchase activity. It enables sellers to track subscriber history and take action to adjust subscription status as required. The details include name of the subscriber, email ID, phone number, the date when they subscribed, frequency of subscription, status, and history.
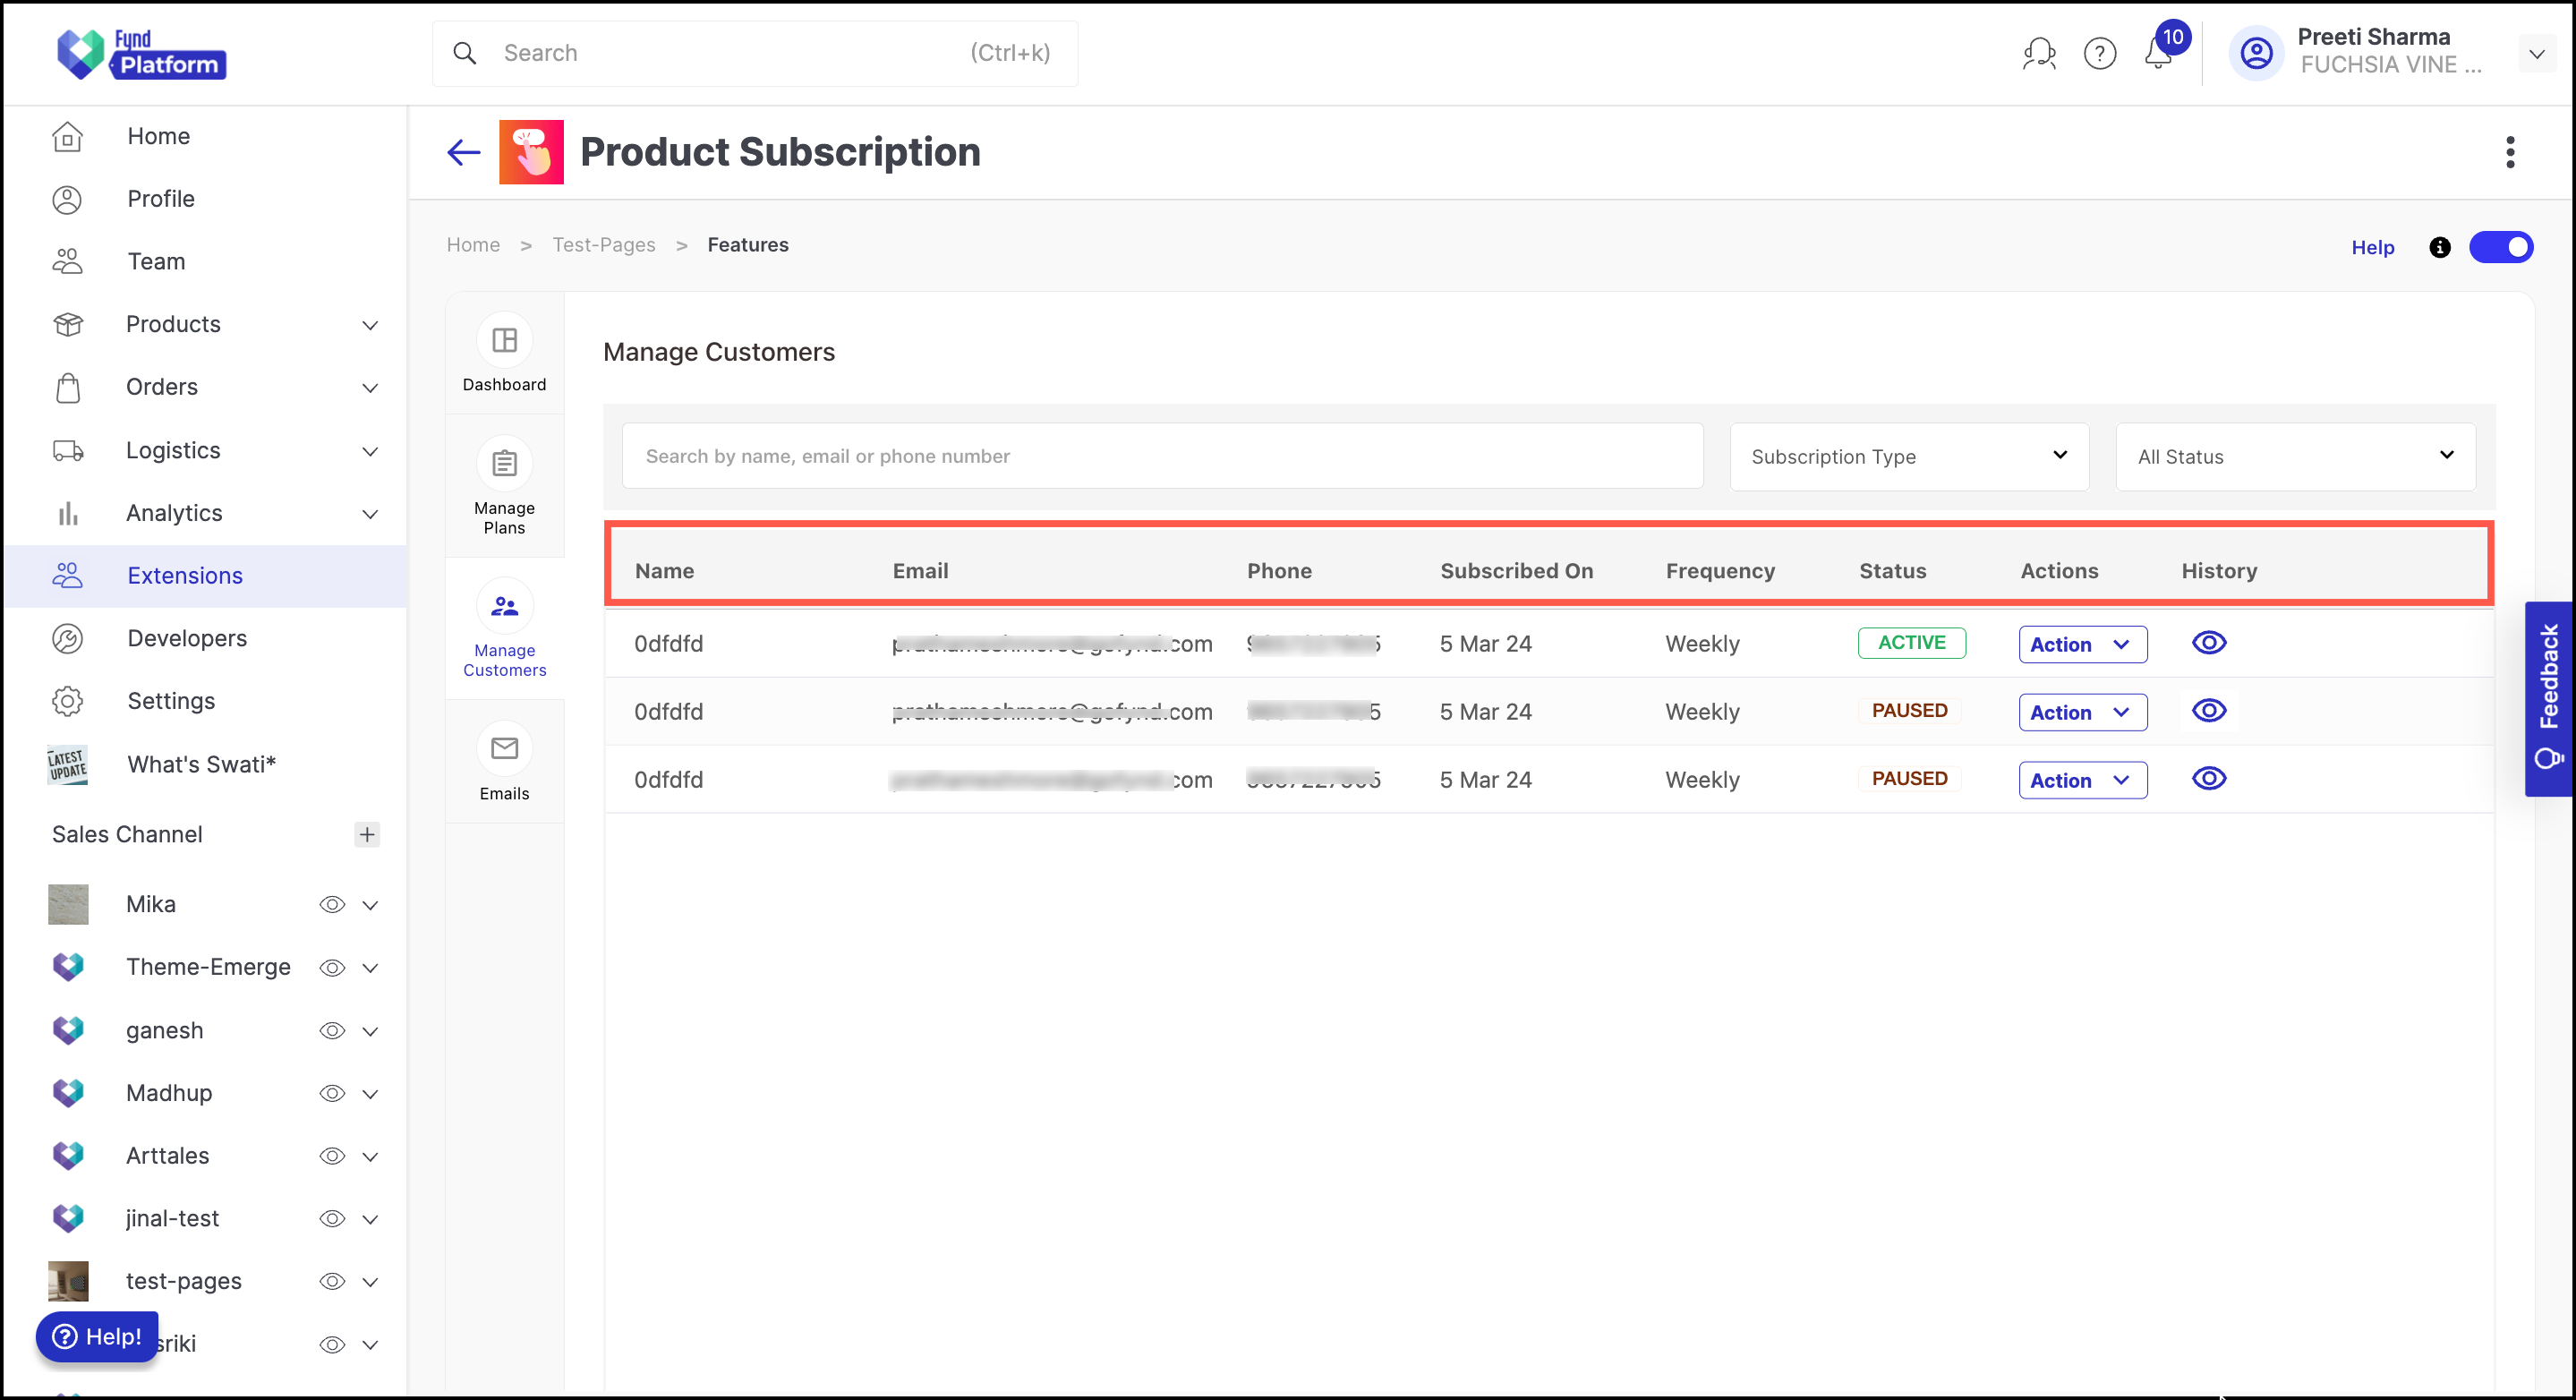
Subscribers can have any of the following statuses:
-
Inactive: The subscription has been closed by the seller. This state cannot be undone. If the same customer purchases the subscription again, a new subscription row entry will be created.
-
Pause: The subscription has been temporarily paused because the customer failed to make a payment for an upcoming order. An email reminder is sent to the customer regarding the subscription renewal. If the customer makes the payment within 48 hours the subscription is kept active. This is a temporary step, seller can resume the subscription post which again the payment link will be sent to the customer.
-
Active: The subscription is currently active for the customer. The payment link will be sent to the customer as per the frequency. Post successful payment, an order will be placed for the customer.
The seller can filter the details present on the page based on the following criteria:
- Customer's name, email or phone number
- Type of subscription
- Status of the subscription
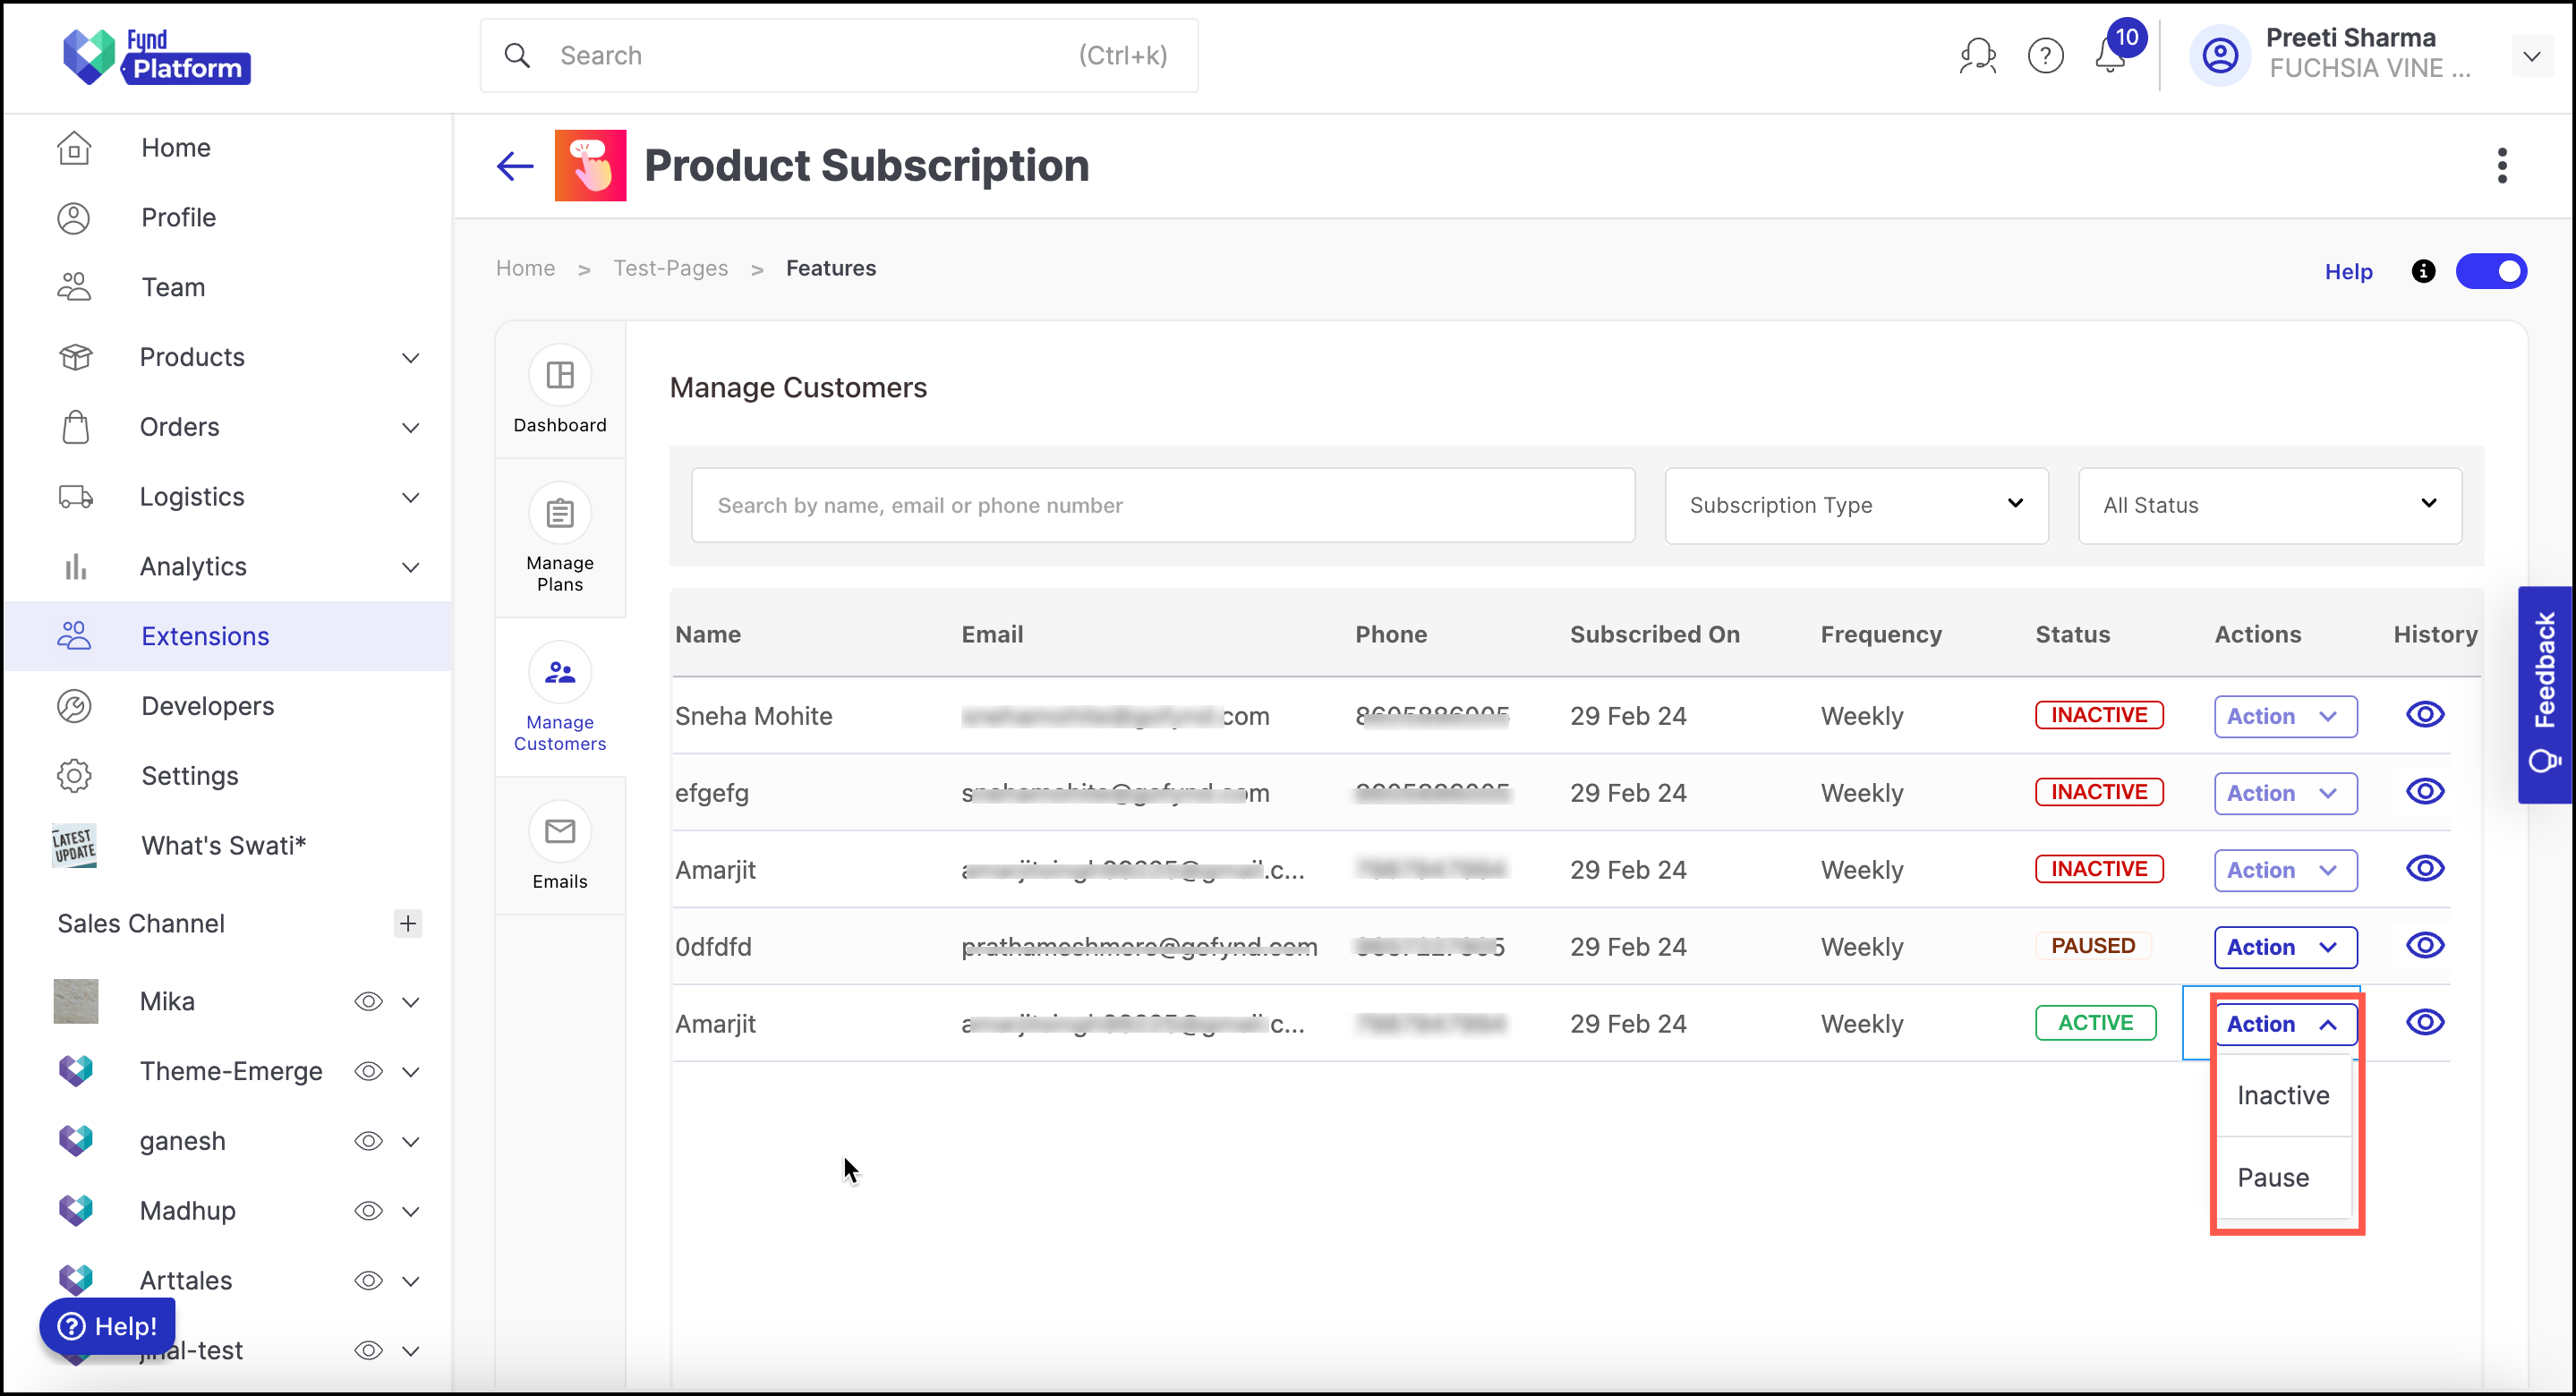
The seller can access the customer's details and view the consolidated order and payment history for the respective subscriber by clicking the Eye icon.

On the View History page, seller can access the following details:
- Product Code: Unique identifier for the product associated with the subscription.
- Plan ID: Identification number assigned to the subscription plan.
- Status: Indicates the current status of the subscription, such as active, paused, or inactive.
- Amount: Displays the amount charged for the subscription.
- Status of Upcoming Order: Provides information about the status of the next scheduled order, such as pending, processed, or cancelled.
- Order History: Shows a comprehensive history of past orders associated with the subscription, including order id, dates, and statuses.
Emails
This section lists all the email templates that are sent to the customers regarding product subscription.
- Welcome Email: This email is sent to customers upon successful purchase of subscription to a product.
- Payment Confirmation Email: This email is sent as a confirmation of cancel event for a subscription.
- Subscription Paused Email: This email is sent to inform the customer in case subscription has been temporarily paused.
- Subscription Cancellation Confirmation: This email is sent as a confirmation of cancel event for a subscription.
- Subscription Resumed Email: This email is sent to inform the customer in case subscription has been resumed after been paused.
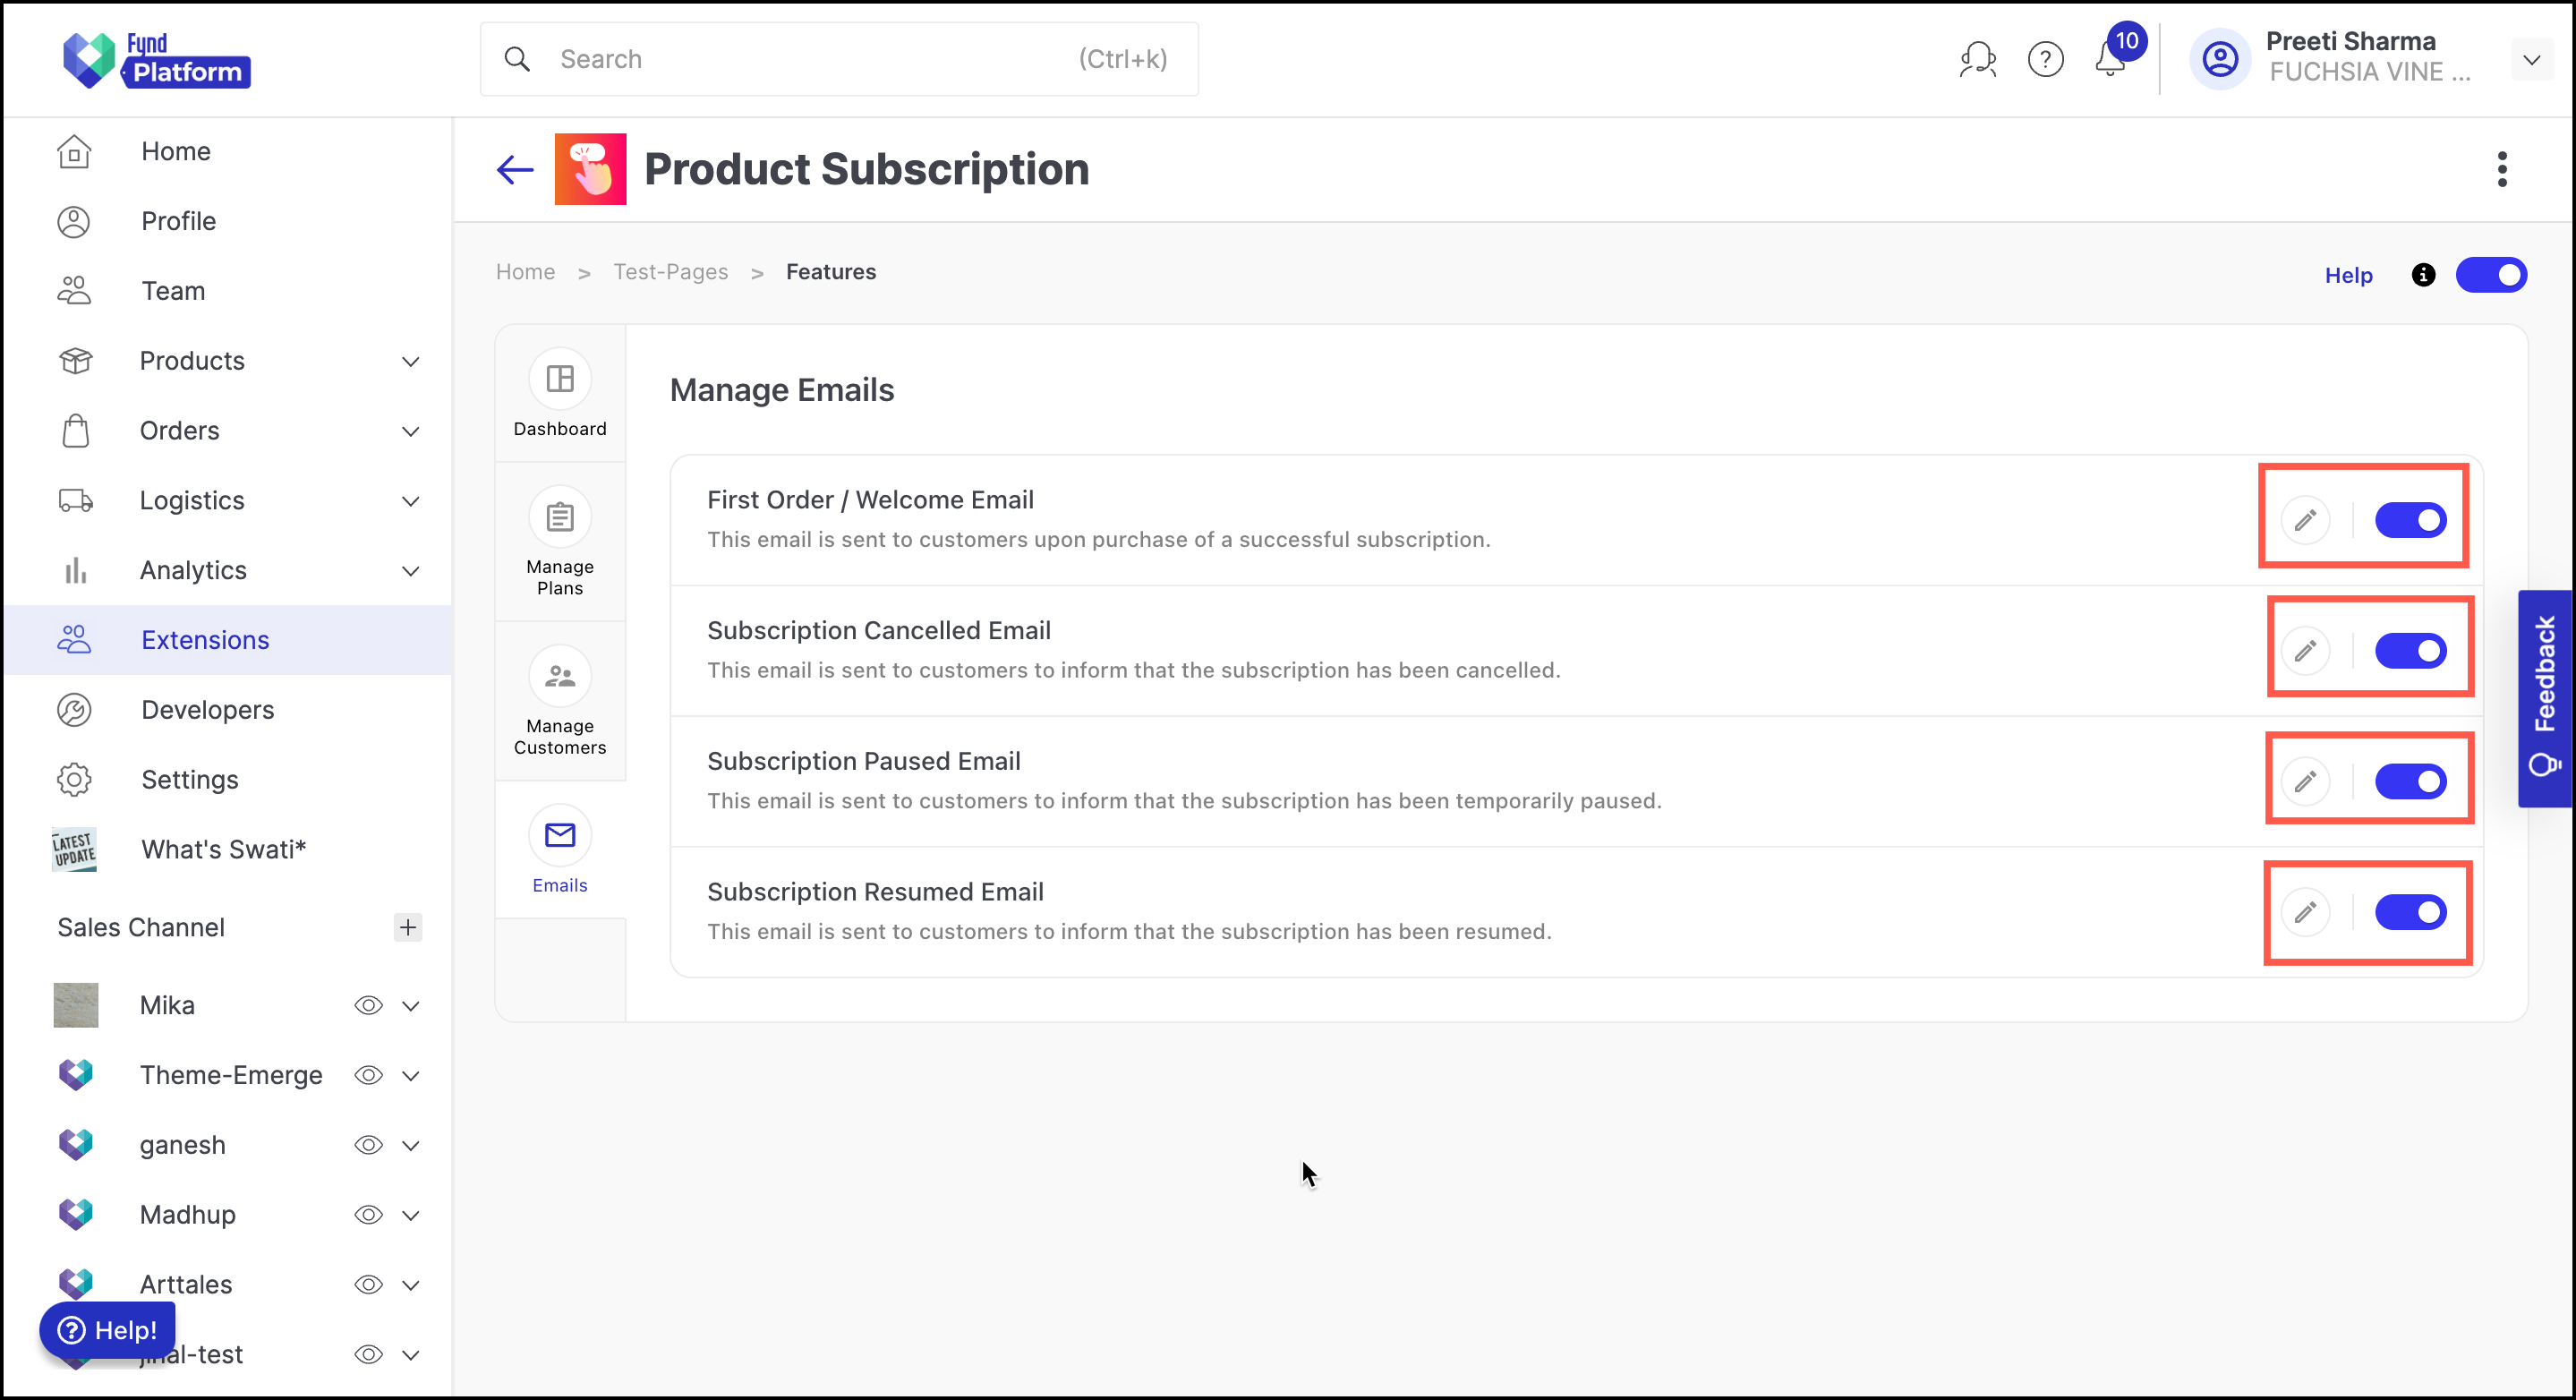
Additionally, sellers can click on the edit button next to each email template to make any necessary changes to the email template. They can also test the email by sending a sample to their own email address.
When editing the email, the seller can select the default provider from a list of all available providers for the respective sales channel. Additionally, seller has an option to customise the subject of the email to align with their business need.

Adding Product Subscription Extension in Theme
- Go to Sales Channel. Here we have selected test-pages.
- Click Appearance.
- Click Theme.
.png)
- Click Edit. Theme editor will appear.
.png)
Now, we will add the product subscription extension wrapper in our theme.
- Select Product Description option from the drop down.
- Go to the Page tab under Sections.
- Select Extension as product subscription in below delivery location.
- Select wrapper as Product Subscription.
- Click Save.
.png)
Final Output
Customer Journey
If the customer is not logged on the storefront, they will be prompted to log in on the product display page of the sales channel saying LOGIN TO SUBSCRIBE.
-mg5SB154h.png)
Once logged in, customers will be able to see the SUBSCRIBE AND SAVE button on the Product Description Page (PDP).
-gNzVBBUtx.png)
Upon clicking SUBSCRIBE AND SAVE, customers will be prompted to select the plan along with an email ID in case email is not available for the logged in customer. This email ID will be used to send all subscription related communication.
Click SELECT & PROCEED.
-ufF1qSDvK.png)
Customers will provide delivery details similar to checkout journey. The subscription discount will be added in the price summary during checkout as shown below.
-A0Tu_44sM.png)
The customer can pay the remaining amount with any mode of payment to buy the selected product on subscription. After successful payment, the order will be created for the customer.
-Fsudli6Tx.png)
-R6lahizrW.png)
Once the subscription order is successful, customer receives a welcome email.
-2sKwRWVFq.png)
Seller Journey
Once the seller creates the subscription plan from the Manage Plan section, the customer will be able to see the subscription on the product description page.
.png)
Additionally, the details of the customer subscription are reflected in the Manage Customer section, where the status of the subscriber is active, which is available in the History section.
.png)
.png)
For the next upcoming order due date, the customer receives a Pay Now email. This email contains a payment link that is valid for 10 minutes.
.png)
If the customer successfully completes the payment within the 10-minute, the order is marked as placed and can be processed ahead.
If the payment is not completed within the 10-minute window, a payment regenerate link email is sent to the customer. This regenerate link is valid for 48 hours. The customer can click on the same to generate a new payment link which will again be valid for 10 mins. If the customer completes the payment using the link, the order is marked as placed and can be processed ahead.
.png)
If the payment is not completed within the 48-hour window, The subscription is paused and a subscription pause email is sent to the customer.
.png)
.png)
The status of the customer remains paused. If the seller wishes to deactivate the paused customer from the platform, he can change the status of the subscriber to Inactive and a subscription cancellation email is sent to the customer.
Once the customer is marked inactive, it cannot be marked active again with the same subscriber ID. In case, the customer makes the same purchase using subscription, it will be treated as a new customer.
.png)