GlamAR
Introduction
GlamAR is an augmented reality platform to get a seamless try-on experience using your device camera, built-in models, or stored pics. Engage your customers with our realistic and versatile try-on solutions. Customers can try different shades and styles of lipstick, blush, eyeliner, and eyeshadow for a virtual makeover. Hence, GlamAR helps your customers decide what suits them the best!
Steps to use GlamAR Extension
-
Go to Extensions in Fynd Platform.

Figure 1: Extensions Section - Fynd Platform
-
Click GlamAR (Virtual Try-on) extension.

Figure 2: GlamAR Extension
noteOnce you have installed this extension, it will be available in the list here.
-
Click Applications dropdown.

Figure 3: Applications Dropdown
-
Select desired sales channel from the dropdown list. Here, we have selected 'playclanbilling'.

Figure 4: Selecting Desired Sales Channel
-
Click Proceed.

Figure 5: Clicking Proceed Button
-
Log in to your GlamAR portal.
-
Copy PRODUCTION KEY present under SDK section on your GlamAR portal.

Figure 6: Copying Production Key
-
Paste the key in API key field.

Figure 7: Pasting Production Key
-
Click Submit.

Figure 8: Clicking Submit Button
-
Click Add Product.

Figure 9: Clicking Add Product Button
-
Search a product by its name or item code.

Figure 10: Searching a Product
-
Click Add Product.

Figure 11: Clicking Add Product Button
-
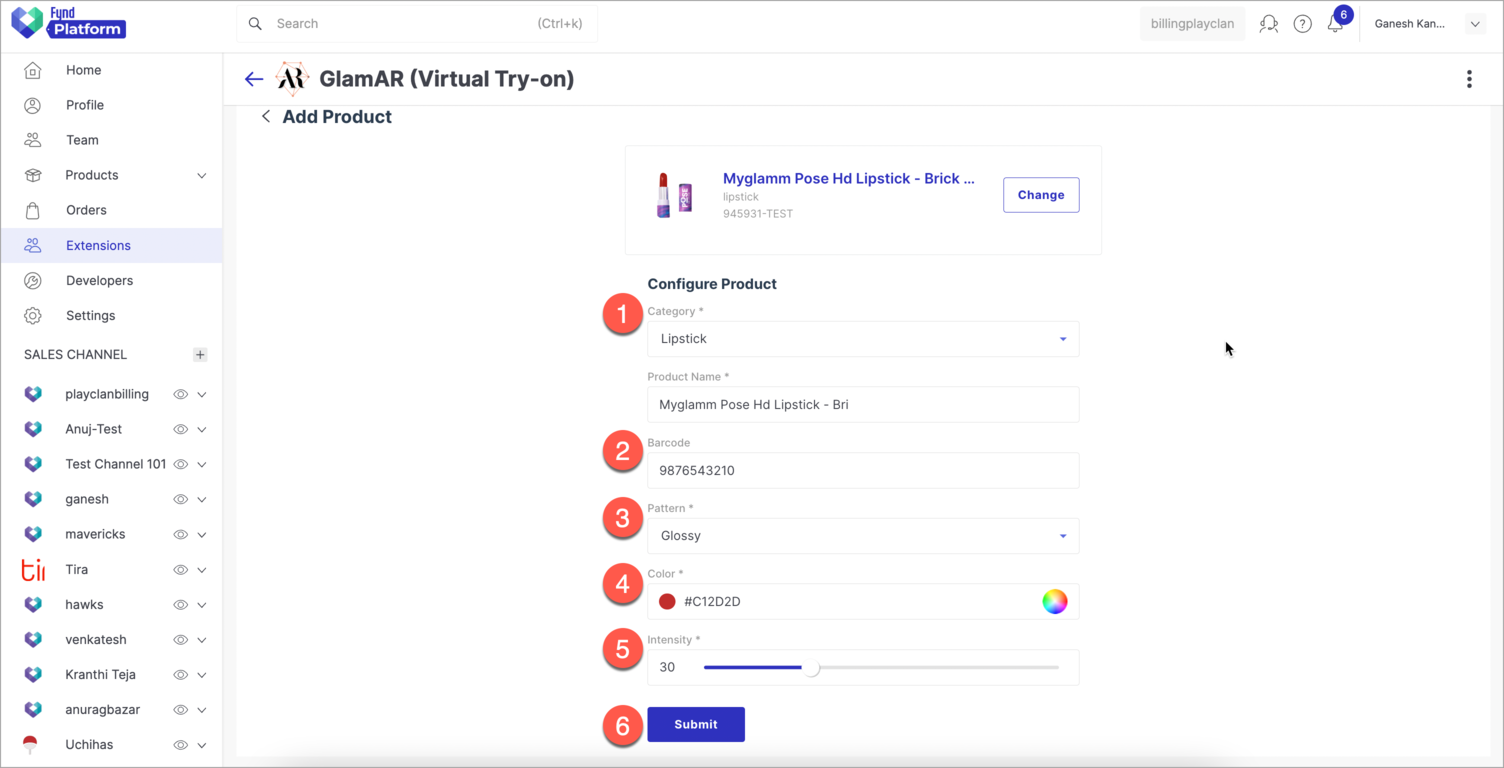
Fill the details appropriately.

Figure 12a: Configure Product Window
- Category - Choose category to which the product belongs. For e.g., Lipstick.
- Barcode - Enter item code or product identifier of a product. For e.g., EAN, SKU, ALU, UPC, etc.
- Pattern - Choose desired pattern that will be visible once the product is tried virtually by customers. For e.g., Glossy, Velvet, etc.
- Color - Choose colour of the product from colour-picker.
- Intensity - Adjust the slider to brighten the colour of product when used by customer virtually.
- Submit - Click Submit to save the product details on GlamAR.
In this way, GlamAR is enabled on your product successfully.

Figure 12b: Product Mappings
Activating/Deactivating GlamAR Extension
-
Click Settings.

Figure 13: Clicking Settings Button
-
Turn ON the toggle button to activate GlamAR for sales channel.

Figure 14: Activating GlamAR Extension
-
Click Submit.

Figure 15: Clicking Submit Button
Final Output
Click Go to product and you will see GlamAR is available on product description page.
![]()
![]()