Create Easy Navigations
Introduction
Navigation within a website is moving from one page to another. The navigation structure of a website shows how the various pages of a website are connected to one another to find products and other information.
The custom link (refer figure. 1) in the navigation bar is the header, and at the bottom of the page is the footer (refer figure.1). You can add, edit, hide, and enable these custom navigations that link to other pages or sections of your website. Sync their positions on the Web, Android, and iOS platforms.

Main Screen

- Create a new navigation
- Assign existing navigation to the platform
- List of navigations
- Filter navigations by platform
- Filter navigations by position
Check assigned Navigation
The assigned navigation here is the 'default-nav' on the web platform (refer figure. 2). This navigation can be used as it is, or can be customised to suit the look of your website.
How to customise navigation

Let us understand how to customise the existing 'default-nav' navigation and to make changes in the steps that follow.
- The boxes that are blue ticked are existing navigation menus which will be displayed on the header part of the website.
- Uncheck one or two navigation menus to enable or disable them.
- Save the changes. Menus that are in blue ticks are displayed.
- To change the image of the newly added menu, click the icon (refer table below).
- Link the navigation to any page on the website using link builder.
- Refresh the website and view the changes made.
Navigation Option Icons
| Icon | Purpose | Explanation |
|---|---|---|
| 1 | Enable or Disable the navigation item | You can use the checkbox to hide or show the navigation to your users |
| 2 | Drag and drop for arranging | Drag and drop a navigation item below the blue dashed line at the intended place |
| 3 | Icon for the navigation item | If your website theme supports this, you will be able to view an icon besides the navigation |
| 4 | Rename | You can also double-click to rename |
| 5 | Add a sub-navigation menu | Click this to add a sub-menu. This sub-menu will be visible only if your theme supports it. A sub-menu can be shifted to a main menu by drag and drop |
| 6 | Add tags | This is an optional tag |
| 7 | Authorization to view the navigation | All - Everyone can view the navigation Staff - Only authorized team member can view the navigation Registered - Only registered users/customers can view the navigation Anonymous - Anonymous users can view the navigation |
| 8 | Link the navigation to a webpage | Use the link builder to link the navigation item to a webpage |
| 9 | Delete | Delete the navigation item |
The above table explains the meaning of each icon and its usage. Refer to the table to get a better understanding while creating the navigation. Once you understand this, you can add, edit, delete, rename, and shuffle items as you navigate.
Header
The header of the website stays constant while viewing the pages across the website. You can create custom links for the header. Add, shuffle, edit, delete, and activate this custom header navigation that links to other pages or sections of your website. Check their position on the Web, Android and iOS platforms.
Add Header Menu
- Click 'Create' to make a new navigation. Refer figure.2
- By default there are some menus displayed. You can choose to keep the same or add extra navigation menus.
- Click add and rename the navigation menu.
- Blue tick on the checkbox, confirms that the menus and submenus will be displayed on the website.
- Enter a name for the navigation on the right side of the page and click 'Create' to save the details.
- You have successfully added a menu item to the header of your website.

- Default menu
- Add, rename and create a submenu
- Add menu
- Add submenu
- To delete menu or submenu
- Name the navigation
- Click to save
Edit Header Menu
- You can choose to keep the menus or add extra.
- If a menu needs to be added click 'Add'. Once the menu is added, rename.
- Save and preview the changes.
Delete and Hide Menu
- If you choose to delete the menu item click the 'trash bin' symbol.
- Save and preview. The navigation menu is now deleted.
- By default, there are some menus displayed. To hide a few menus, untick the checkbox that needs to be hidden.
- Save and preview.
- You can notice the unticked menus are not visible on the webpage and are now hidden.
Change or Reshuffle the sequence of Header Menu
- Click on an existing Navigation.
- You will see a list of menus that needs to be displayed on the header.
- To change the sequence, drag and move the intended menu, till a blue dashed-line is visible and place it below.
- To place a menu within another menu, drag and move it, till a green dashed-border is visible around the other menu item and then drop it.
Footer
Footer appears at the end of the website page. It is possible to create custom navigation links in the footer. Add, shuffle,edit,delete and activate these custom footer navigations that link to other pages or sections of your website.
Add Footer Menu
- Click Create Navigation
- Click Add to create a footer navigation and create as many footer links you wish to show in the footer block.
- Click the '+' to add a submenu or click Add to enter a new menu.
- Once the necessary menus are added as a submenu or main menu, save the details that is name of the navigation on the right side of the page.
- Click Create
- You have successfully added a Footer to your website. If you require to create another footer block, create another menu with submenus.
Edit Footer Menu
- Click the menu name that has to be edited
- Double click to rename and save the changes.
Delete and Hide Footer Menu
- To remove any particular menu click the 'trash bin symbol' to delete.
- The navigation menu is now deleted.
- Some menus are displayed by default. To hide a few menus, untick the checkbox that needs to be hidden.
- Save and preview.
- You can notice the unticked menus are not visible on the webpage and are now hidden.
Change or Reshuffle the sequence of Footer Menu
- Click the Navigation name that has to be edited
- To change the sequence, drag and move the intended menu, till a blue dashed-line is visible and place it below.
- To place a menu within another submenu, drag and move it, till a green dashed-border is visible around the other menu item and then drop it.

- Footer block 1
- Footer block 2
- Add menu
- Add submenu
- To delete menu or submenu
- Name the navigation
- Click to save
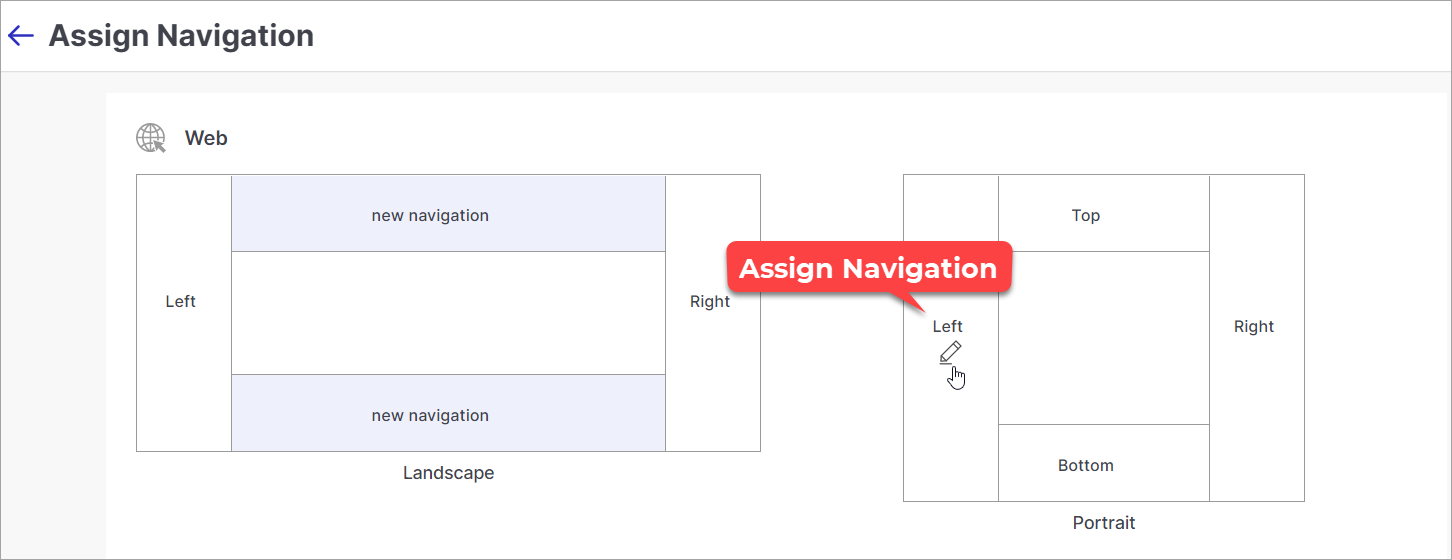
How to Assign Navigation
Filter navigations by Platform (Android, iOS, Web) and Position (Top, Bottom, Left, Right). Once you create and edit navigations it is important to assign the same, to be able to see the changes on the sales channel. For this go to the navigation page and click Assign. Here you can see three different platforms - Android, iOS and Web. There is an orientation to view the website in a landscape and portrait mode. Assign the navigations created, top, bottom,left or right.
- Assign the existing navigation to different platforms
- By default, there is a list of navigations. You can create a new navigation and it will show up in this list.
- Filter by Platforms (Android,iOS,Web), refer to figure.2 point number 4.
- Filter by Position (Top, Bottom, Left, Right), refer to figure.2 point number 5.
- You will be prompted to assign the navigations to an appropriate position (top/bottom/left/right) for platforms such as Web, Android and iOS.
- Later, you can use the Assign button (shown in figure.2) for re-assigning the navigation, if needed.
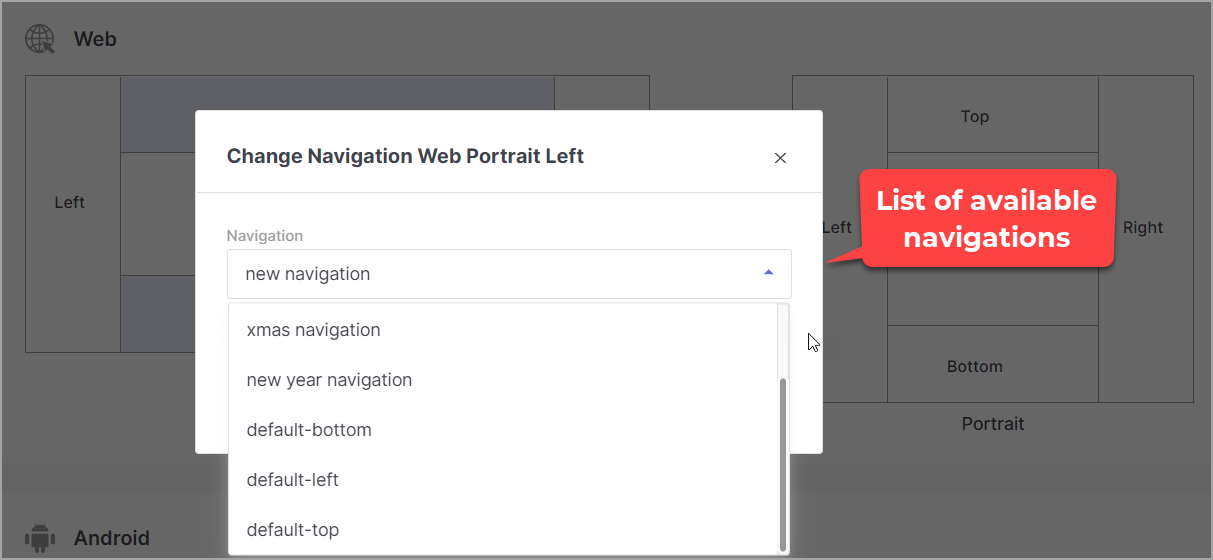
Assign Navigation
You will be presented with the options to assign the navigations for Web, Android and iOS. You can click on the edit option to re-assign any of the created navigations from the dropdown.