Finance & Payments
Introduction
Fynd Platform is changing the way it bills subscribers. Instead of a postpaid model, you will now be required to pay at the beginning of each month to use Fynd's services. This switch to a prepaid model aligns with Fynd's 30-day billing cycle.
-
If you default on your paid subscription due date, then a 7 days grace period shall be applied. For e.g., if your subscription payment due date is May 31, 2022, you will be able to utilise platform services till Jun 06, 2022. Furthermore, if you still fail to pay your subscription bill, your Fynd Platform will freeze (partially) and platform services (Team, Products, and Extensions), and sales channel services (Analytics, Customers, Abandoned Checkouts, Marketing, and Communication) will not be accessible for next 7 days i.e. till Jun 13, 2022.
-
Moreover, if you still fail to pay your subscription bill within the span of 8 to 14 days (i.e. on or before Jun 13, 2022), your platform panel will be blocked on 15th day (i.e. on Jun 14, 2022) with immediate effect.
-
If you are installing an extension in current billing cycle, its charges will be levied in the next billing cycle. For e.g., a monthly recurring extension installed on May 20, 2022, shall be billed on May 31, 2022, and can be accessed till Jun 19, 2022.
Go to Finance & Payments section present in dropdown on top-right of the Platform Panel.
![]()
Accept E-Mandate
What is E-Mandate in Fynd Platform?
According to Reserve Bank of India (RBI) rules in context of e-commerce, e-mandate is an electronic authorisation given by a seller to a service provider to make recurring payments for a specific service or product. E-Mandate allows the Fynd Platform to automatically debit the saved card for subscription payments without requiring manual authorisation for each transaction.
E-Mandate in Fynd Platform is calculated as below:
- E-Mandate Amount is always 2.5x of Subscription Payable Amount and it is rounded off to multiples of 100
- Example, E-Mandate Amount = 2.5 × (Subscription Payable Amount) = 2.5 × ₹2,499 = ₹6,247.5 ≈ ₹6,300
If subscription payable amount is less than or equal to e-mandate amount, subscription payable amount will be auto-debited from the saved card.
How to accept E-Mandate in Fynd Platform?
-
Click Set Up.
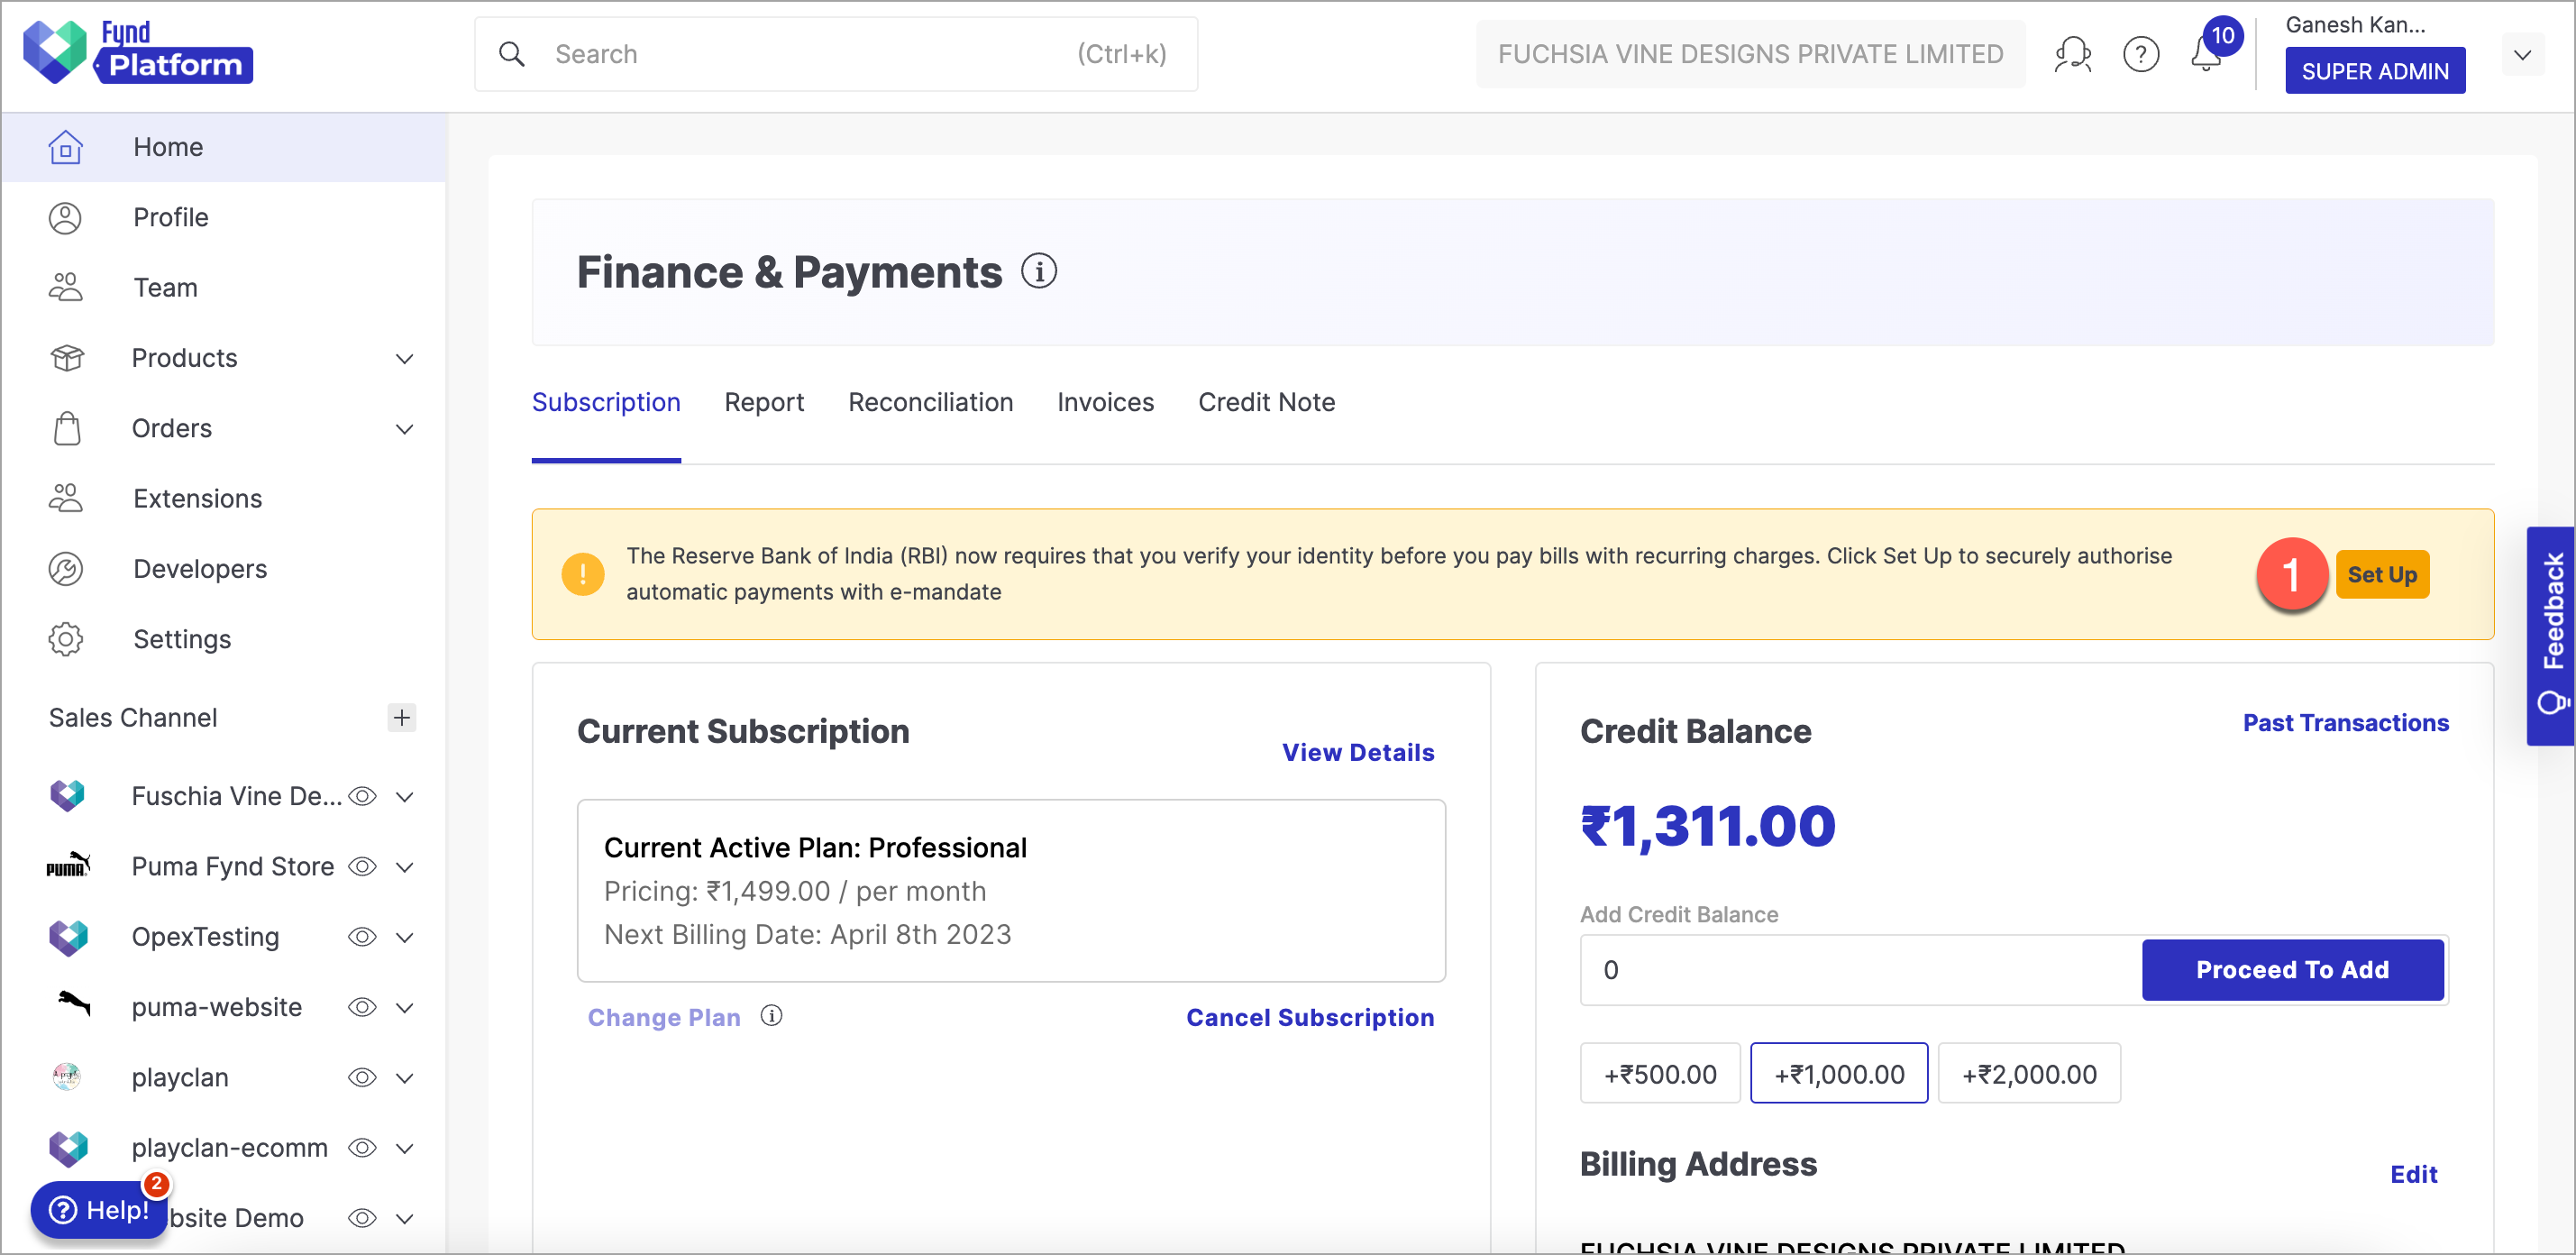
Figure 2: Clicking Set Up Button
-
Tick the checkbox to accept e-mandate (Refer Figure 3).
-
Click Save Card.
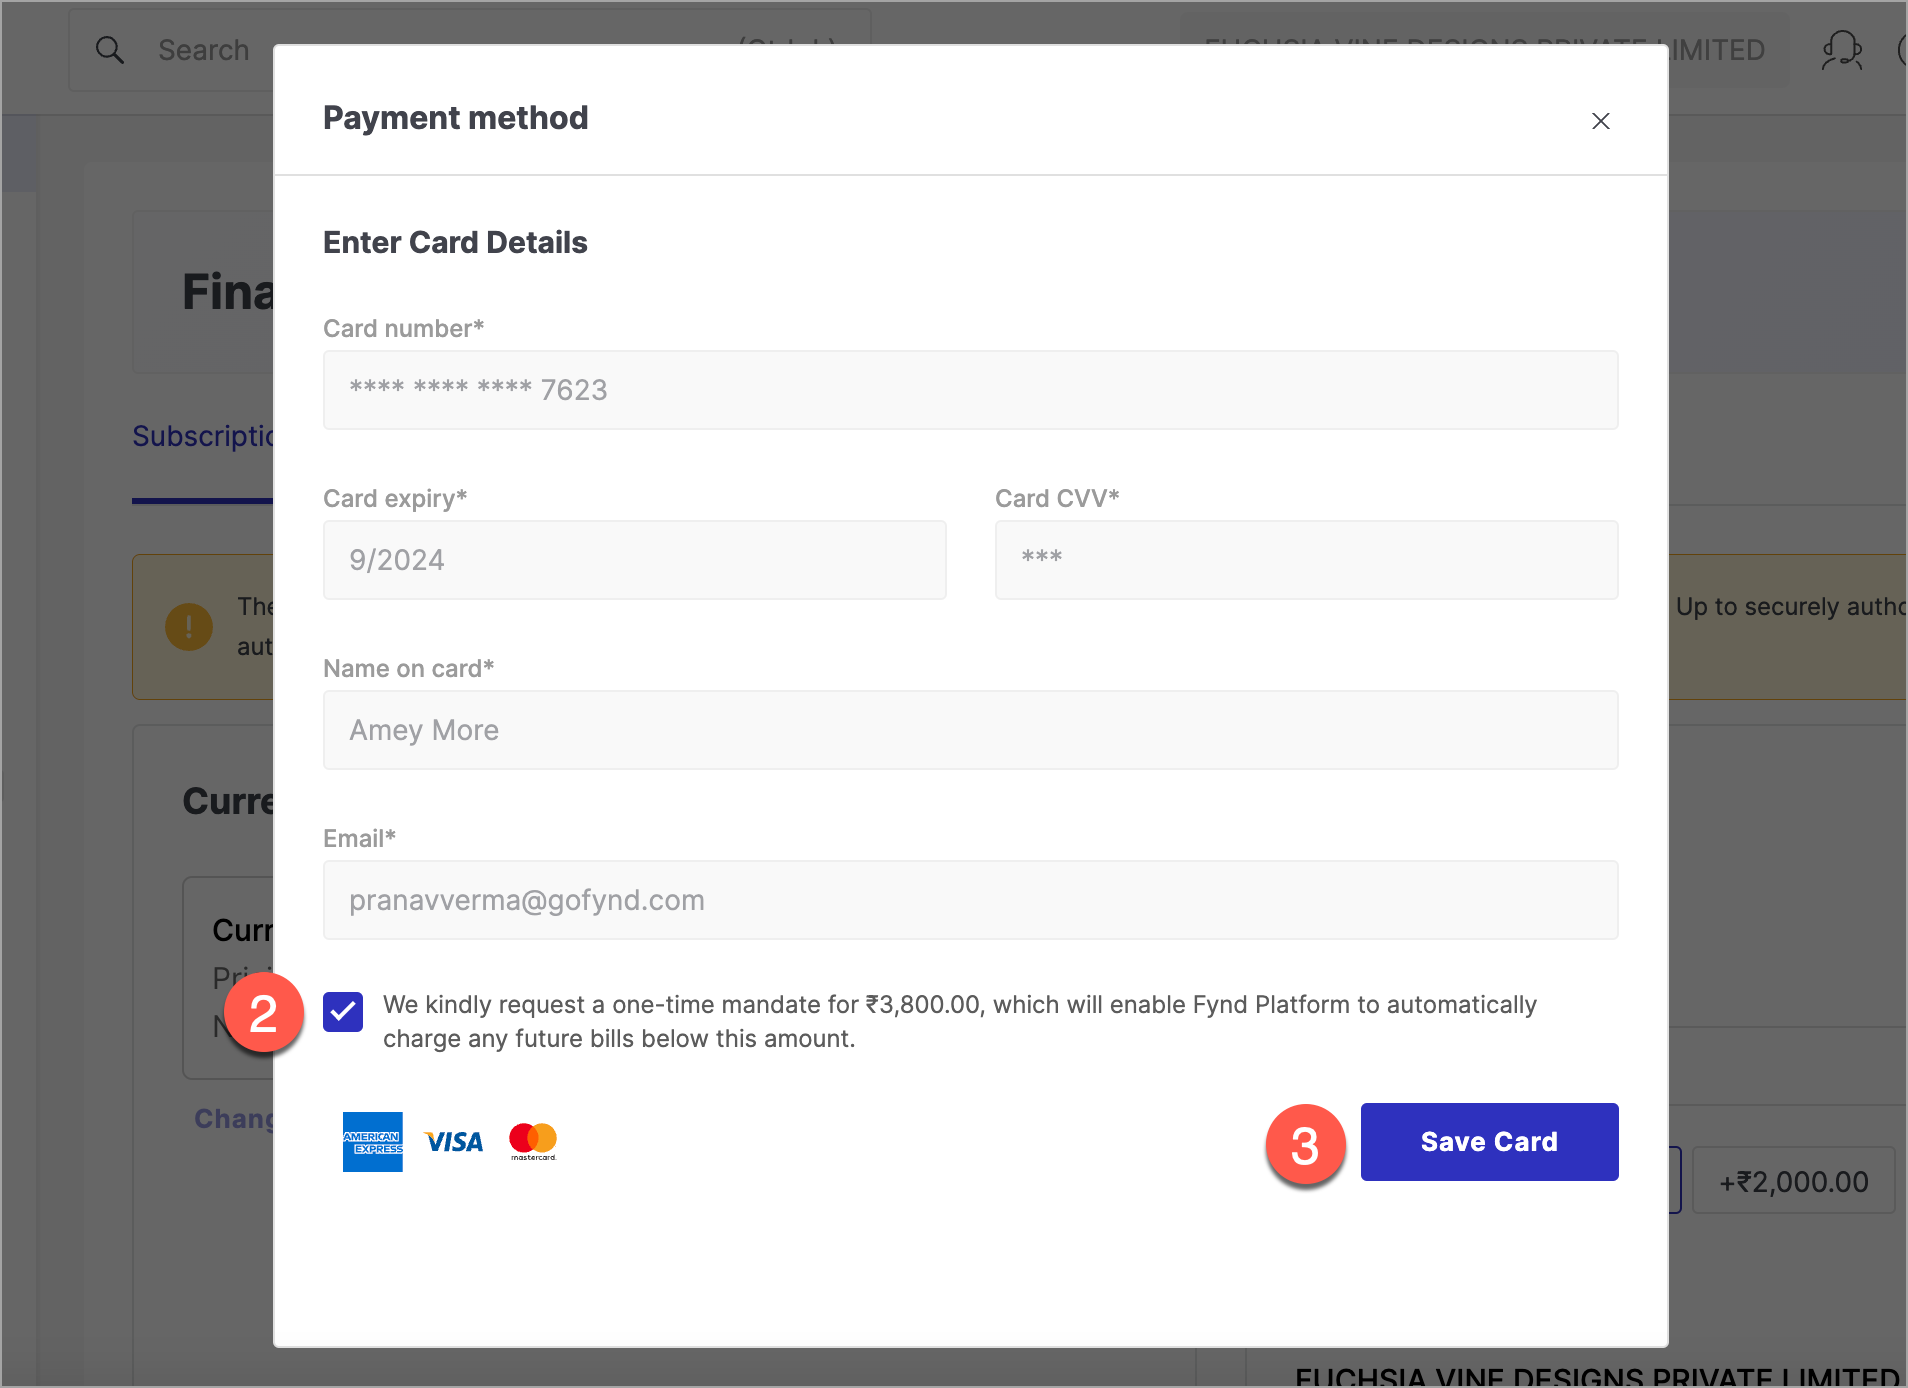
Figure 3: Clicking Set Card Button
Here, you are authorising Fynd Platform to automatically debit any subscription payable amount which is below the e-mandate amount. Upon accepting e-mandate, subscription payable amount will be debited from the saved card and not the e-mandate amount (mentioned in Figure 3 above).
Understanding Credit Note (CN)
Scenario: Considering a billing cycle of 30 days, you initially subscribed to the Standard Plan (₹599), which has a cost of ₹706.82 (₹599 + GST). You have used this plan for 10 days. On the 11th day, you decided to upgrade to the Professional Plan (₹1,499), which has a cost of ₹1,768.82 (₹1,499 + GST).
Now, let's calculate the amount you need to pay for the upgraded plan based on the remaining 20 days of the billing cycle.
- For the Standard Plan (10 days): Amount = (706.82/30) * 10 = ₹235.60
- For the Professional Plan (20 days): Amount = (1768.82/30) * 20 = ₹1,179.21
- Therefore, the total amount you need to pay for the upgraded plan is: Total Amount = 235.60 + 1179.21 = ₹1,414.81
In this case, you had already paid ₹706.82 for the Standard Plan, which creates a credit note (CN) of ₹943.59. This credit can be applied to the total amount, resulting in a reduced payment of ₹707.99.
To understand the concept of Credit Note, let us study the table below:
| Plan | Billing Cycle (days) | Plan Cost with GST (₹) | Usage (days) | Total Amount (₹) |
|---|---|---|---|---|
| Standard Plan (₹599) | 30 | 706.82 | 10 | 235.60 |
| Professional Plan (₹1499) | 30 | 1768.82 | 20 | 1,179.21 |
| Total | 1,414.81 | |||
| Credit Note (CN) | 706.82 | |||
| Total Payable = Total - CN | 943.59 |
The Credit Note is a document or record that acknowledges the credit amount owed to a seller. In this scenario, the Credit Note of ₹471.22 represents the amount that the seller had already paid for the Standard Plan but did not fully utilise. It can be applied to compensate a portion of the payment required for the upgraded plan.
In summary, a Credit Note serves as evidence of a prepayment that can be utilised or refunded in future transactions, allowing for proper accounting and financial management.
![]()
![]()
View the Current Plan and its Features
Click on View Details present in Current Subscription window to check the current plan details whenever you want to. It shows you the features supported in the plan.
![]()
![]()
If you are on a trial plan, make sure you subscribe to a paid plan to avoid losing your data.
Timestamps and time zones are synchronized with the seller's browser settings. Additionally, currency representations adhere to the currency of the seller's country of origin or the base currency of the organization.
Add Credit Balance
-
Enter an amount in Add Credit Balance field. Alternatively, you can select an amount from the predefined values available on the page.
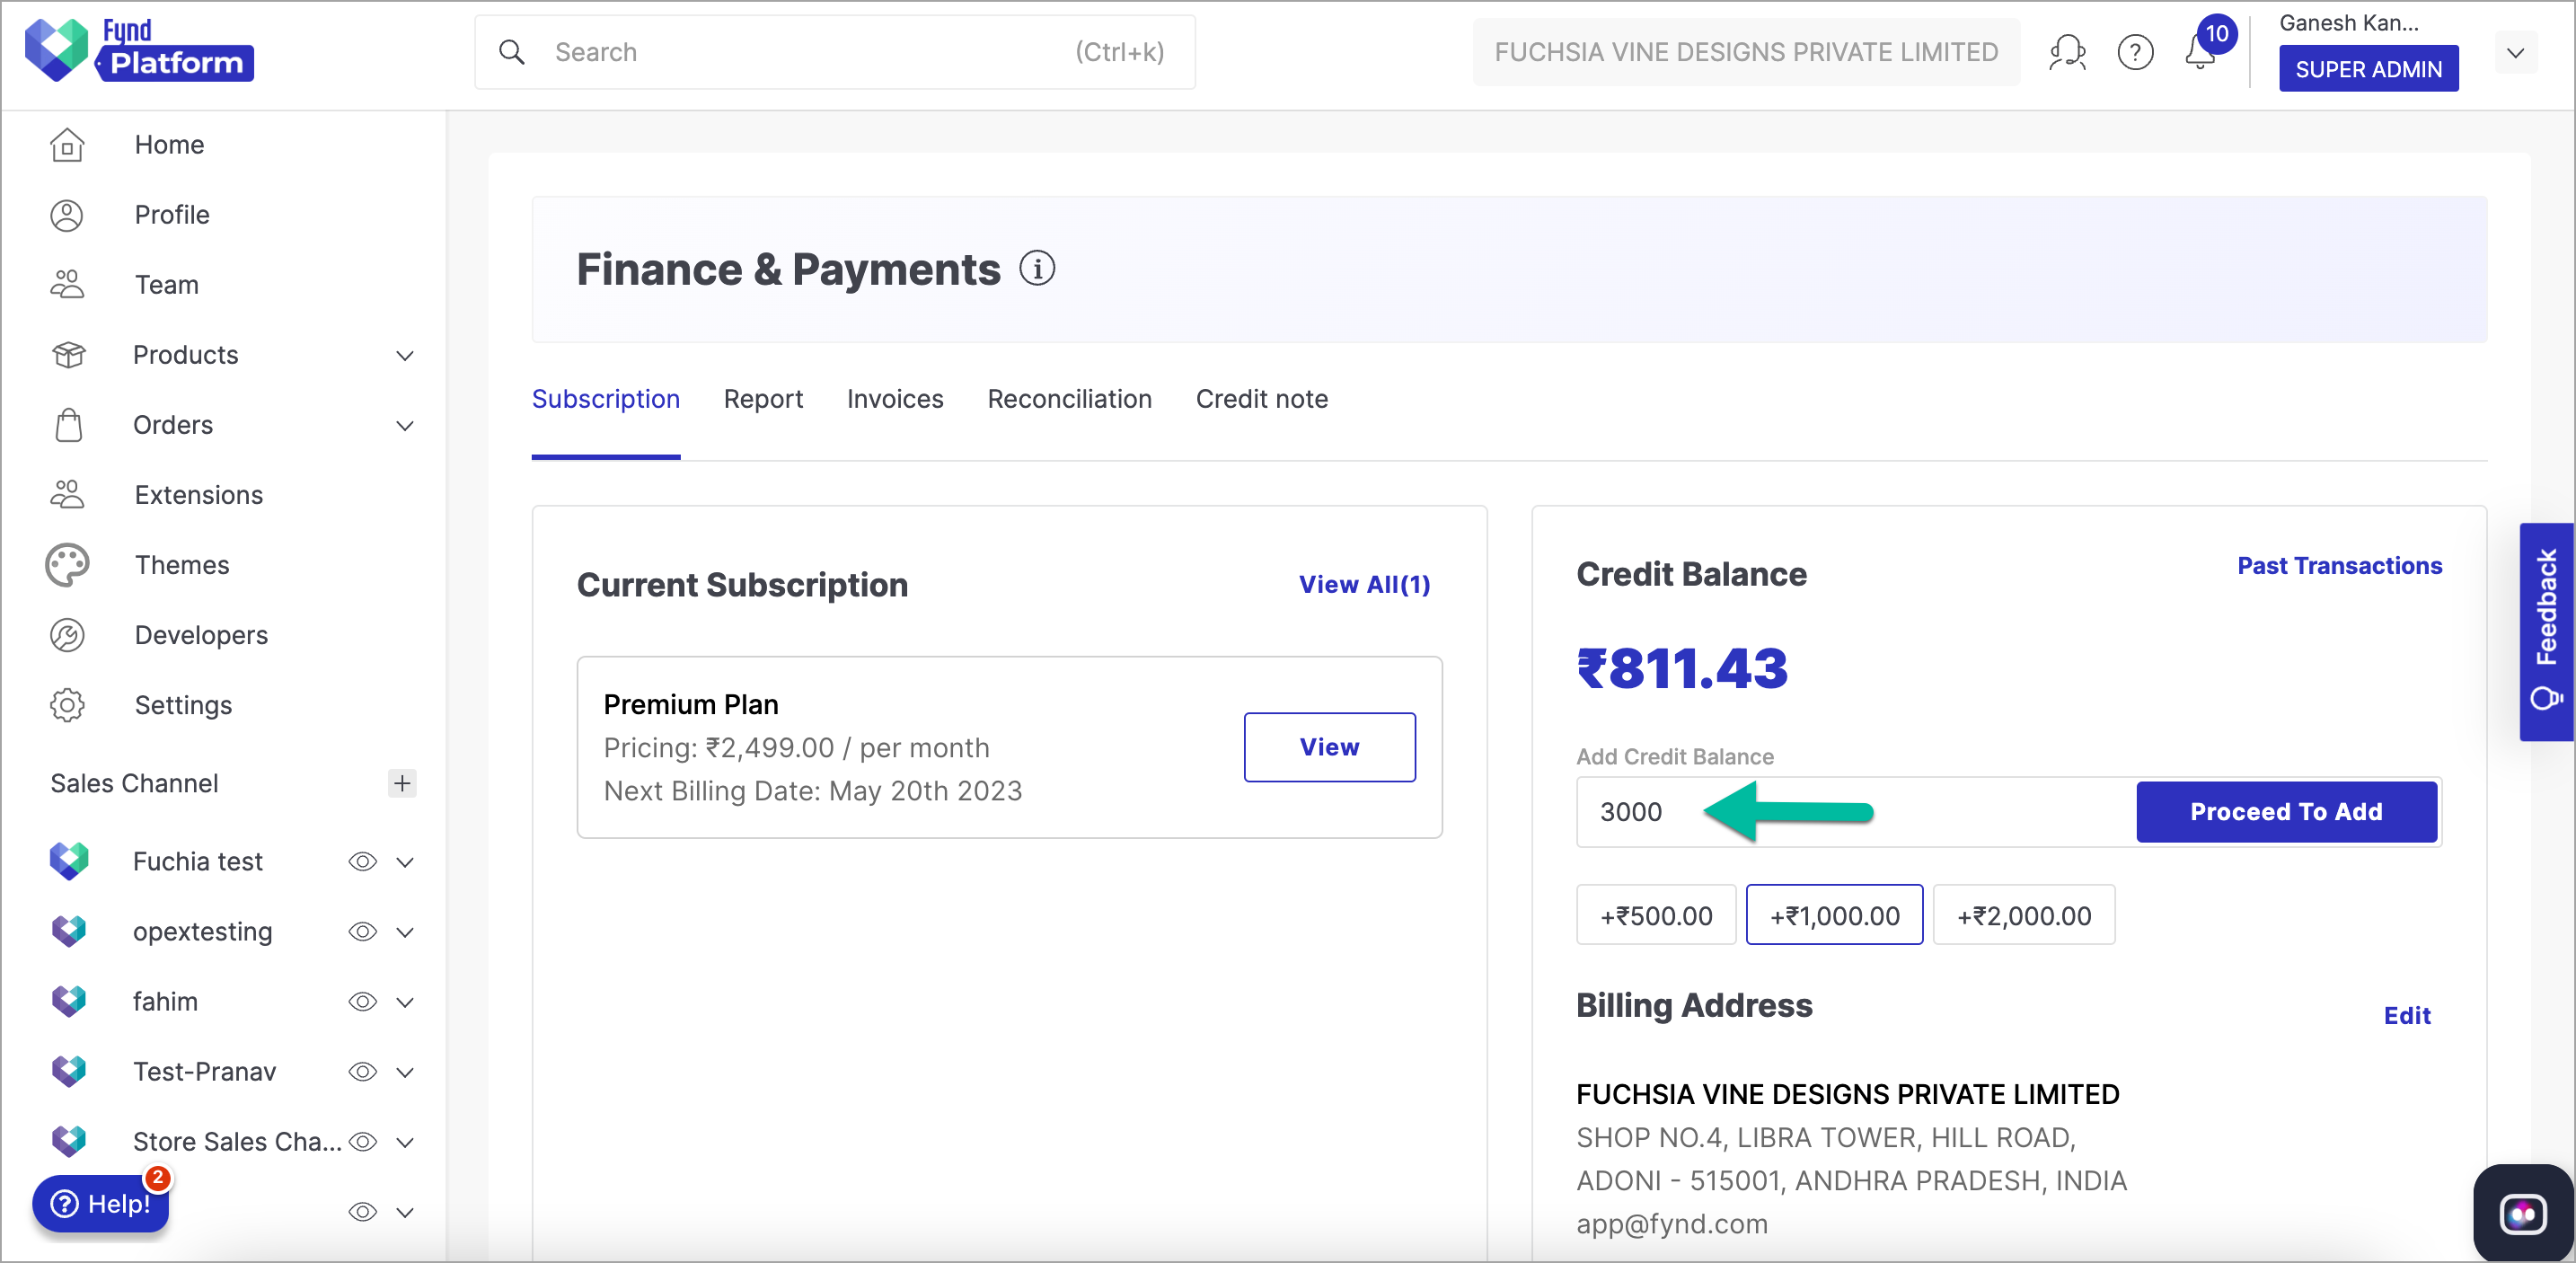
Figure 6: Adding Amount
-
Click Proceed To Add.
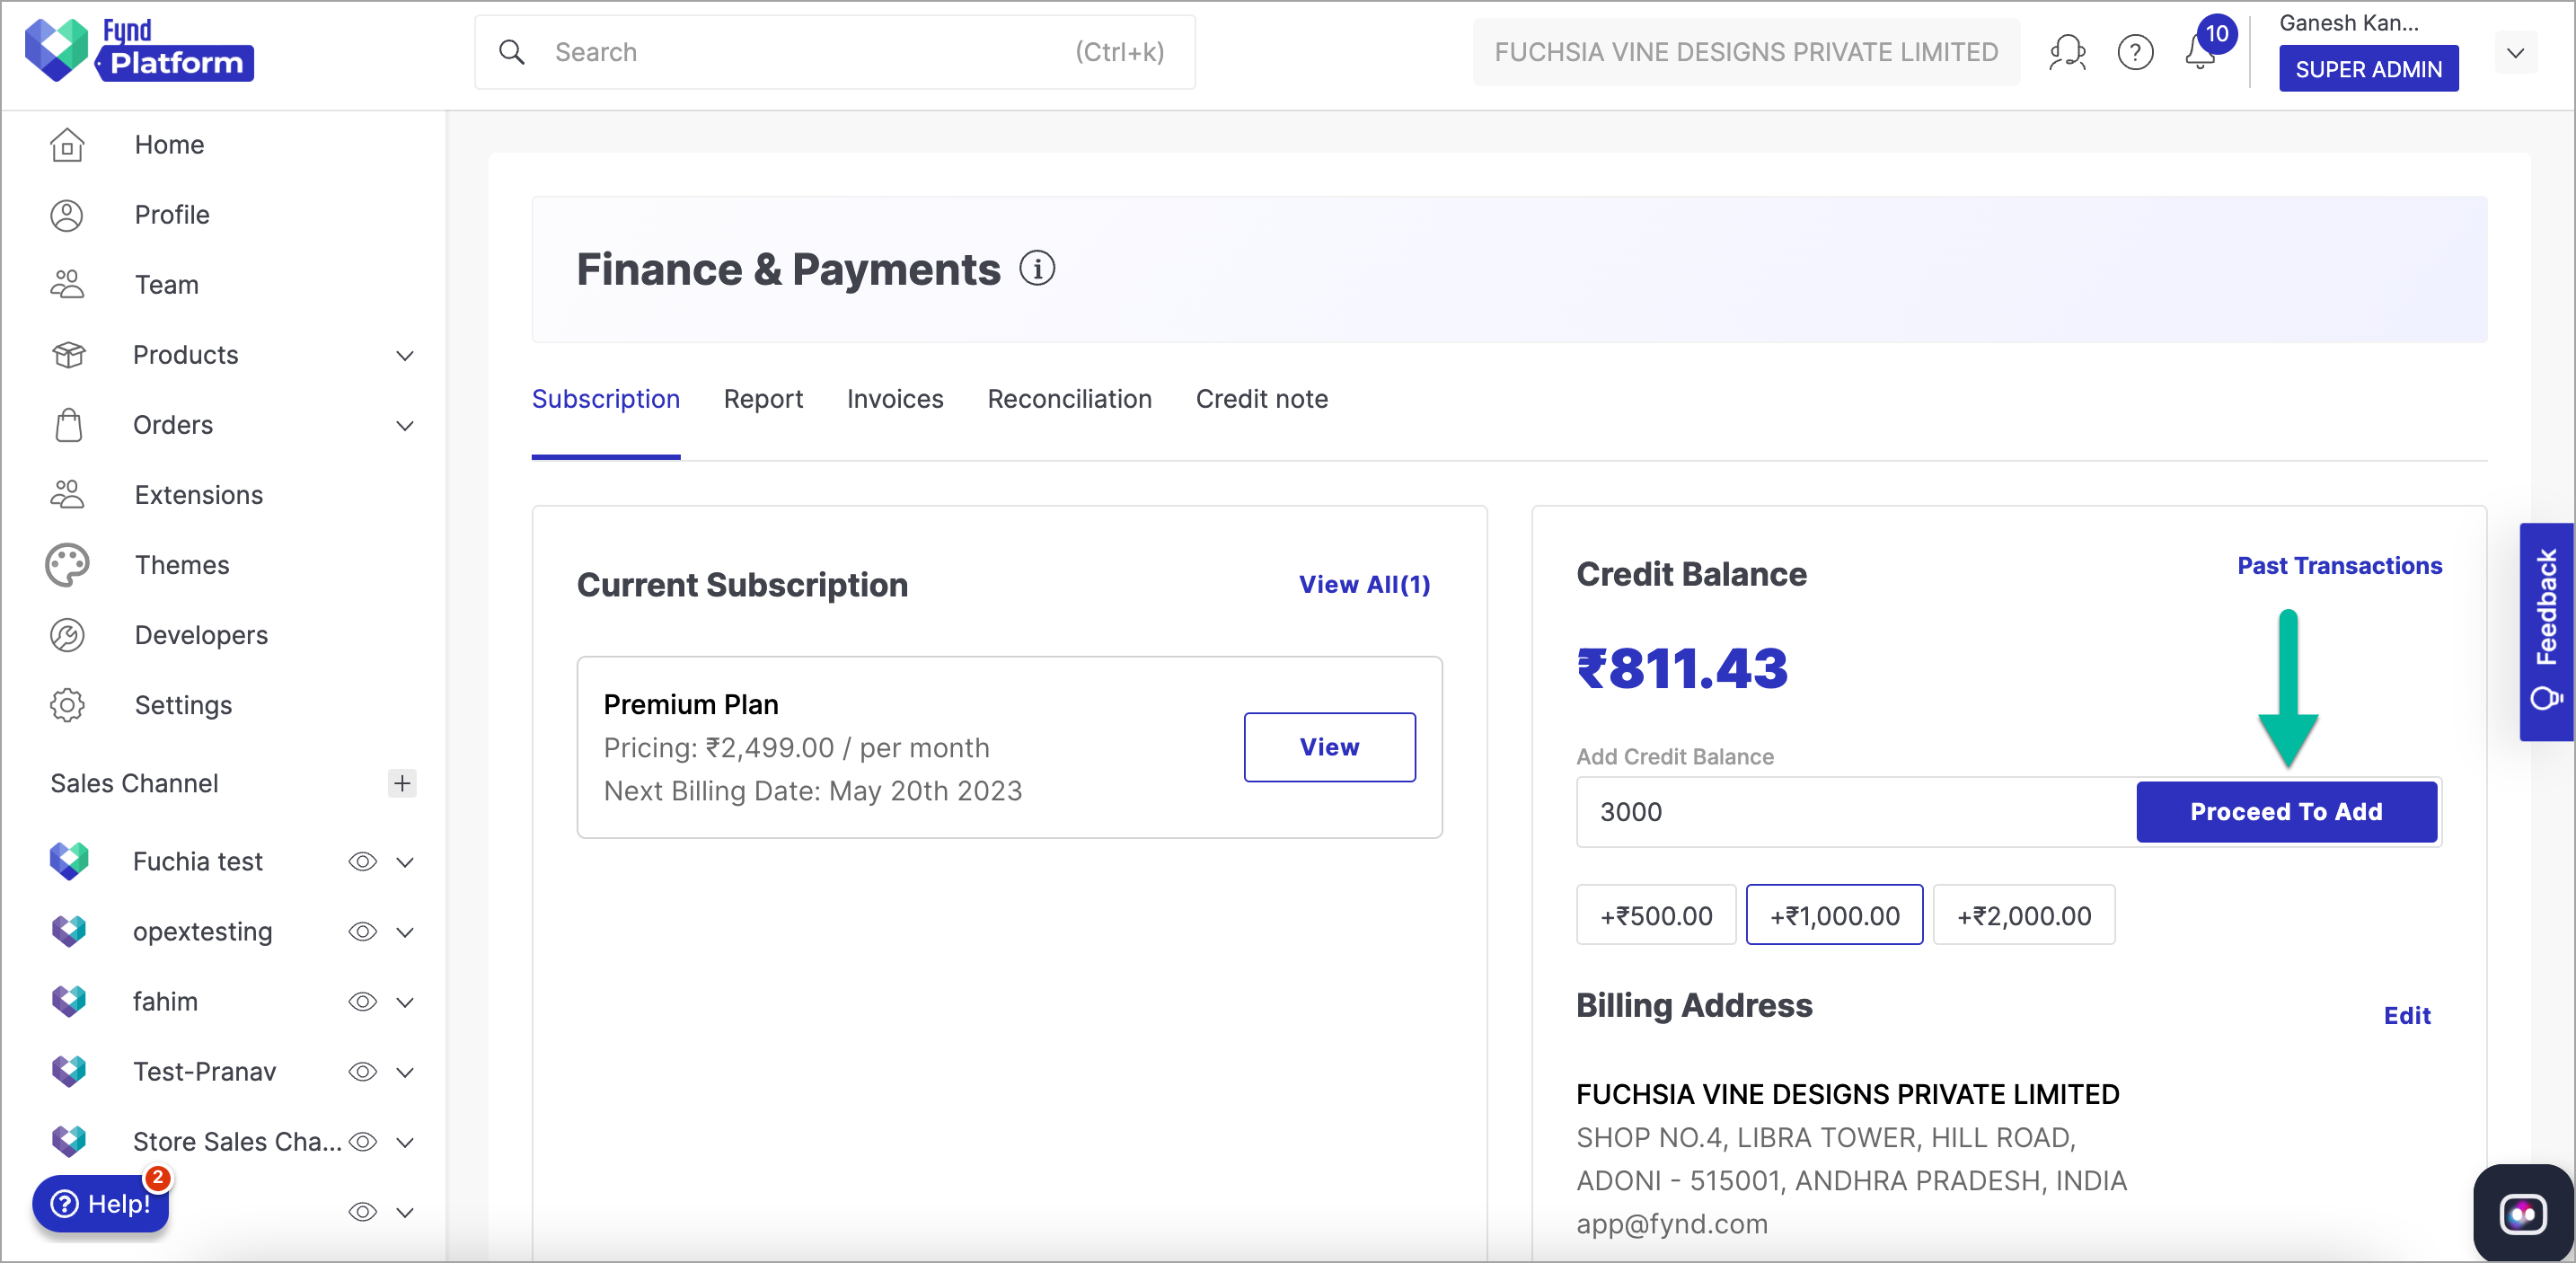
Figure 7: Clicking Proceed To Add Button
-
Choose the desired payment method and enter the payment details.
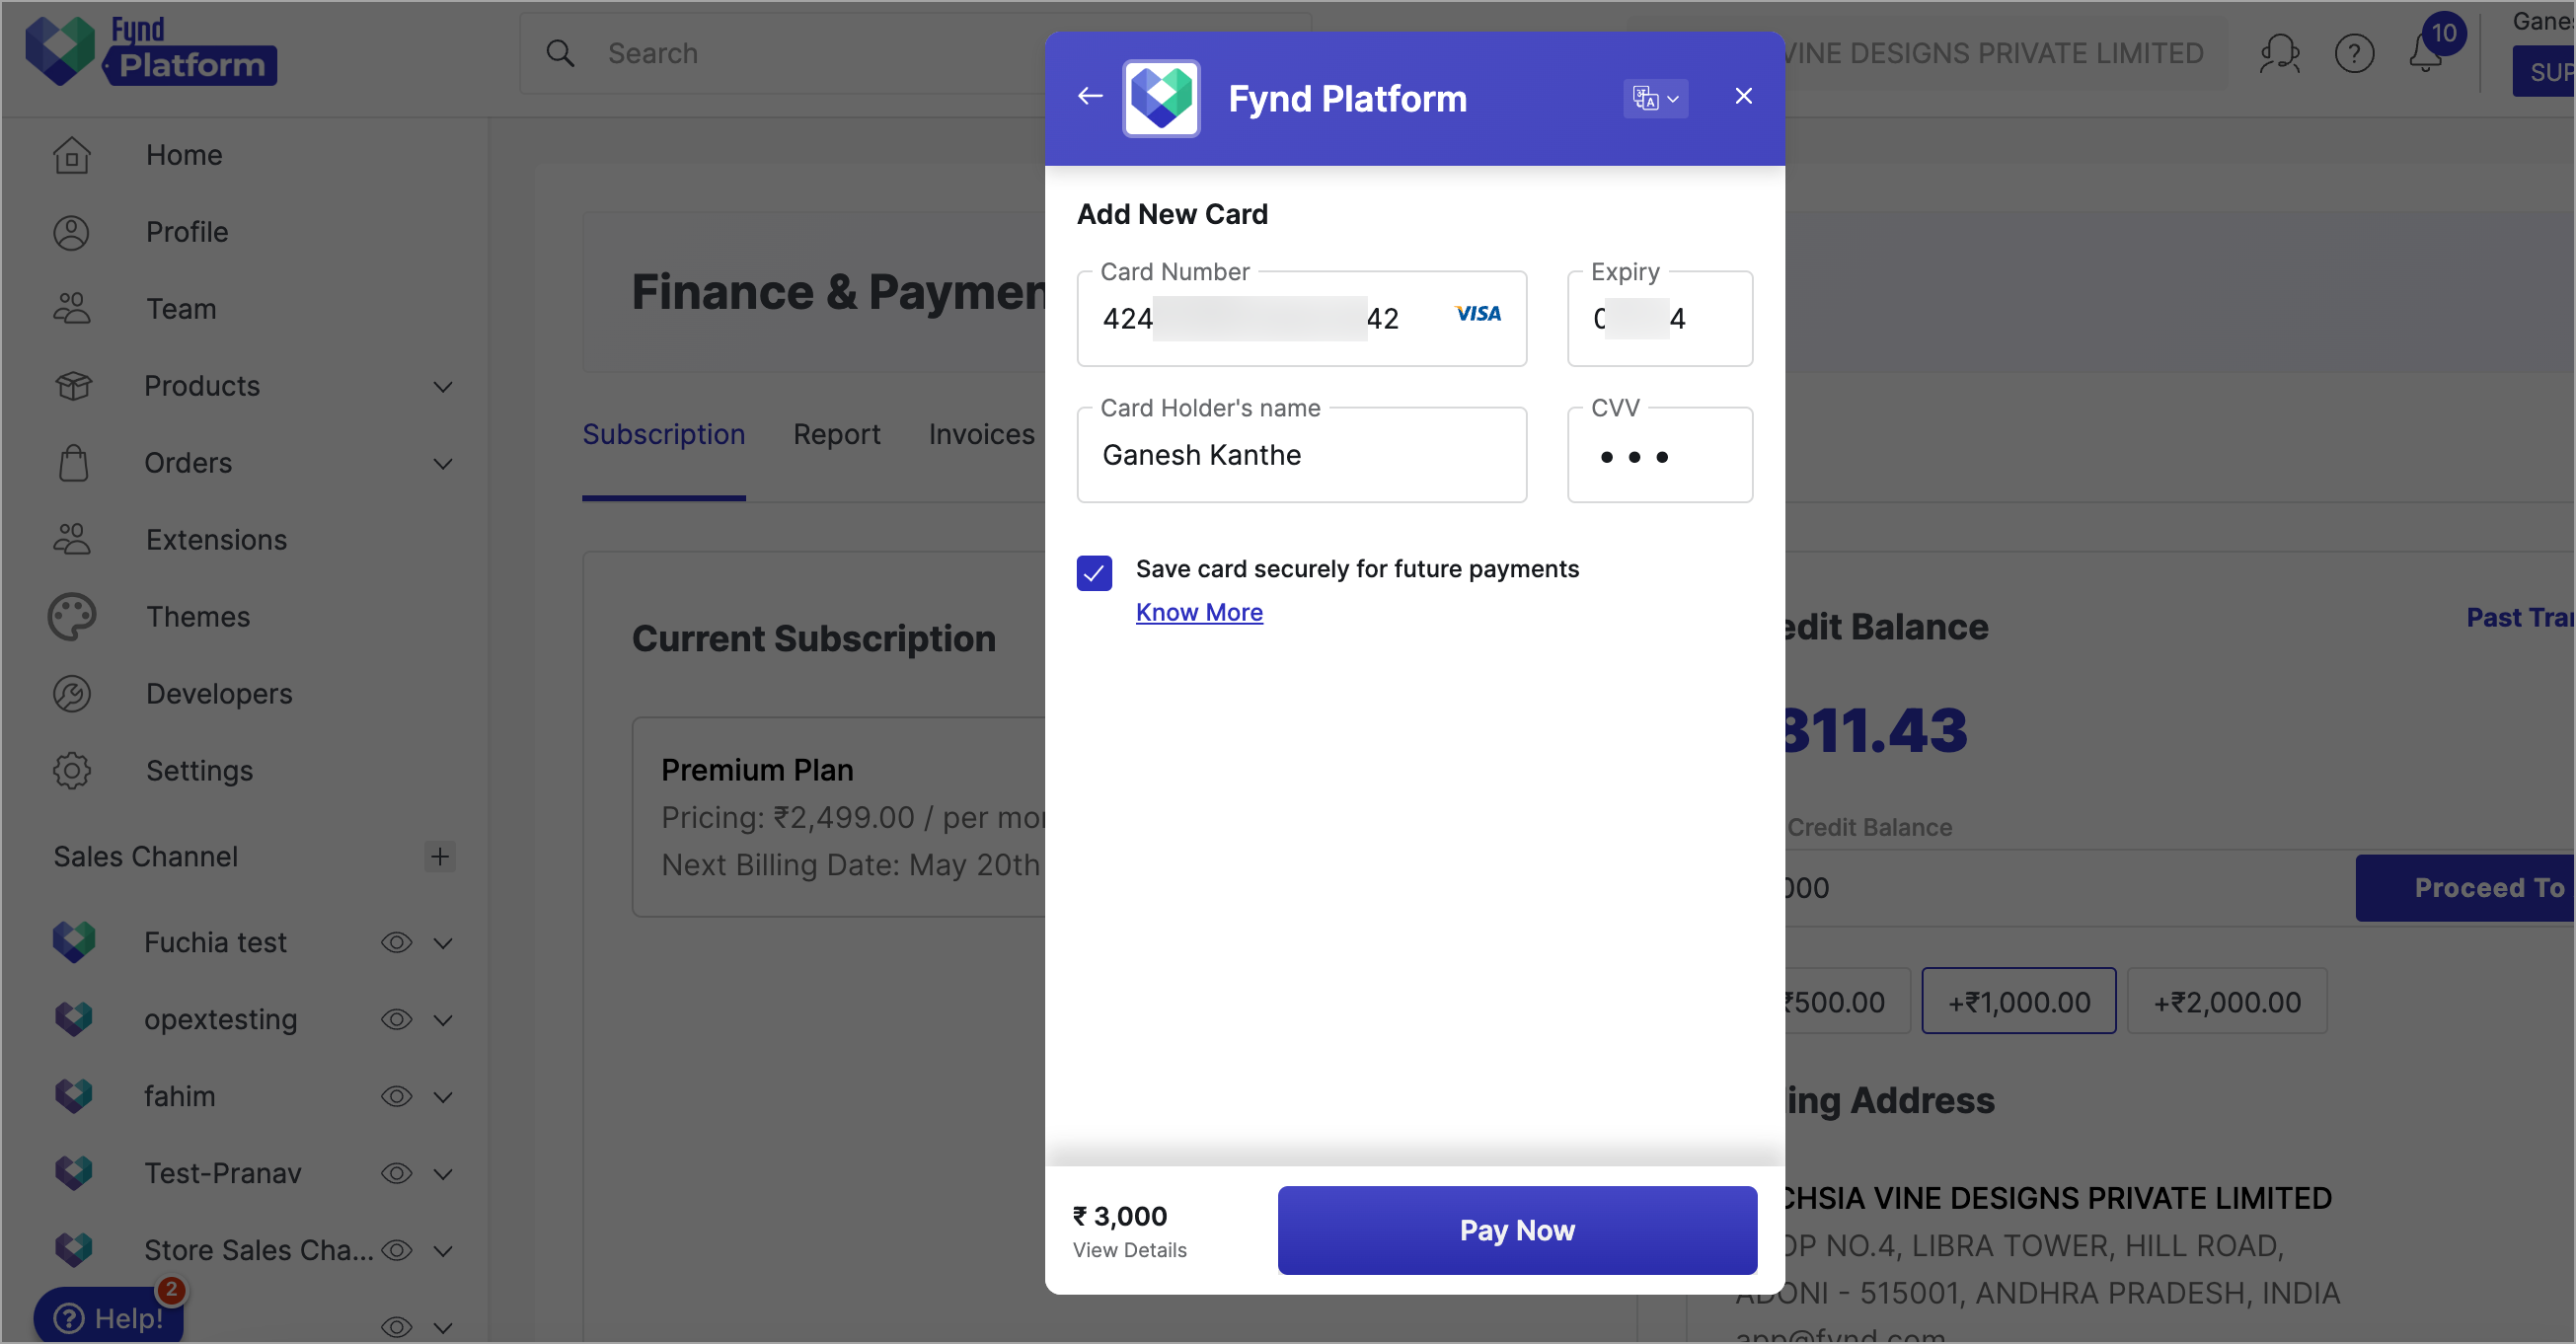
Figure 8: Adding Payment Details
-
Click Pay Now.
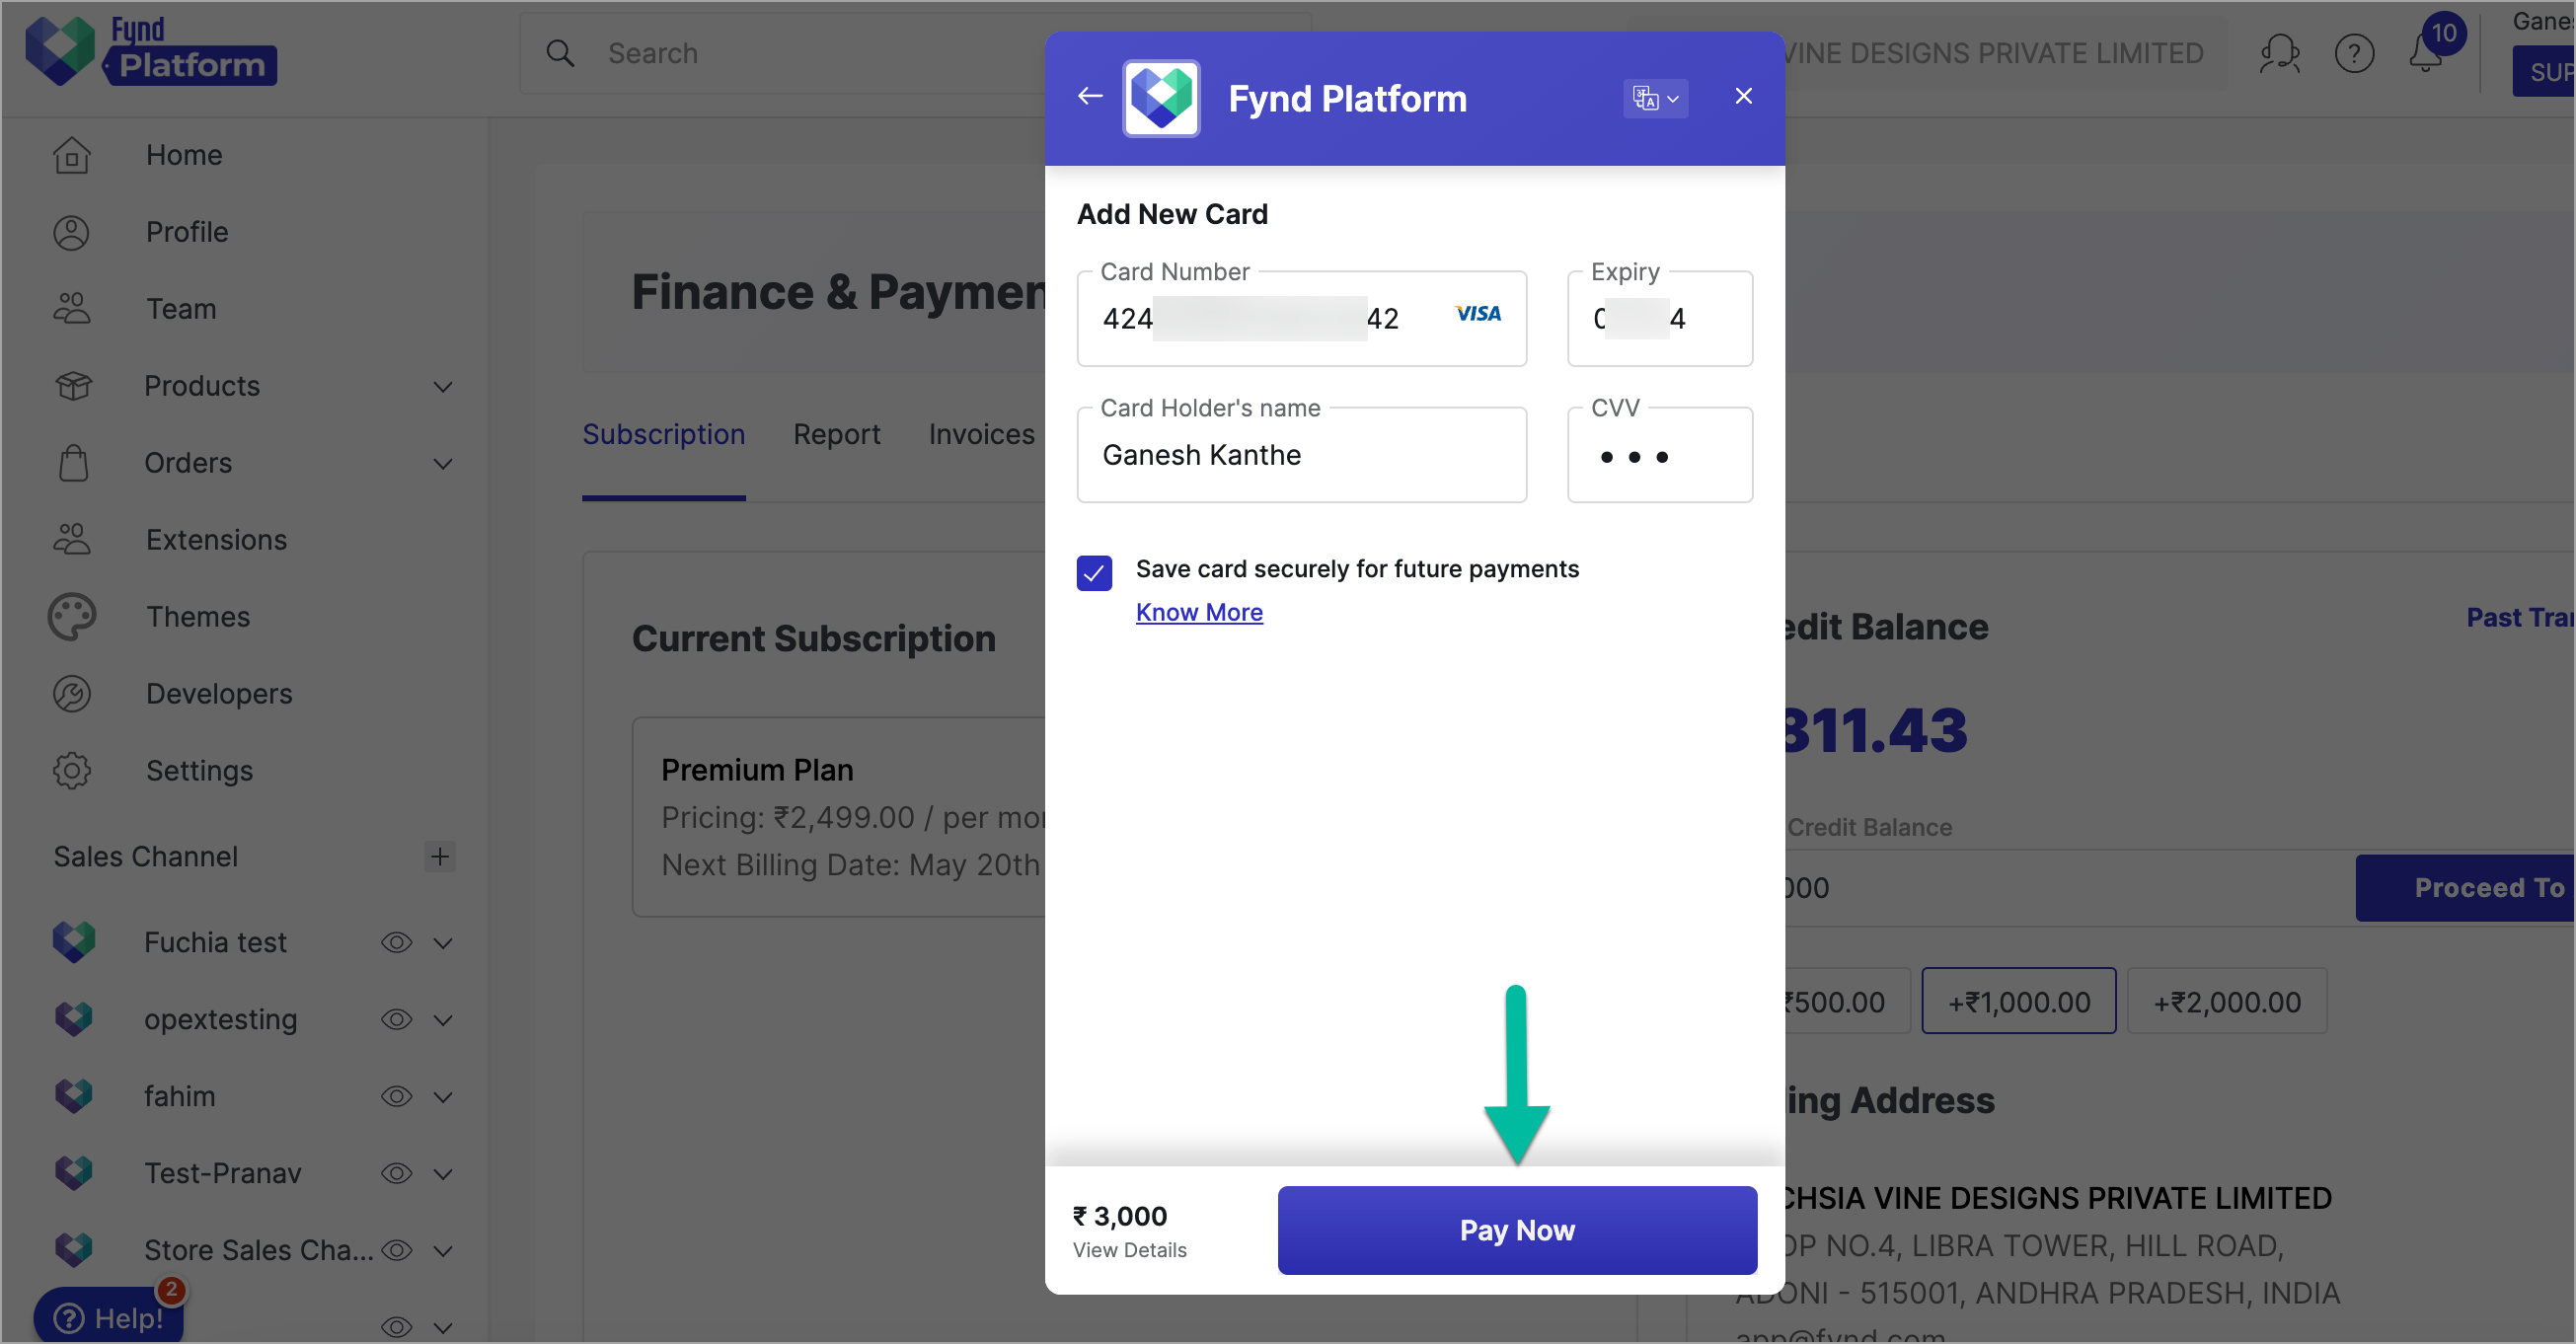
Figure 9: Clicking Pay Now Button
In this way, your credit balance is added successfully.
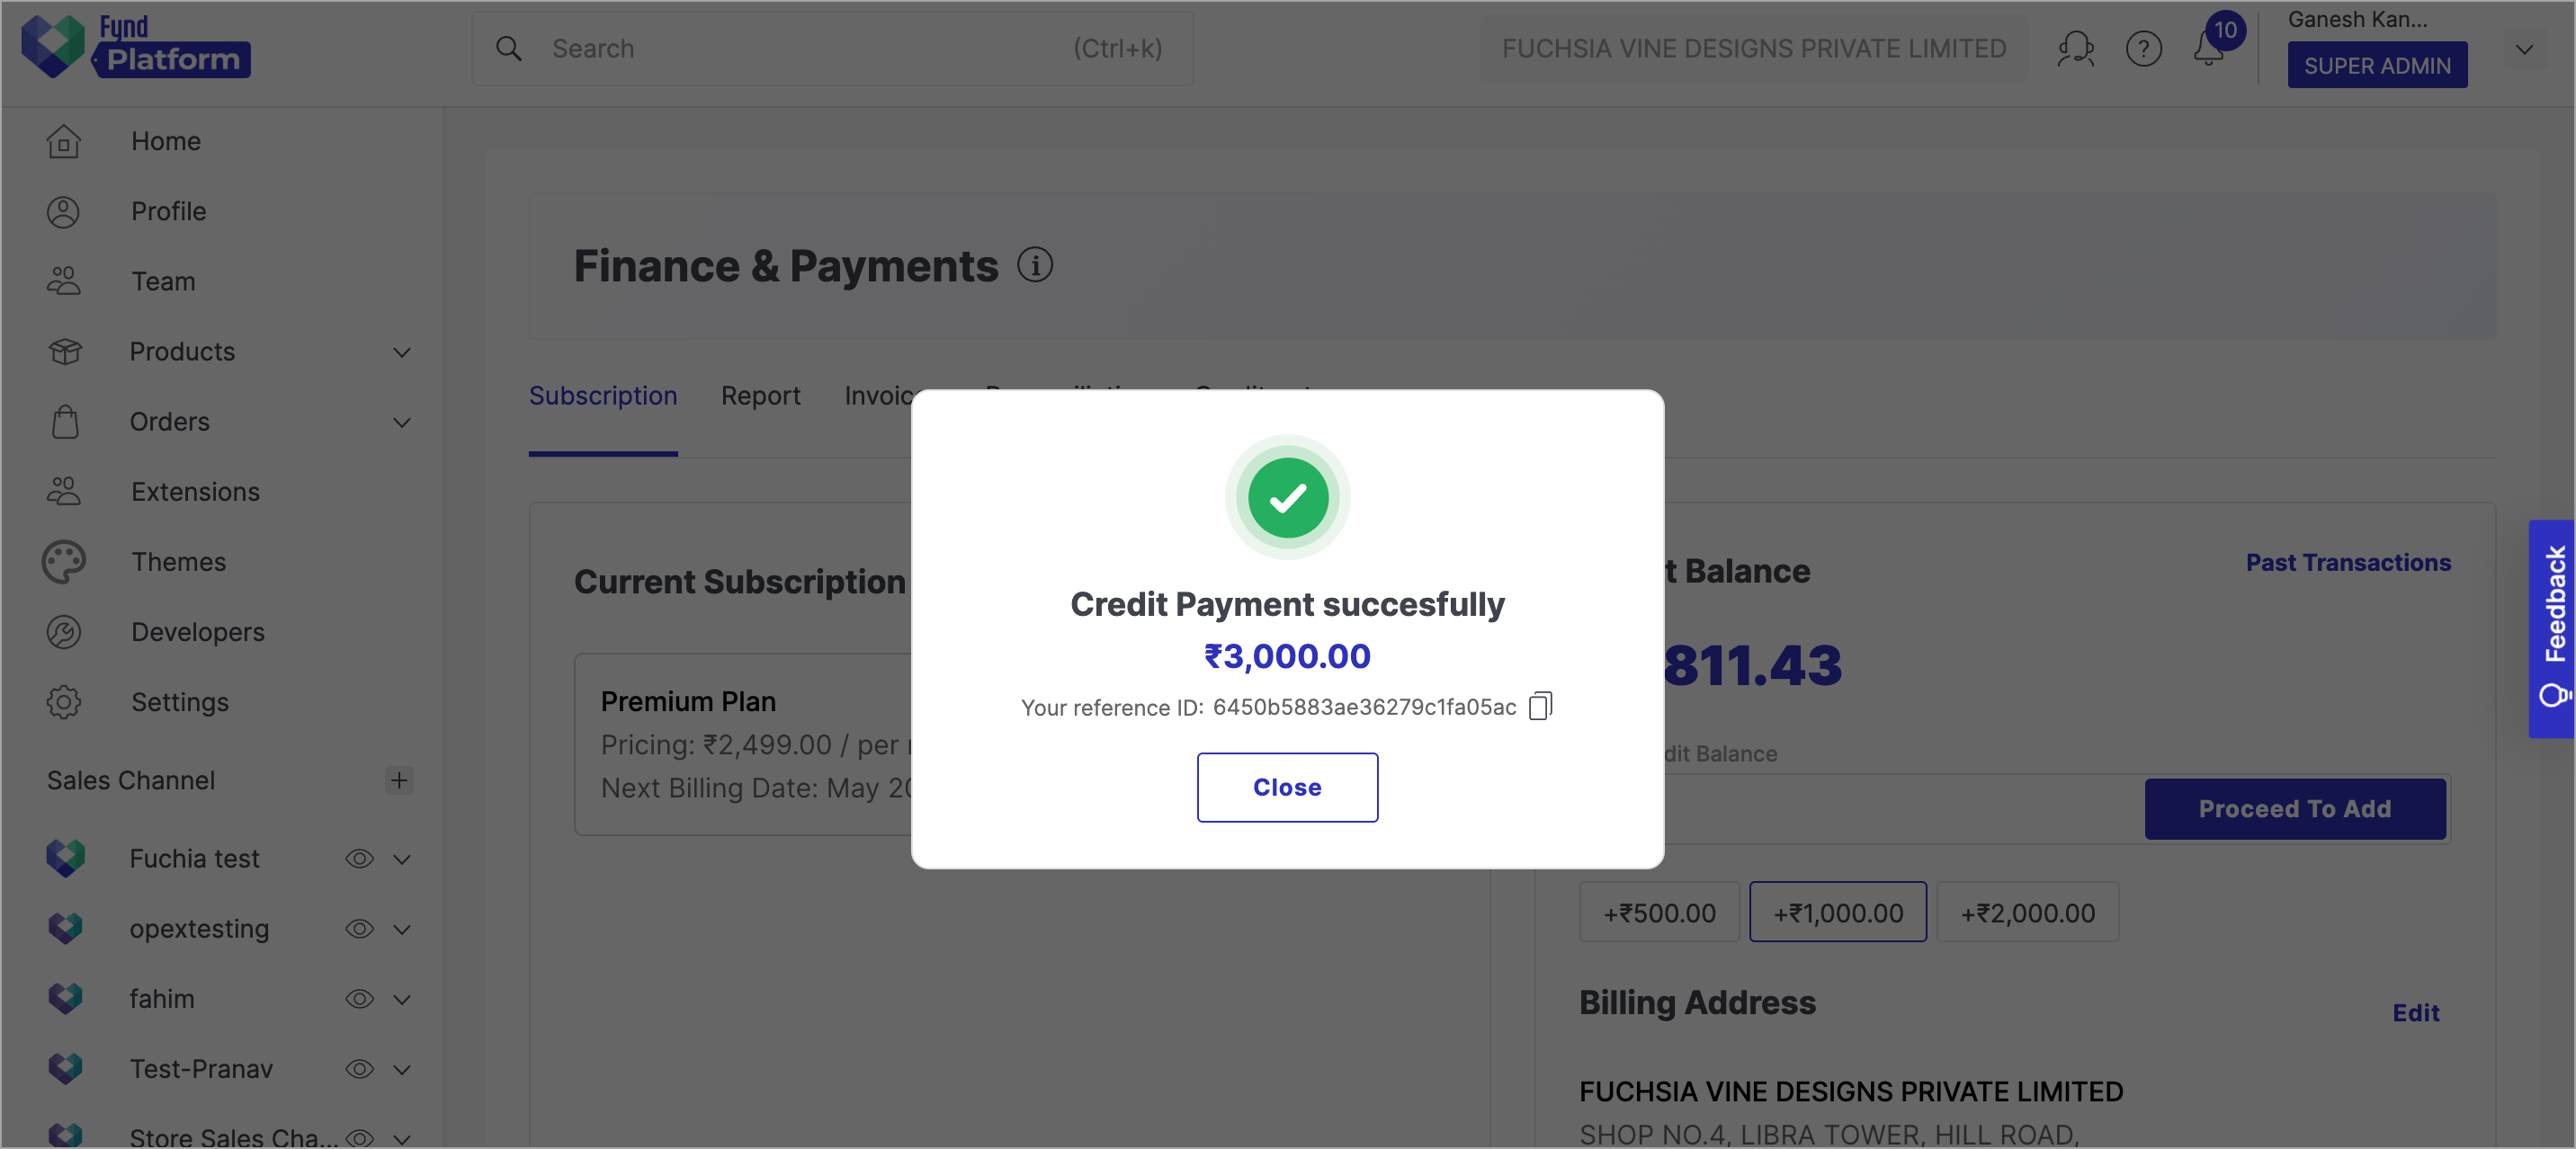
Figure 10: Credit Payment Successful
Activate a Subscription Plan
If you fail to subscribe to a plan before the end of your trial plan, your company on Fynd Platform will be blocked with immediate effect.
-
Click on Subscription.
-
Click on Activate Plan in Current Subscription window.

Figure 11: Clicking Activate Plan Button
-
Click on Subscribe by selecting a particular plan depending on your needs.
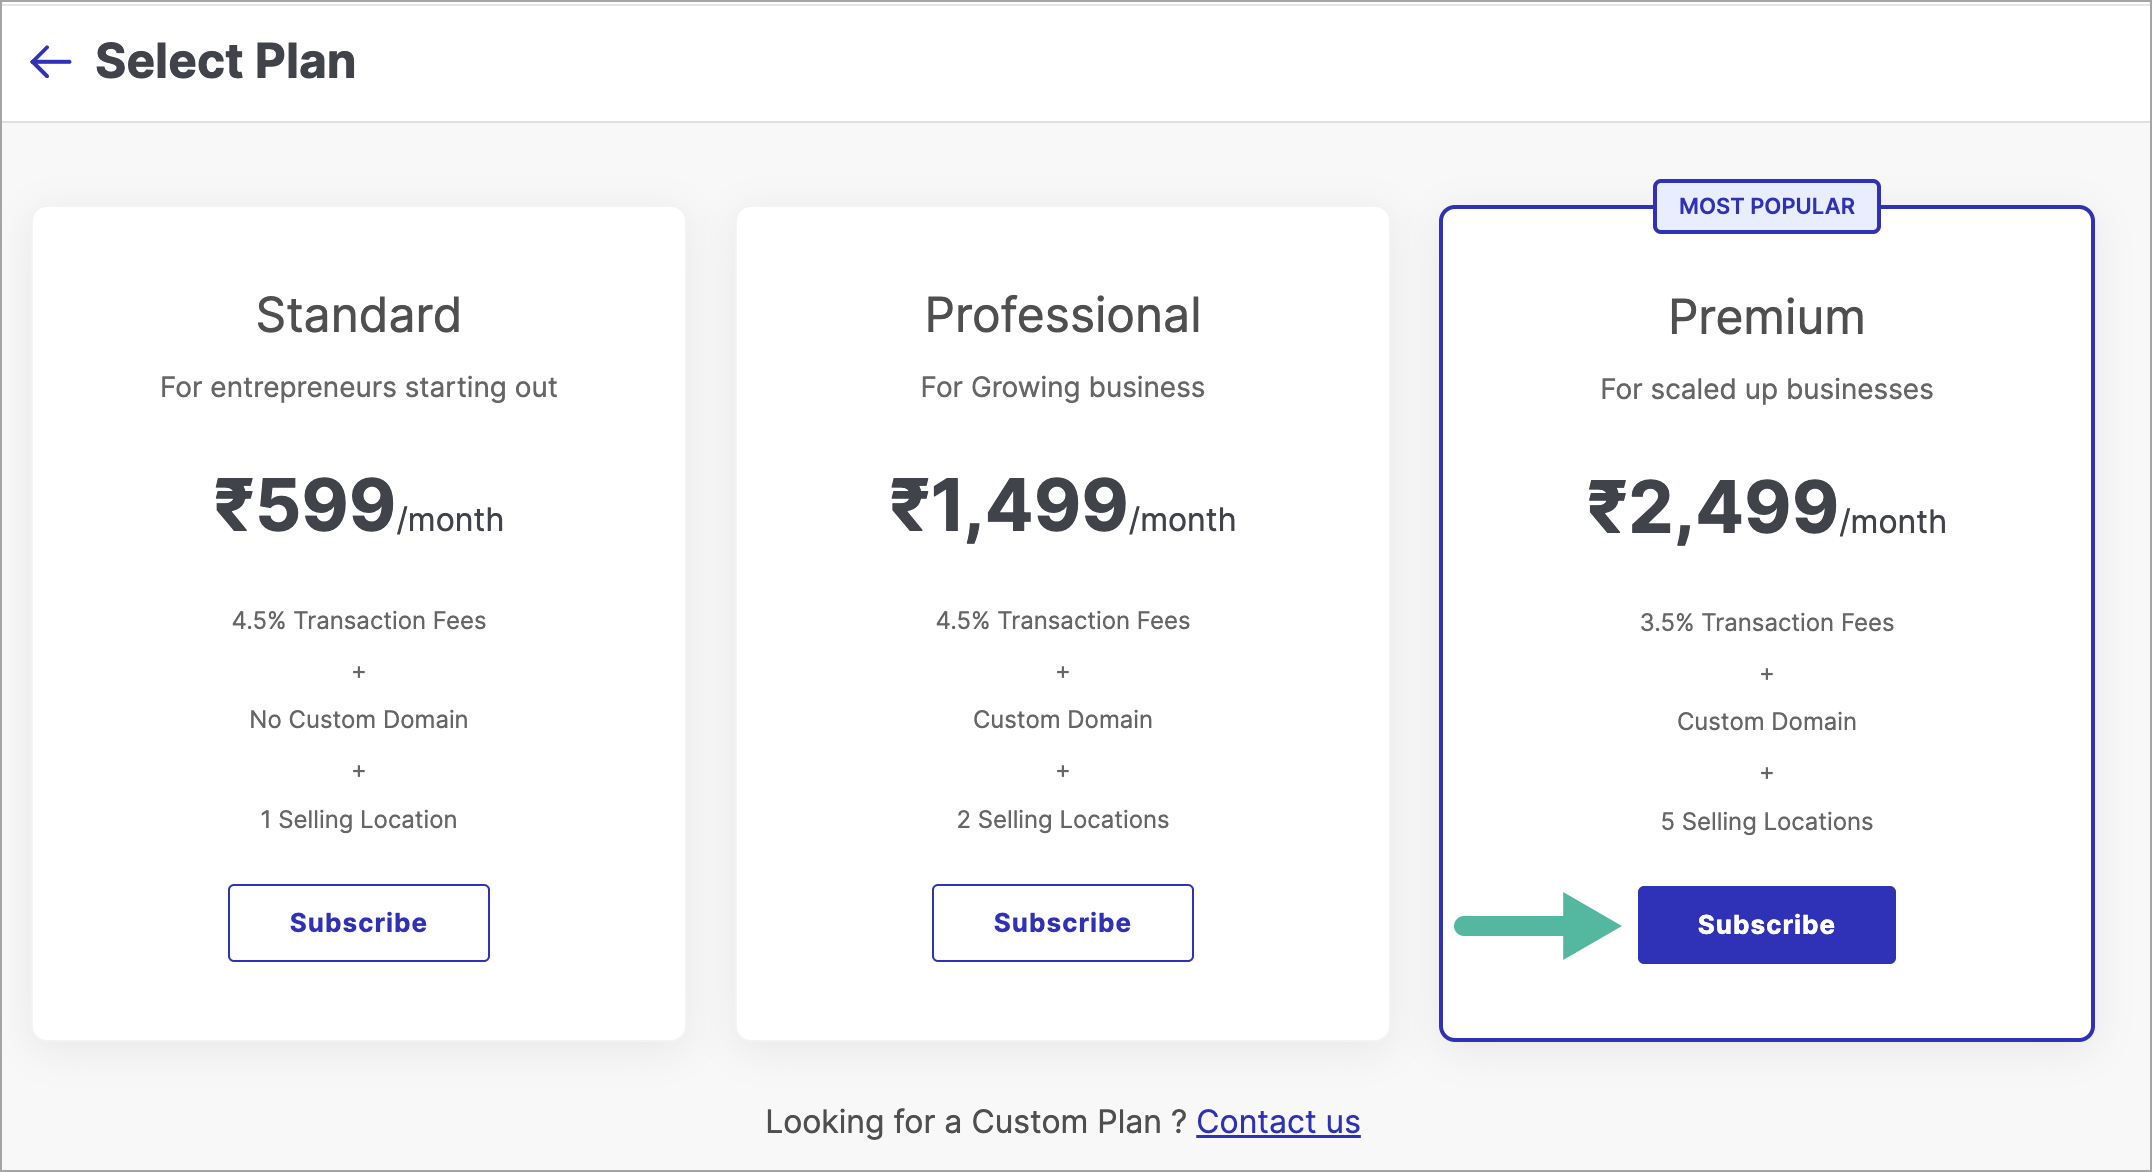
Figure 12: Choosing a Plan
-
You can make payment using the following approach:
In this example, we have used credit card.
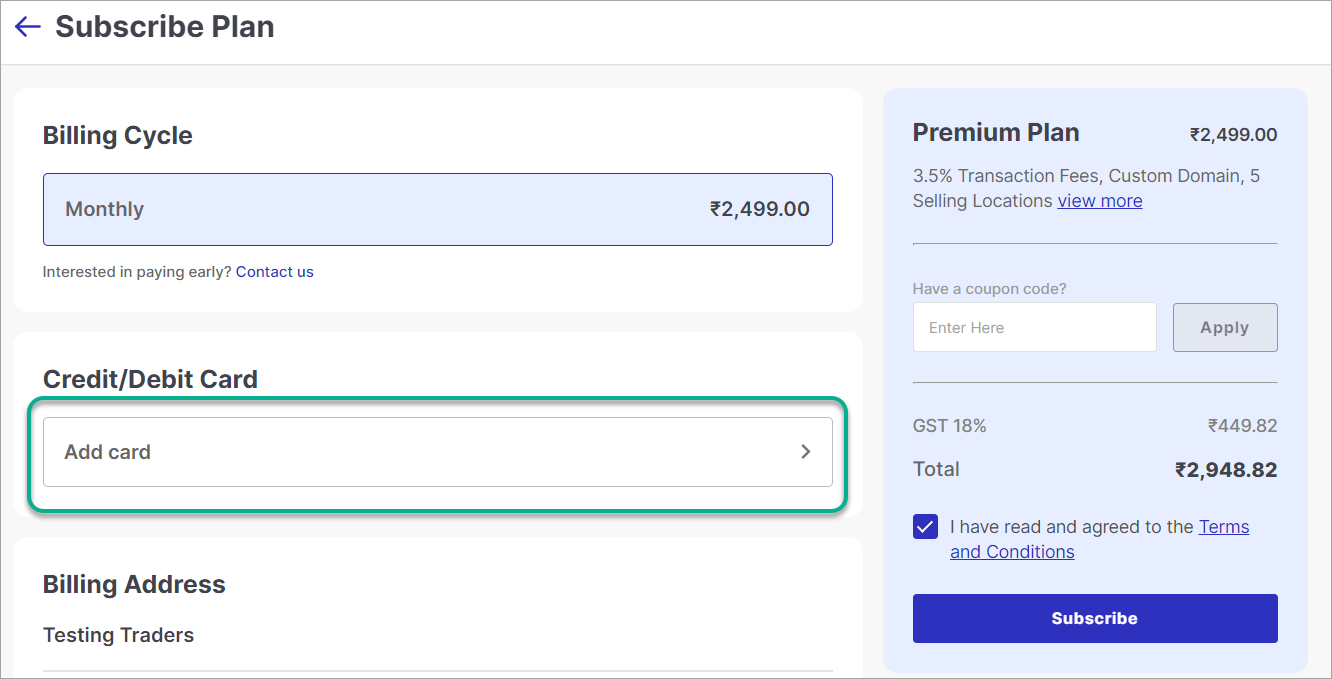
Figure 13: Using Credit Card Option
noteCredit Balance option will be disabled if you have insufficient credit balance.
-
Click on view more in plan card present on the right-side of the page. It shows you the features supported in the selected plan.
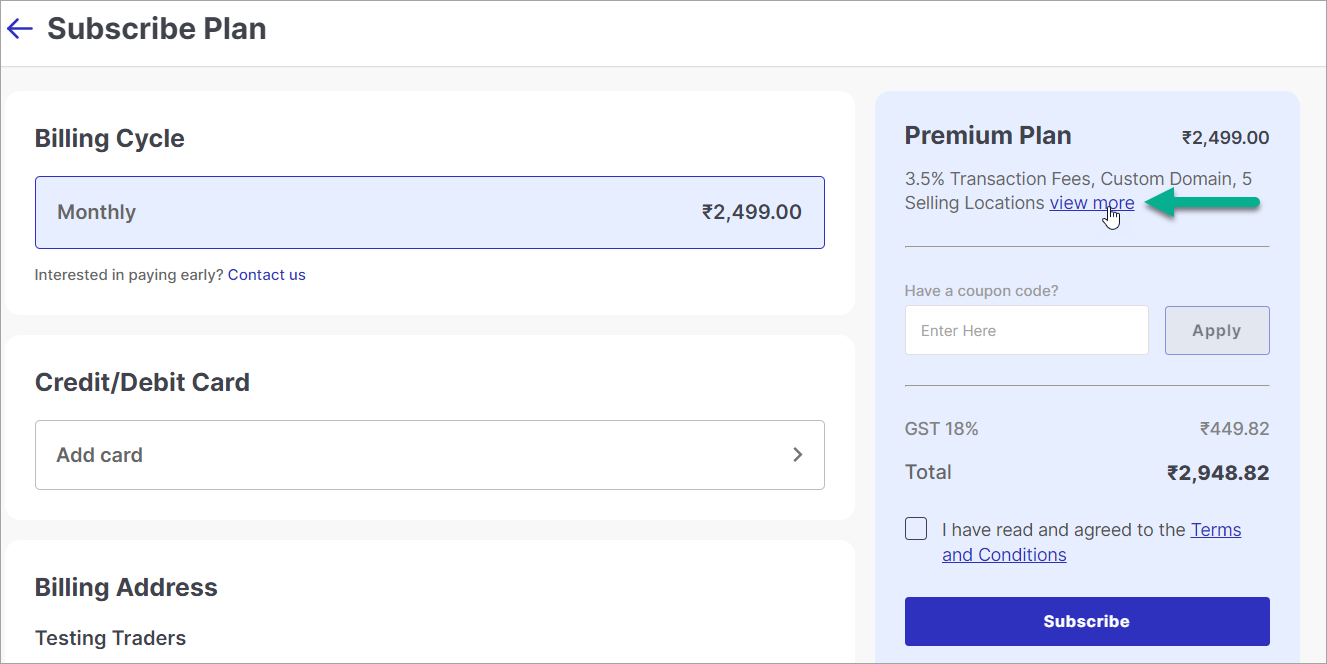
Figure 14a: Clicking View More Option
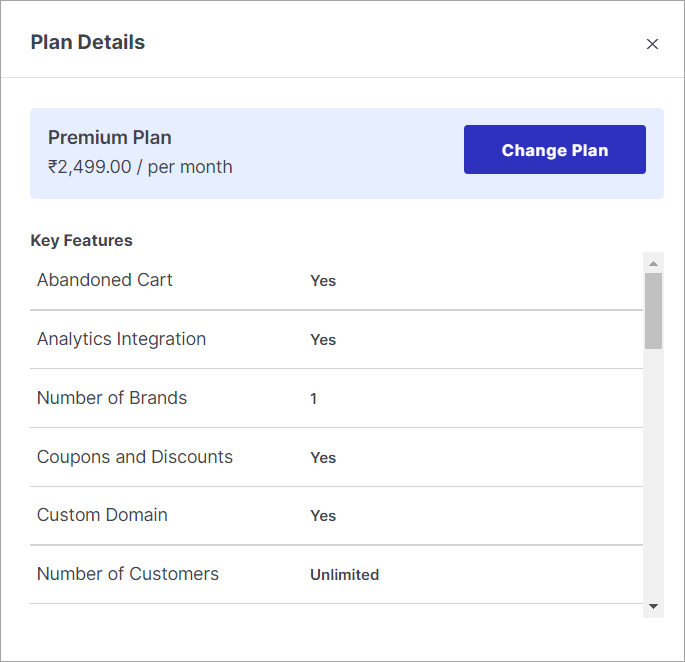
Figure 14b: Plan Details
-
Click on Terms and Conditions checkbox in plan card to accept the terms and conditions of Fynd Platform.
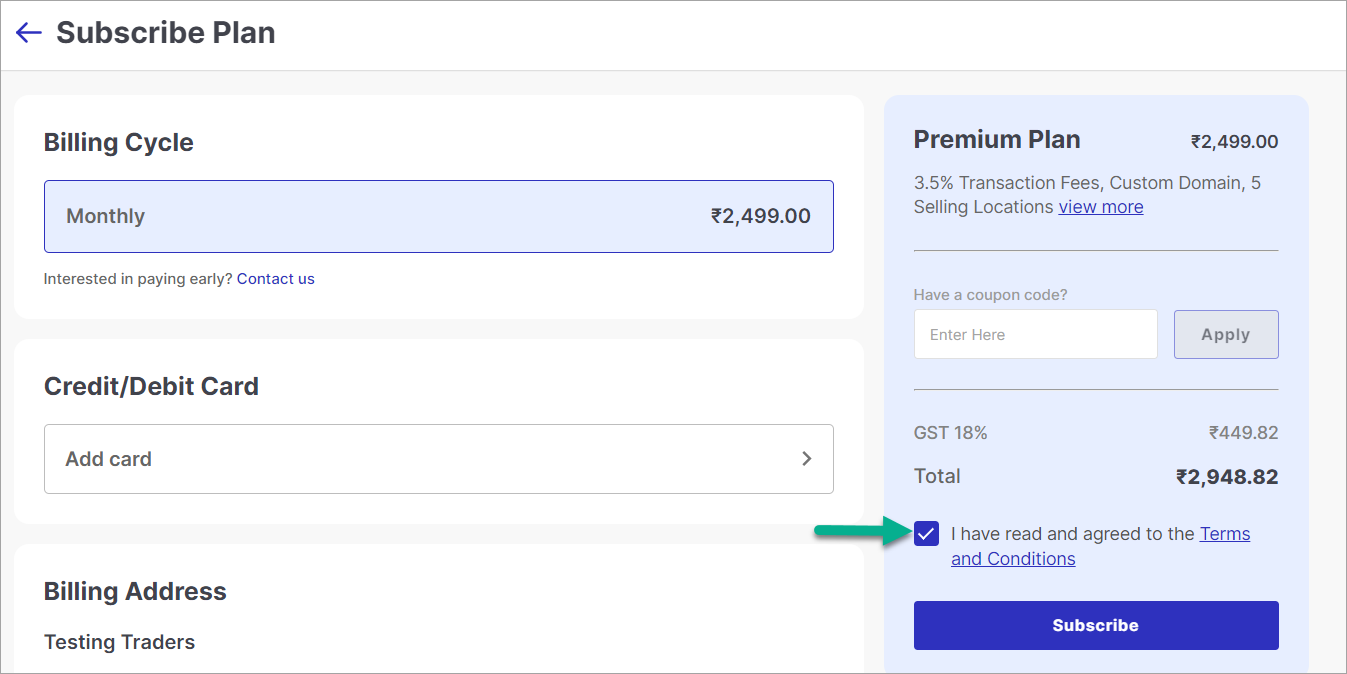
Figure 15: Terms and Conditions
-
Click the Subscribe button. You will see the acknowledgement page upon successful subscription.
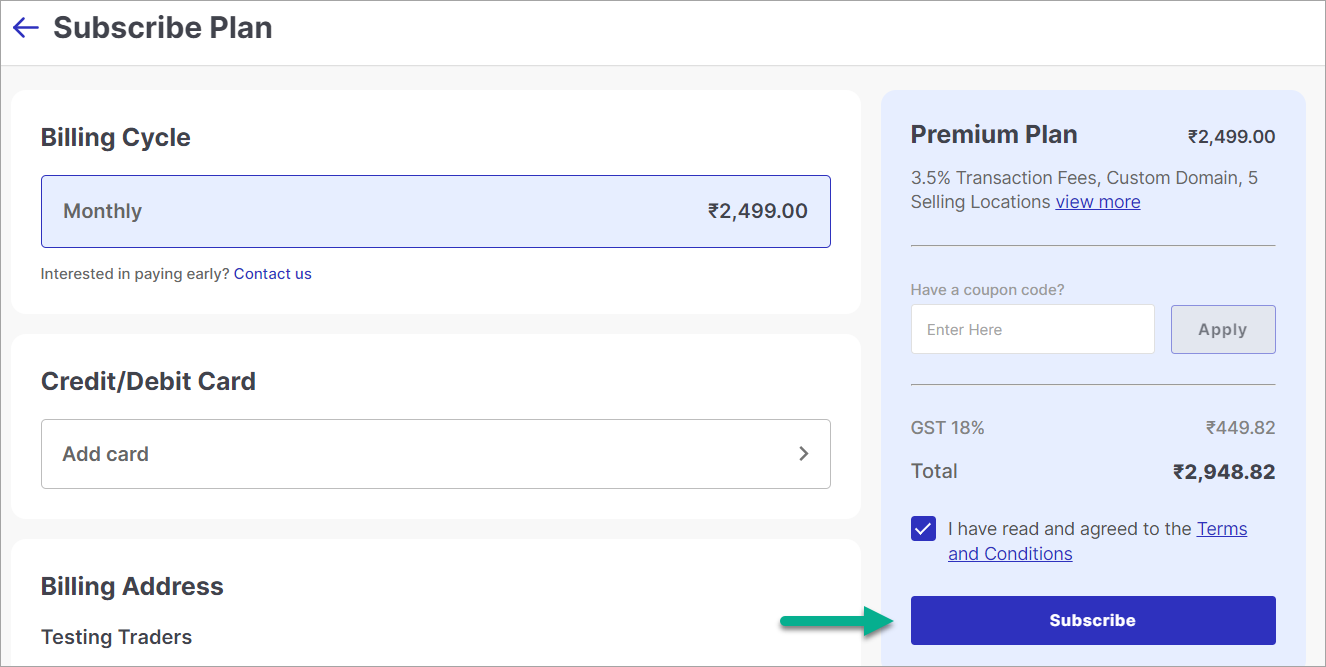
Figure 16: Clicking Subscribe Button
Activate Customized Subscription Plans
Sellers can opt for plans tailored to their preferences and business requirements, negotiated with the account manager. These plans offer specific features along with a designated commission rate.
Users have the choice between standard plans and the option to collaborate with the Fynd platform team (Account Manager) for a personalized plan, ensuring a tailored subscription experience aligned with their unique needs.
Subscription Plan Management Workflow:
- The Admin team creates and deploys new subscription plans, which are displayed on the Fynd Platform's home screen.
- Click "View Plans" on the home screen to find these plans.
- Merchant can subscribe to plans from the list of available options.
Change a Subscription Plan
-
Go to main page Finance & Payments.
-
Click on Change Plan in Current Subscription window.
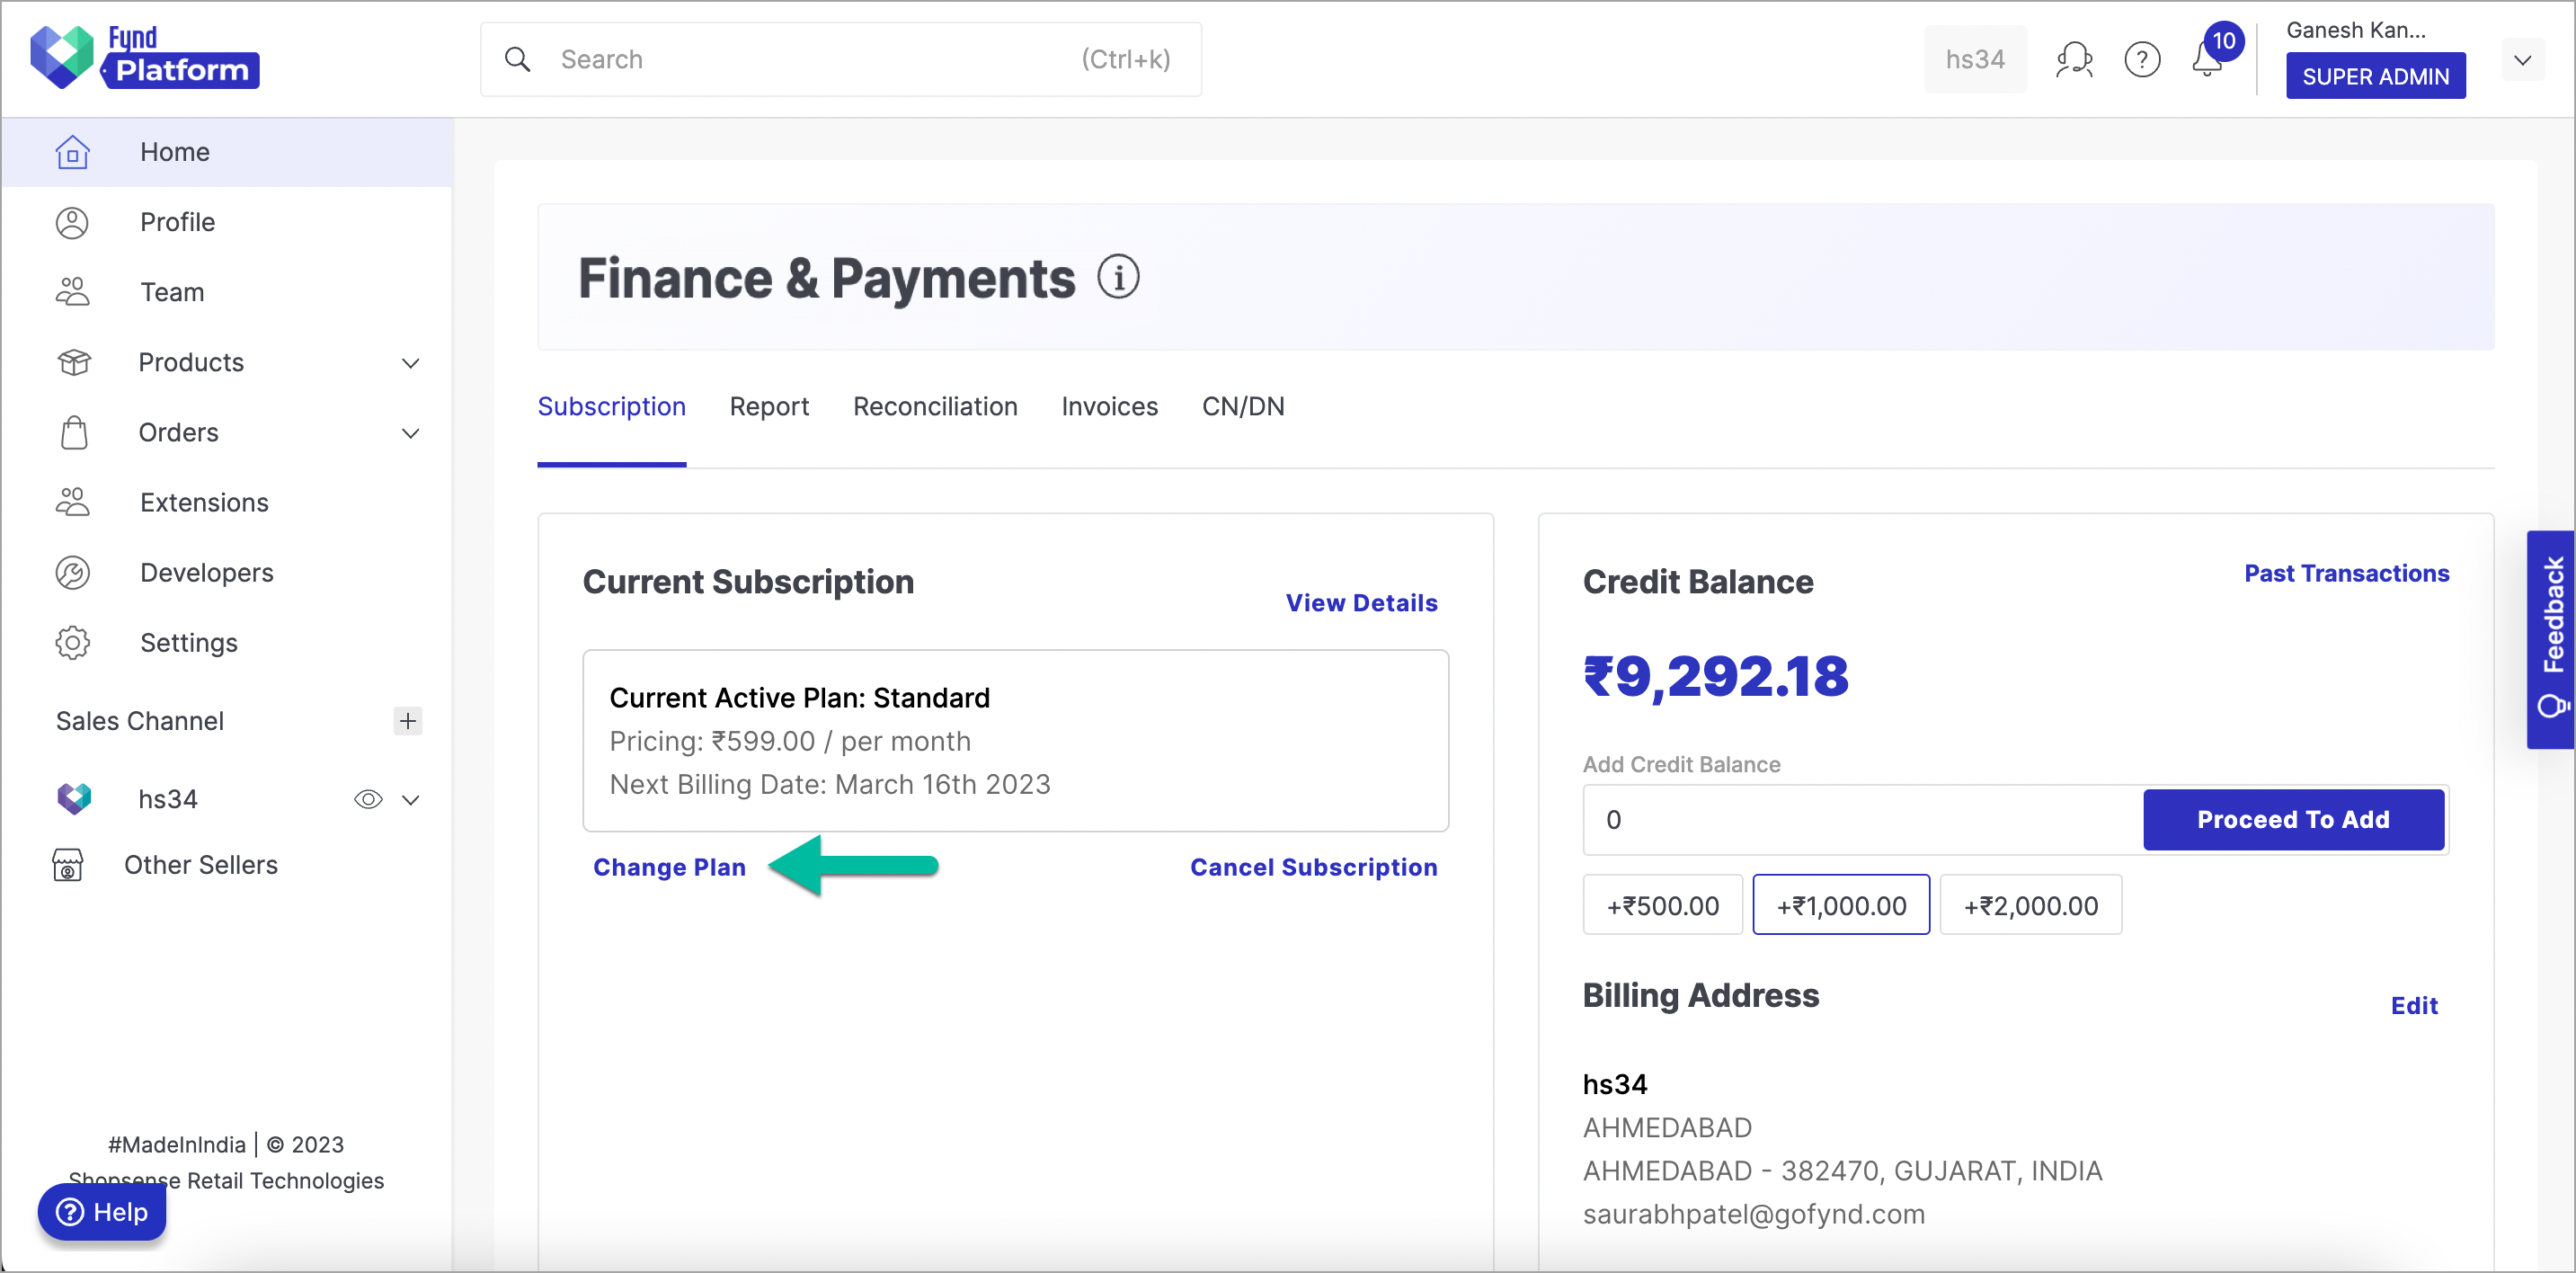
Figure 17: Clicking Change Plan Option
-
Click on Subscribe by selecting a particular plan depending on your needs.
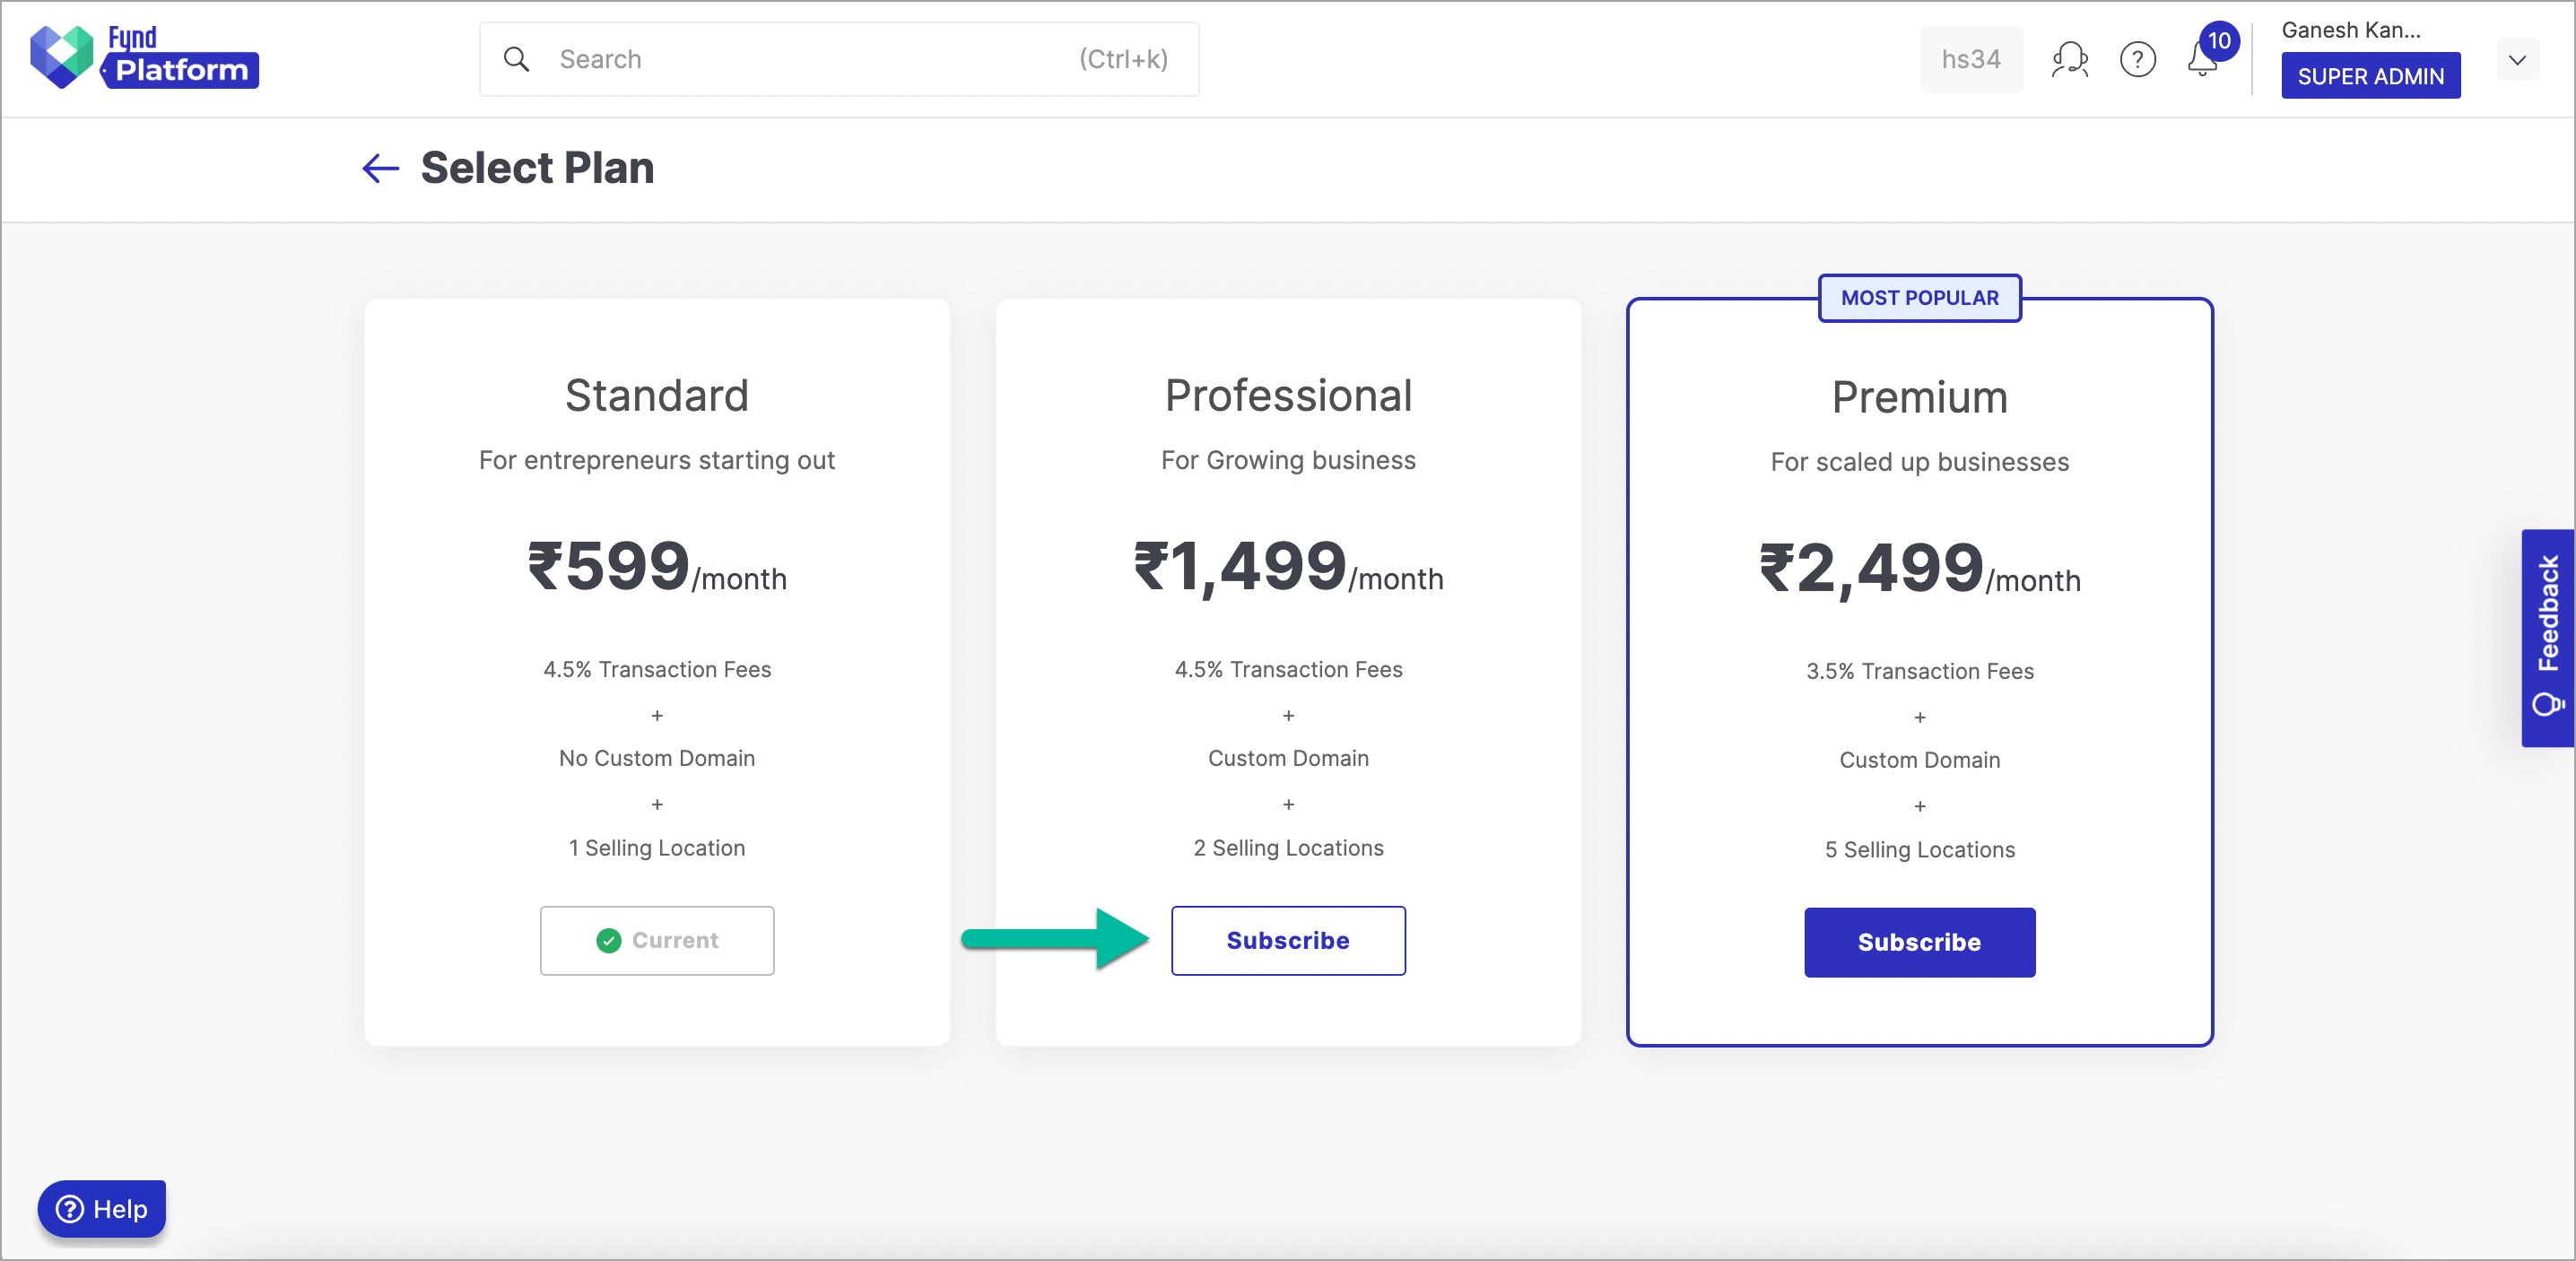
Figure 18: Choosing a Plan
-
You can make payment using the following approach:
In this example, we have used credit balance.
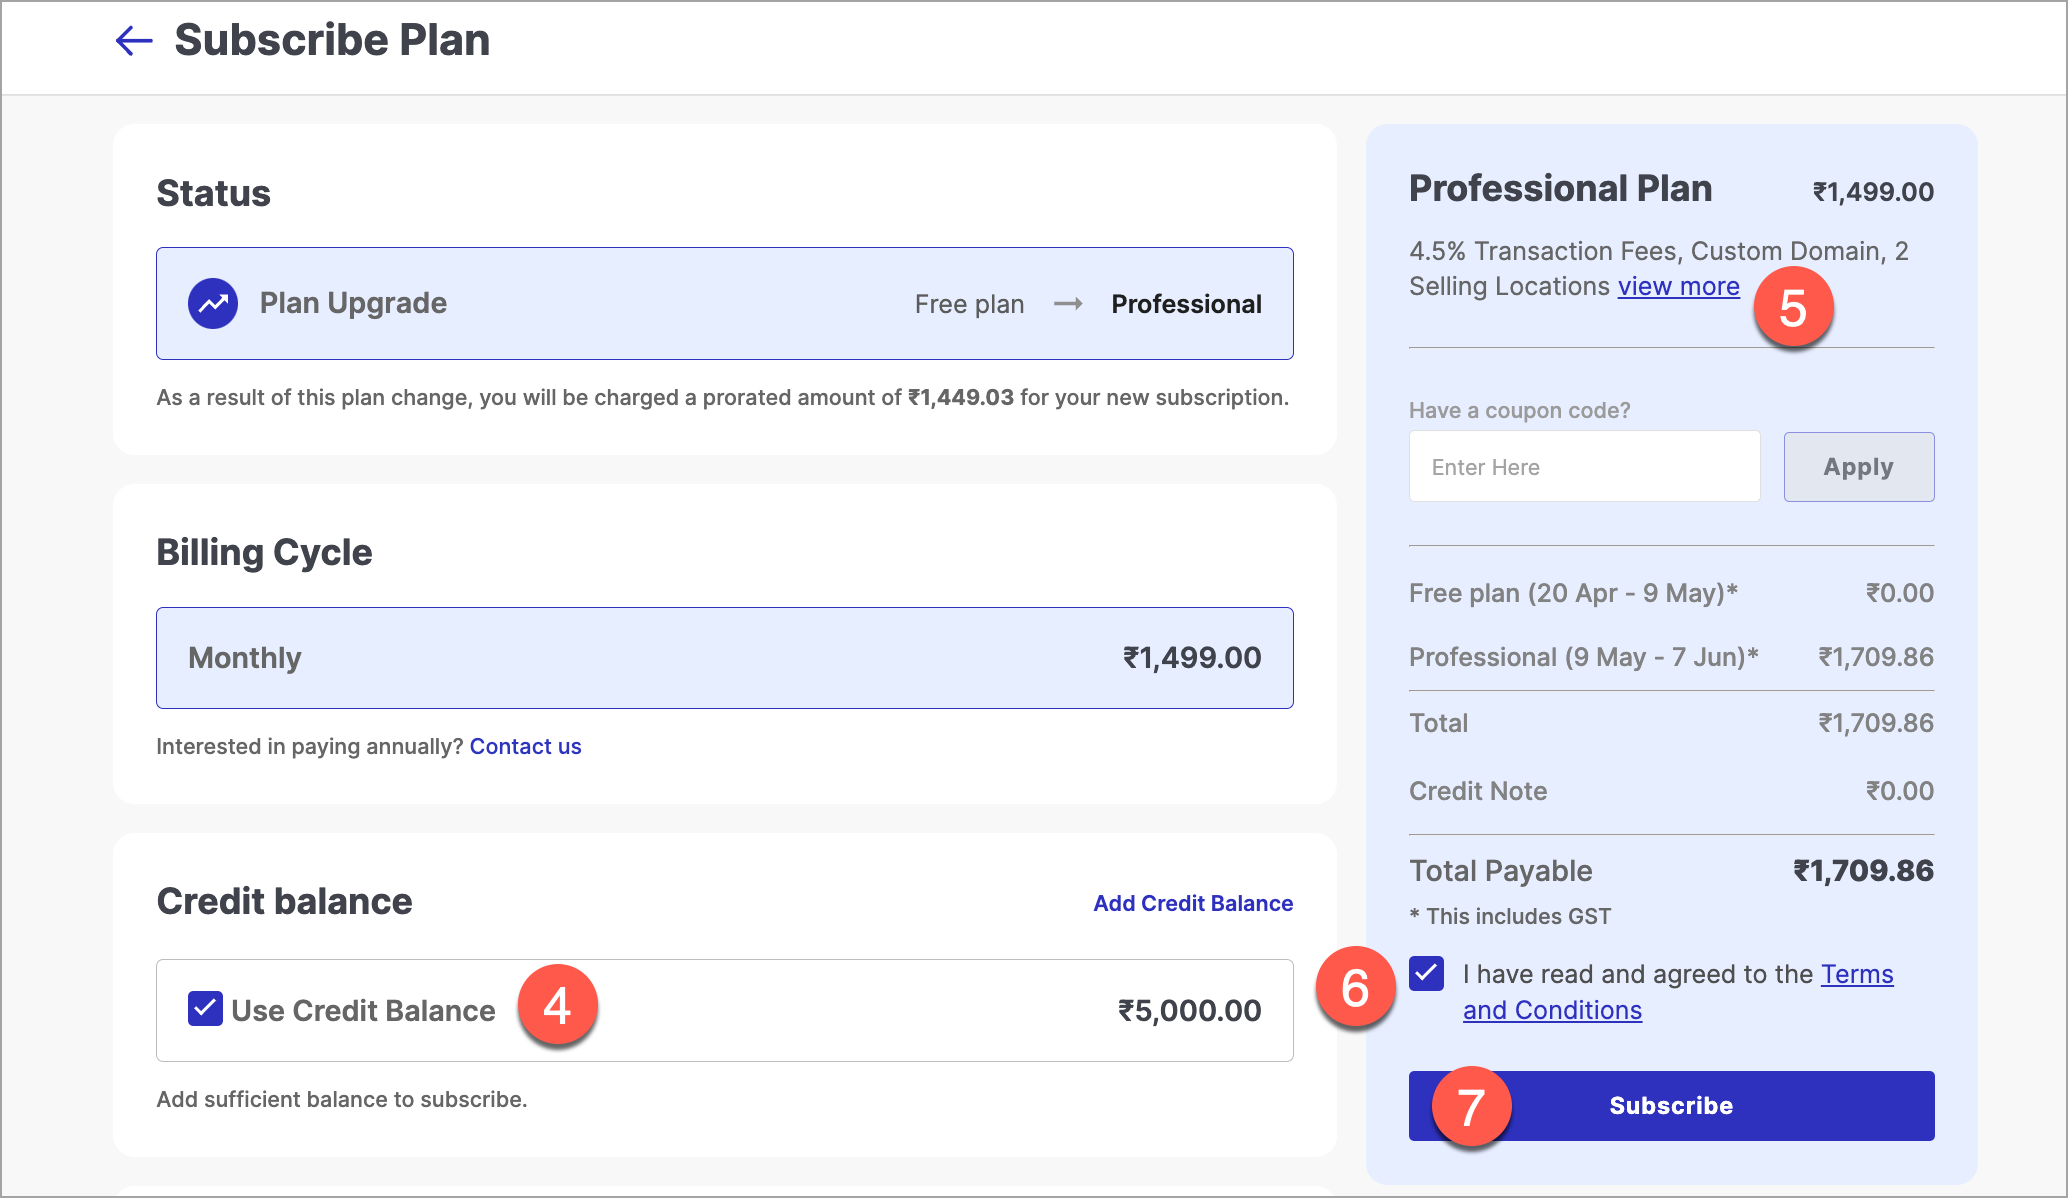
Figure 19: Subscribing to a Plan
noteCredit Balance option will be disabled if you have insufficient credit balance.
-
Click on view more in plan card present on the right-side of the page. It shows you the features supported in the selected plan.
-
Click on Terms and Conditions checkbox in plan card to accept the terms and conditions of Fynd Platform.
-
Click the Subscribe button. You will see the acknowledgement page upon successful subscription.
Cancel a Subscription Plan
-
Go to main page Finance & Payments.
-
Click on Cancel Subscription in Current Subscription window.
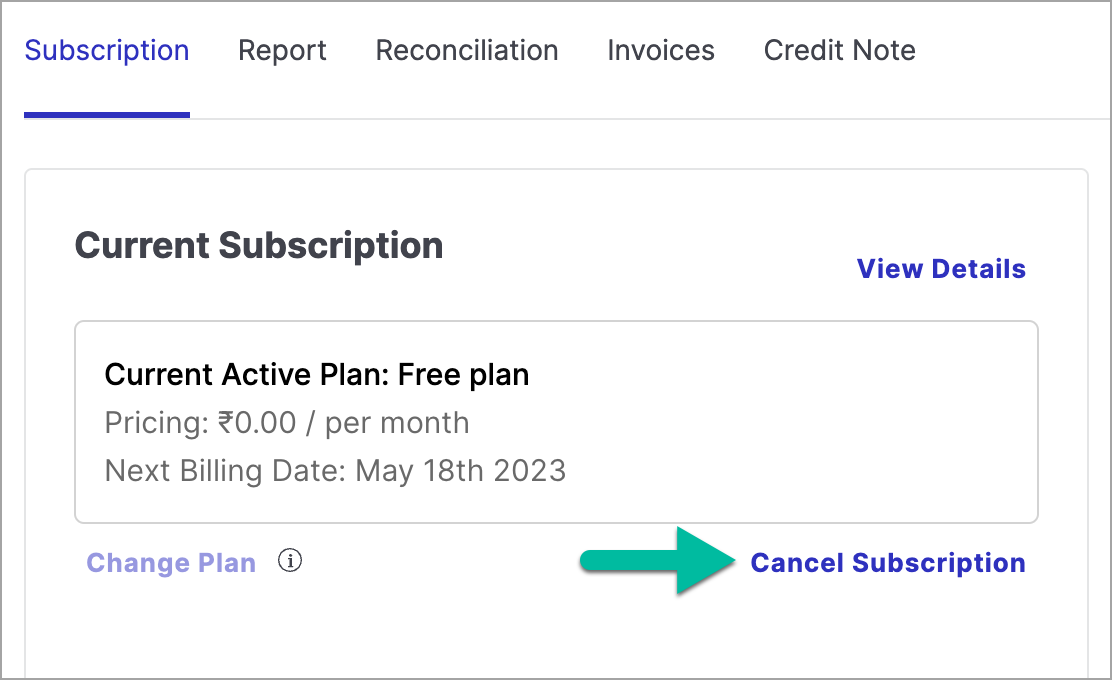
Figure 20: Clicking Cancel Subscription Option
-
Click on Contact support in Cancel Subscription window.
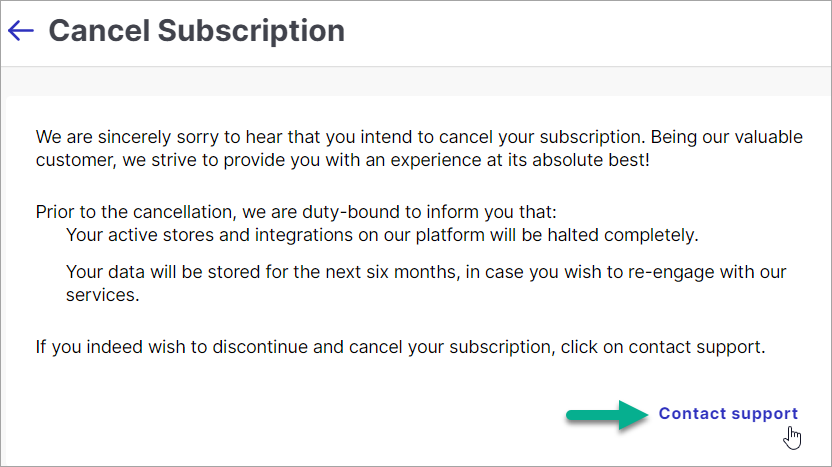
Figure 21: Clicking Contact Support Option
-
Connect with contacts mentioned under Support Managers section to cancel your subscription.
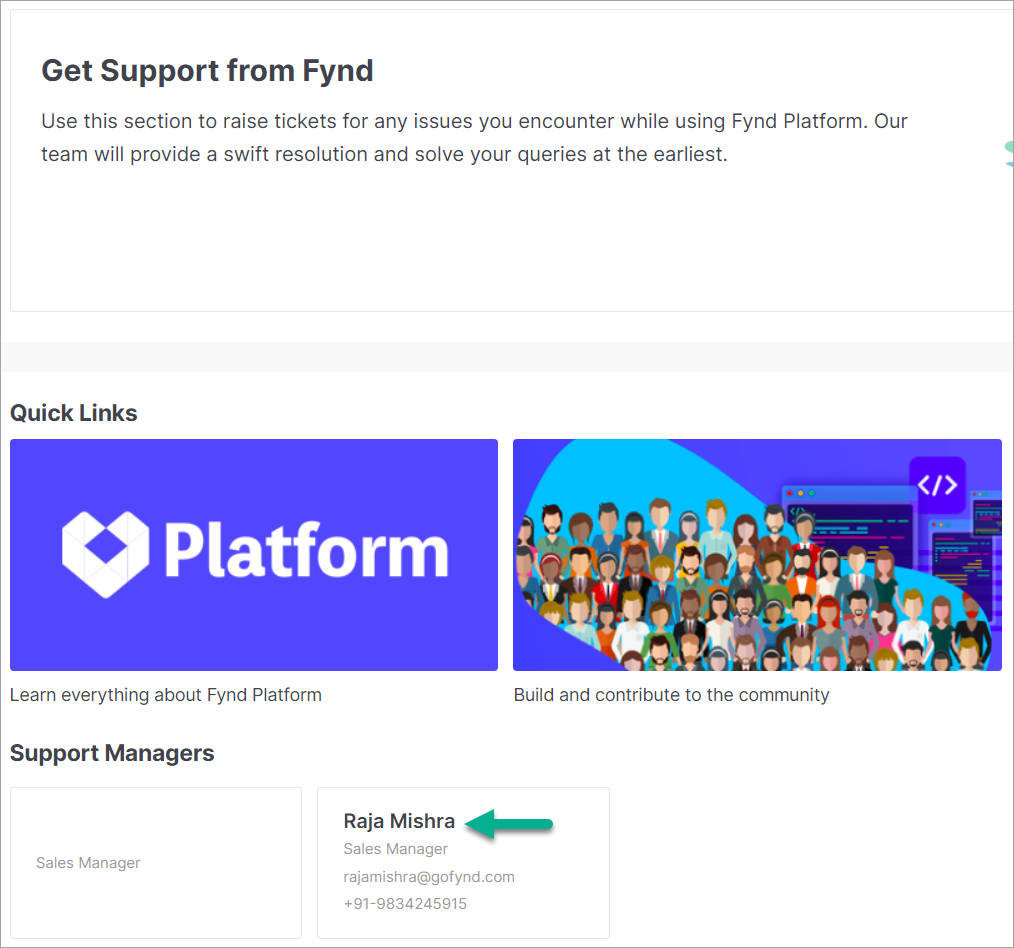
Figure 22: Contact Details of Support Managers
Methods to Pay for Subscription
Credit Balance
Use the credit balance option to make subscription payments. Please maintain a sufficient amount in your credit balance on Fynd Platform. If you have insufficient credit balance, follow the simple steps mentioned in section Add Credit Balance to top-up.
Credit/Debit Card
Add credit/debit cards for making transactions.
-
Click on Add Card of Cards section in Subscribe Plan window.

Figure 23: Clicking Add Card Button
-
Enter card details like 16-digit Card number, Card expiry, Card CVV, Name on card, and Email (Refer Figure 24).
-
Tick the checkbox (Refer Figure 24) to accept the e-mandate.
-
Verify the details and click Save Card.
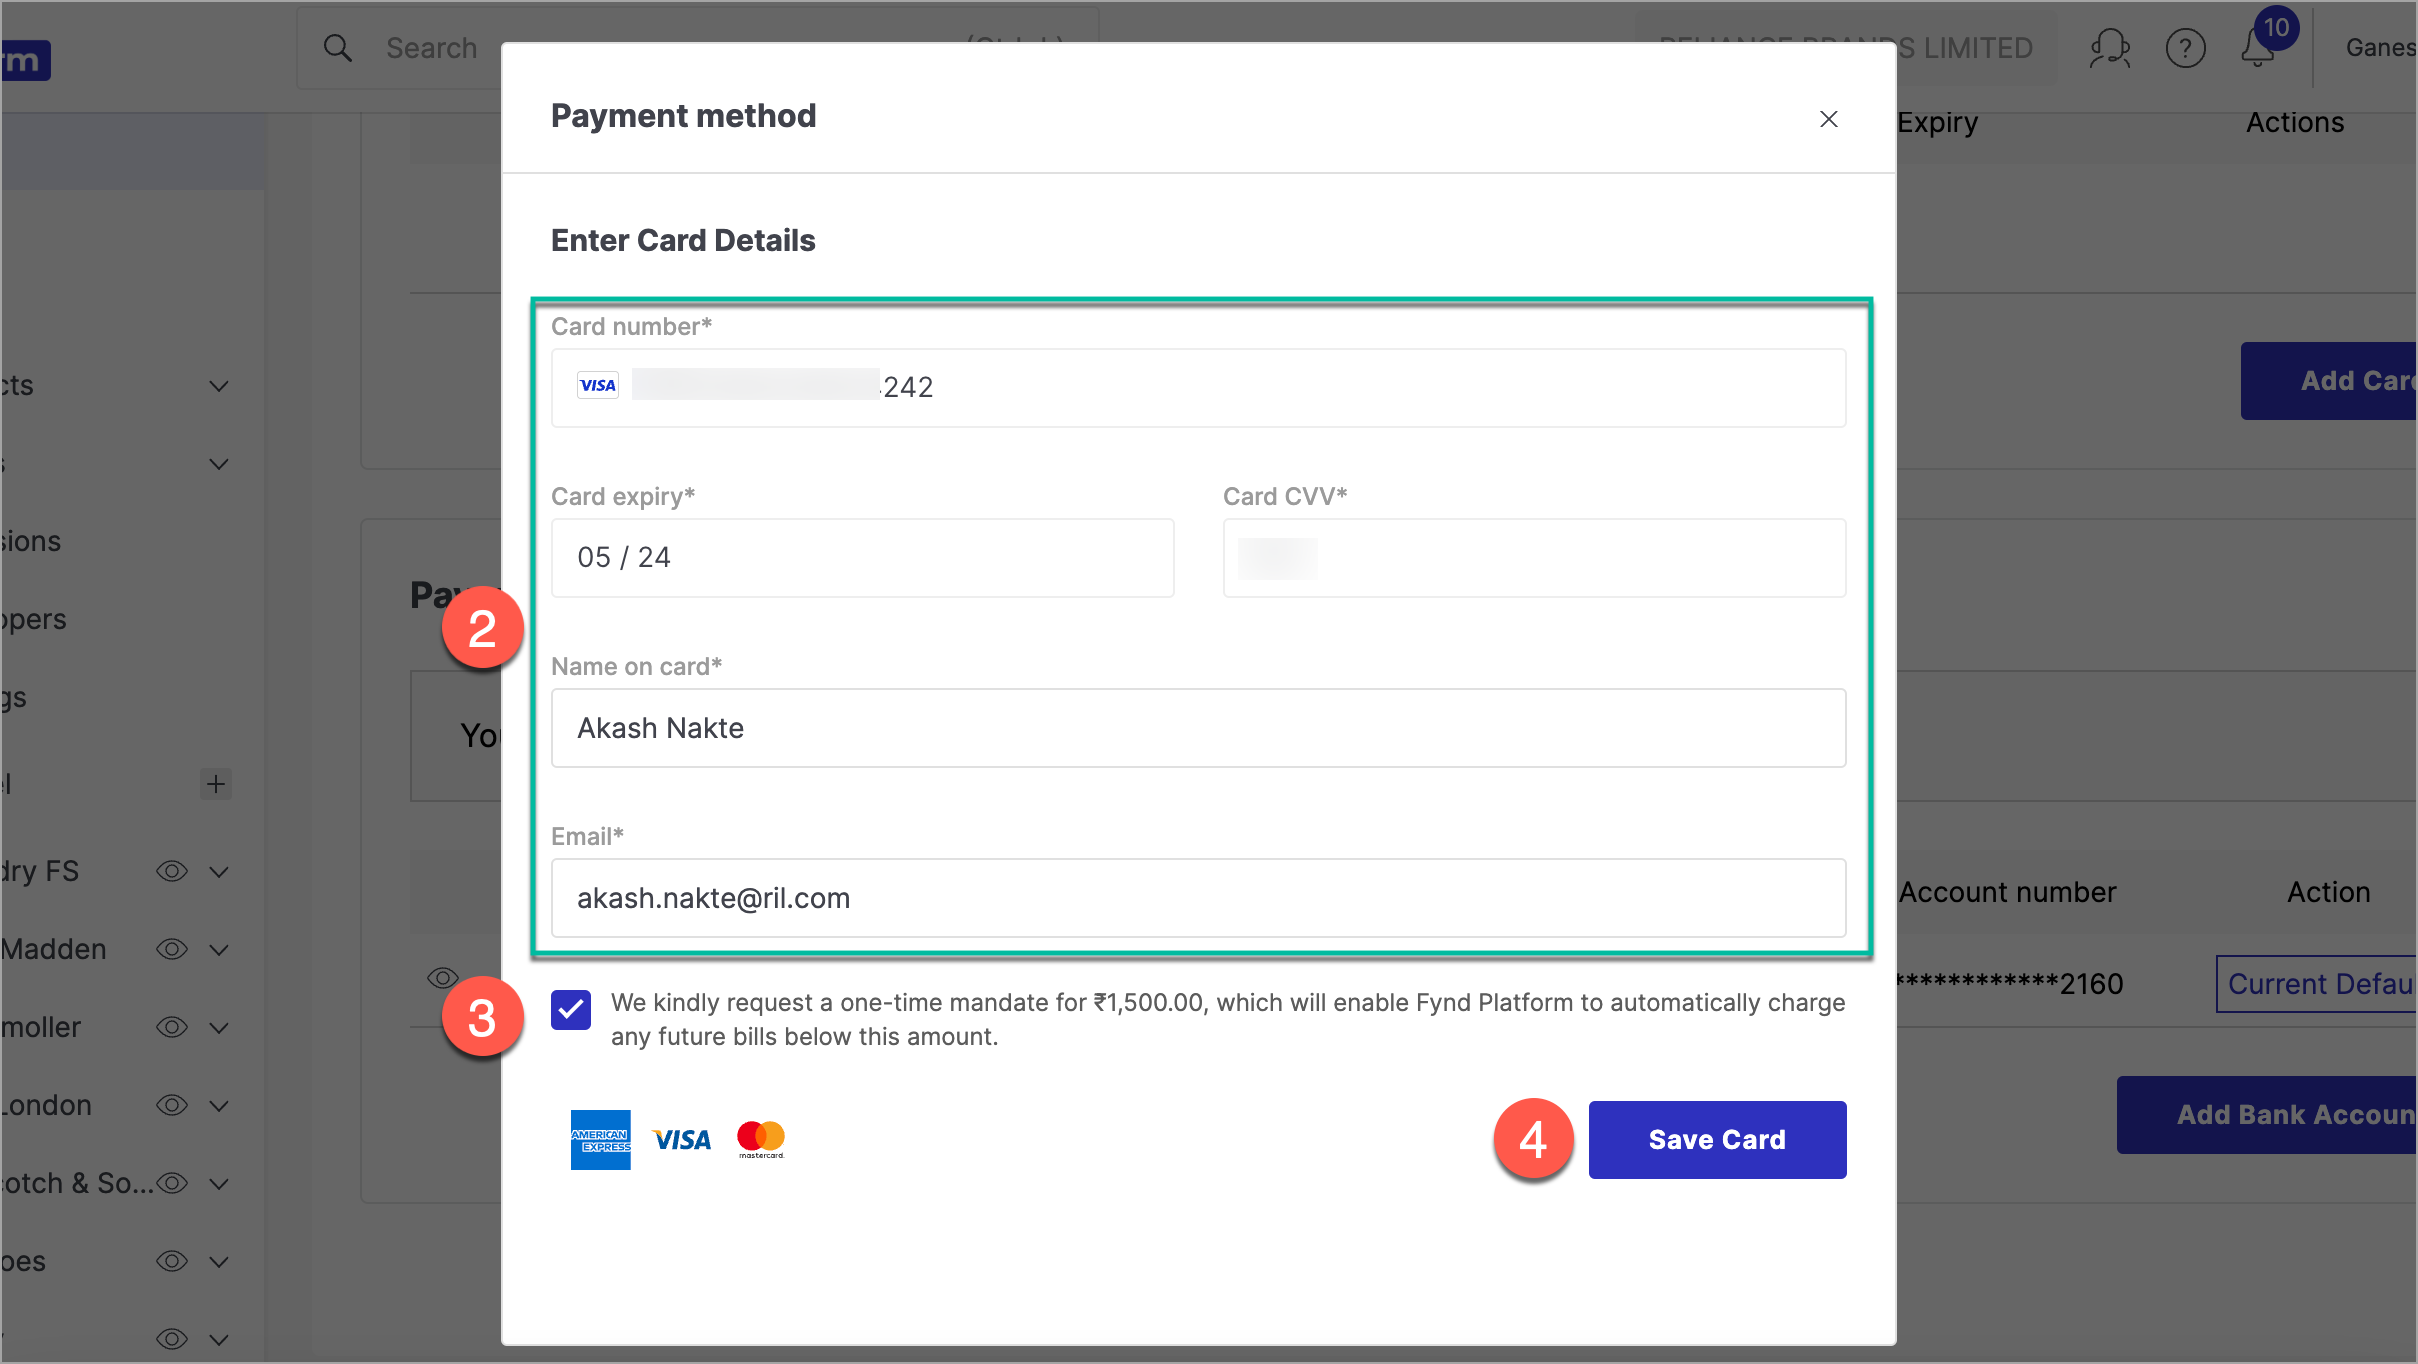
Figure 24: Adding Card Details
Add Bank Details for Receiving Payouts
Enter bank details to receive sales earnings.
-
On the Subscription page, click on Add Bank Account.
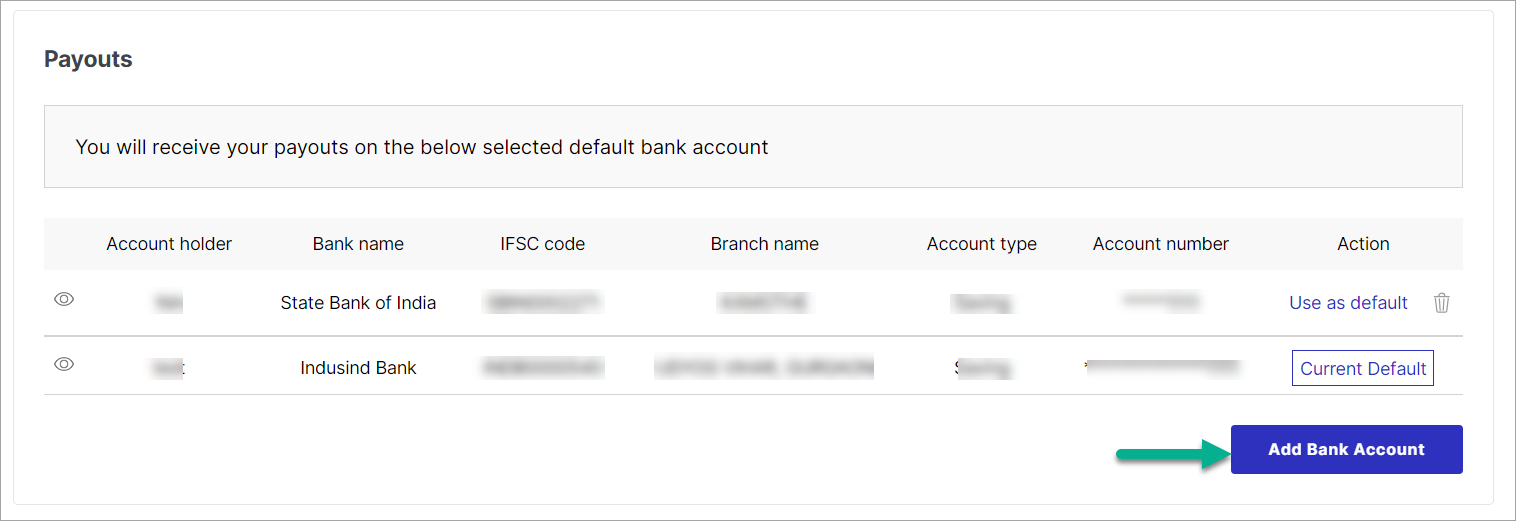
Figure 25: Clicking Add Bank Account Button
-
Enter bank details and click on Add bank account.
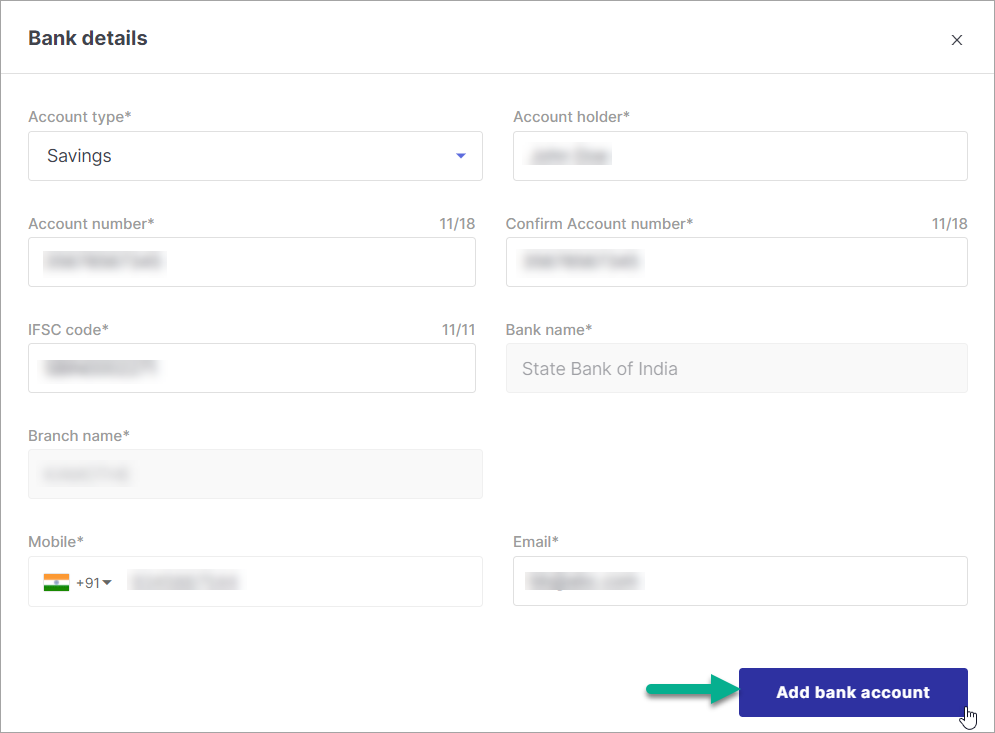
Figure 26: Adding Bank Account Details
Here, bank account is added successfully.
If you add multiple accounts, you will get an option to choose the default one for receiving payouts.
View and Download Reports
Go to Reports tab in main page Finance & Payments.
![]()
- Select a desired Report Type from the dropdown.
- Select Brand (optional).
- Select Channel (optional).
- Click on Generate. In this way, you can view and save the report(s) on your machine for your informtion.
View and Download Reconciliation
In ecommerce, reconciliation is the process of comparing and matching financial data between two parties, such as between a seller and an ecommerce platform, to ensure that all transactions and payments are correctly recorded.
Reconciliation Terminologies
- Recon Date - It is the date at which a forward order (considering returnable period of order in forward journey) or a return order is completely processed. Here, a reconciliation is initiated in seller's Fynd Platform panel.
- Settlement Date - It is the last day of reconciliation cycle. For example, if it is 5-day reconciliation cycle and reconciliation was done on Apr 12, 2023 then Settlement Date would be Apr 15, 2023. On similar lines, if Recon Date was May 04, 2023, the Settlement Date would be May 05, 2023.
- Payout Date - It is the date at which reconciliation payment is received by Fynd Platform or a seller from payment aggregator.
- Order Date - It is the date at which order has been placed by customer.
- Value of Good - The total value of the goods sold in the order, excluding any taxes, fees, or charges. It is calculated as (ESP - Tax applicable based on HSN).
- Transfer Price - The price at which the goods are transferred between the seller and Fynd Platform.
- Seller Sales Amount - The total amount the seller receives from the sale of goods in the order, excluding any commissions, fees, or charges.
- Commission % - The percentage of commission charged by Fynd Platform on the sale of goods.
- Flat Delivery Fee - A fixed fee charged by Fynd Platform for delivering the order to the customer. For example, logistics fee
- Flat COD Fee - A fixed fee charged by Fynd Platform for COD orders.
- Commission Amount - The total amount of commission charged by Fynd Platform on the sale of goods (calculated as Commission % * ESP).
- Processing Fee Amount - A fee charged by Fynd Platform for processing the order, which includes payment gateway charges, order handling, and other operational costs.
- Closing Fee - A fee charged by Fynd Platform upon the completion of the order, which includes costs related to returns, refunds, and cancellations.
- Packaging Fee - A fee charged by Fynd Platform for packaging the goods before they are shipped to the customer.
- Cancellation Fee - A fee charged by Fynd Platform when a confirmed order is cancelled by the seller.
- Net Charges - The total amount of all charges, fees, and commissions applied to the order. It is calculated as (Flat Delivery Fee + Flat COD Fee + Commission Amount + Processing Fee Amount + Closing Fee + Packaging Fee + Cancellation Fee).
- Total GST - The total amount of Goods and Services Tax (GST) applied to the Net Charges. It is calculated as (18% * Net Charges).
- Total Charges - The sum of Net Charges and Total GST.
- TDS - Tax Deducted at Source, which is a tax deducted by Fynd Platform from the seller's payout as per the applicable tax laws. It is calculated as (1% * Total Charges).
- TCS - Tax Collected at Source, which is a tax collected by Fynd Platform on behalf of the seller as per the applicable tax laws. It is calculated as (1% * Total Charges).
Net Payout - It has two definitions as below:
- The final amount paid to the seller after deducting all commissions, fees, charges, and taxes. It is calculated as (ESP - [Total Charges + TDS + TCS]) in case of Fynd marketplaces (Fynd and Uniket).
- The final amount that seller should pay to Fynd after deducting all commissions, fees, charges, and taxes. It is calculated as (0 - [Total Charges + TDS + TCS]) in case of third-party marketplaces (Example, AJIO).
Downloading Reconciliation Report
-
Go to Reconciliation tab in main page Finance & Payments.
-
Open filter option.
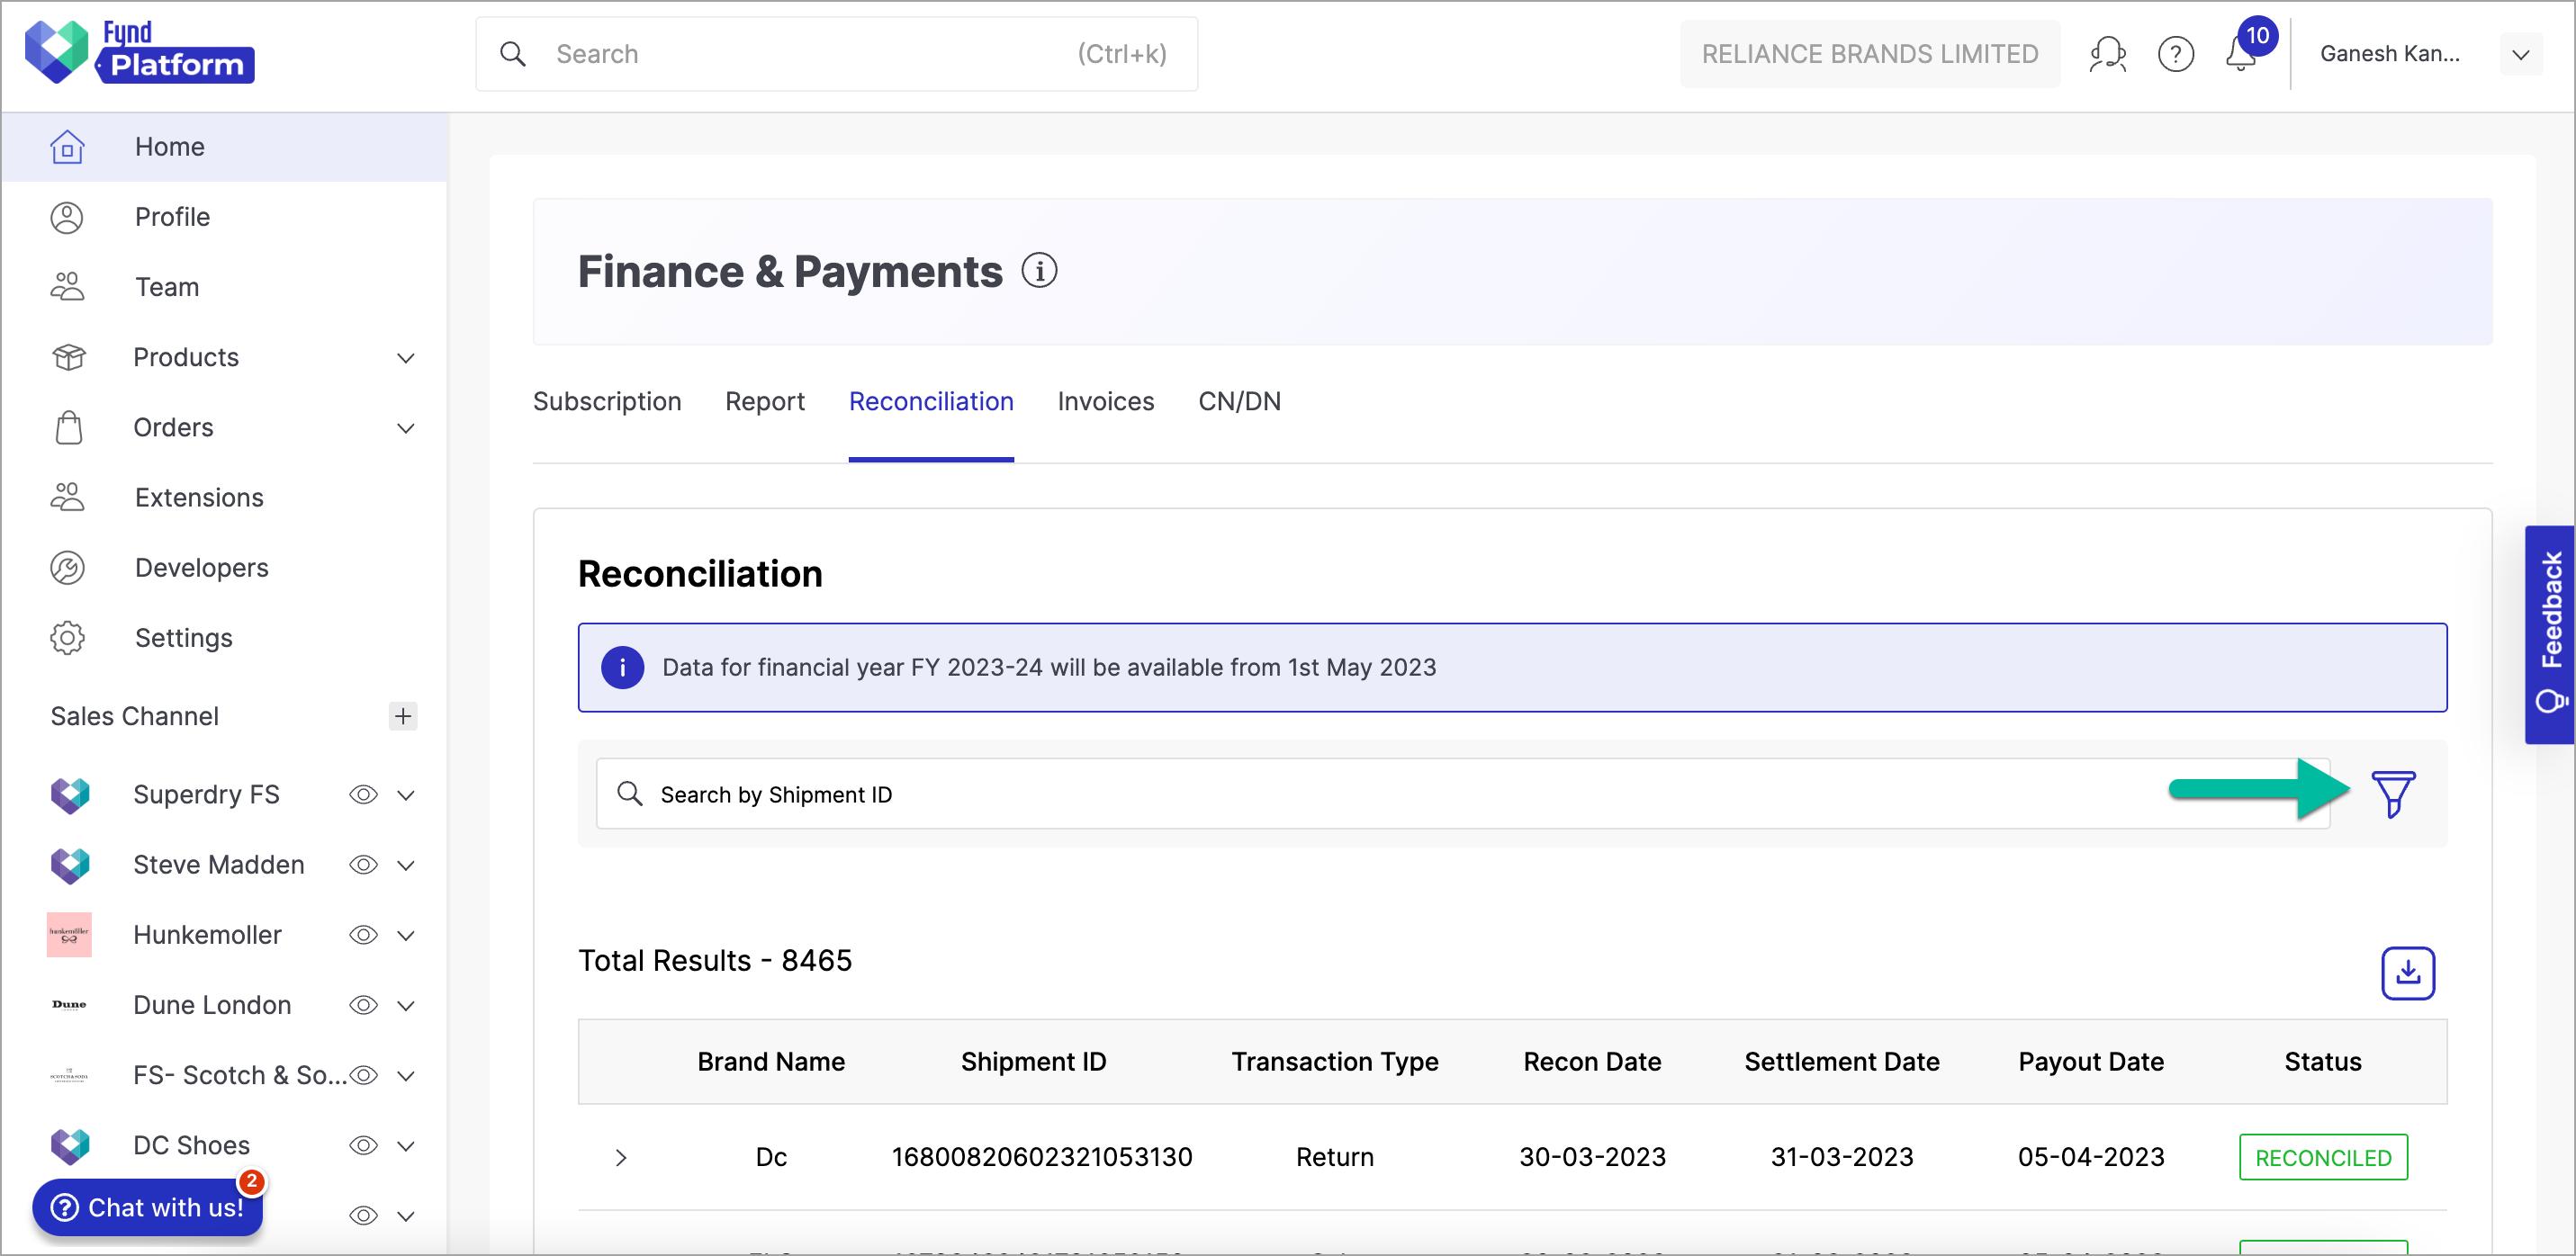
Figure 28: Reconciliation Tab
-
Apply desired filters.
-
Click Apply. Upon clicking this button, a reconciliation data will be visible on the page.
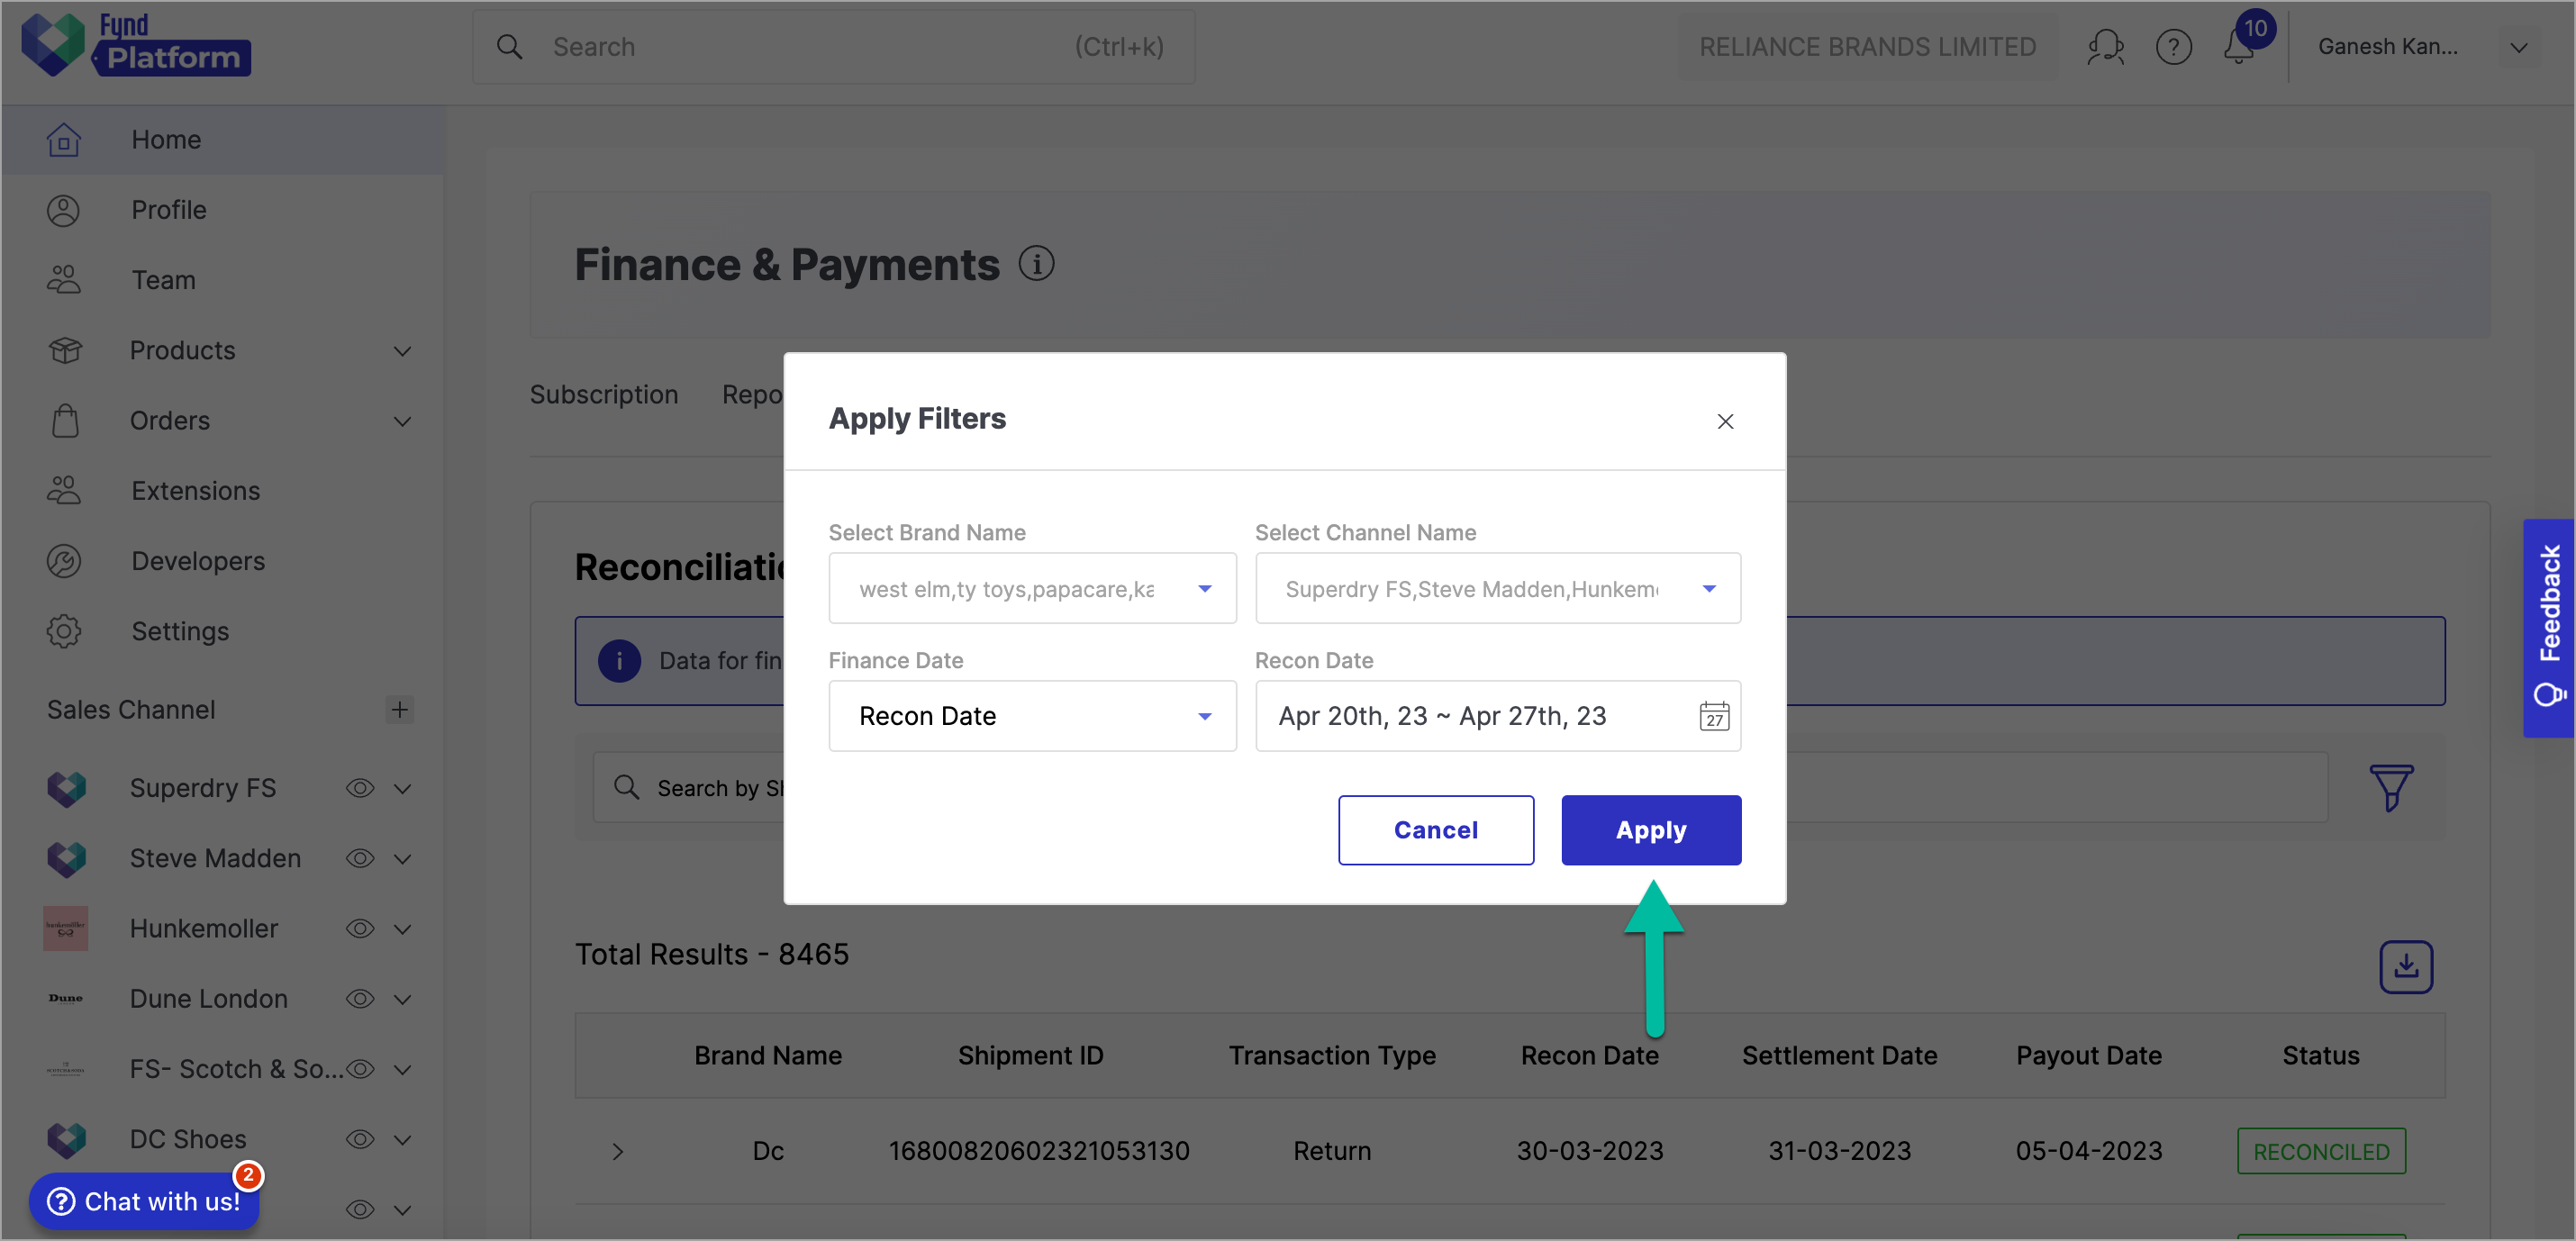
Figure 29: Clicking Apply Button
-
Click download option. It will start generating reconciliation report.
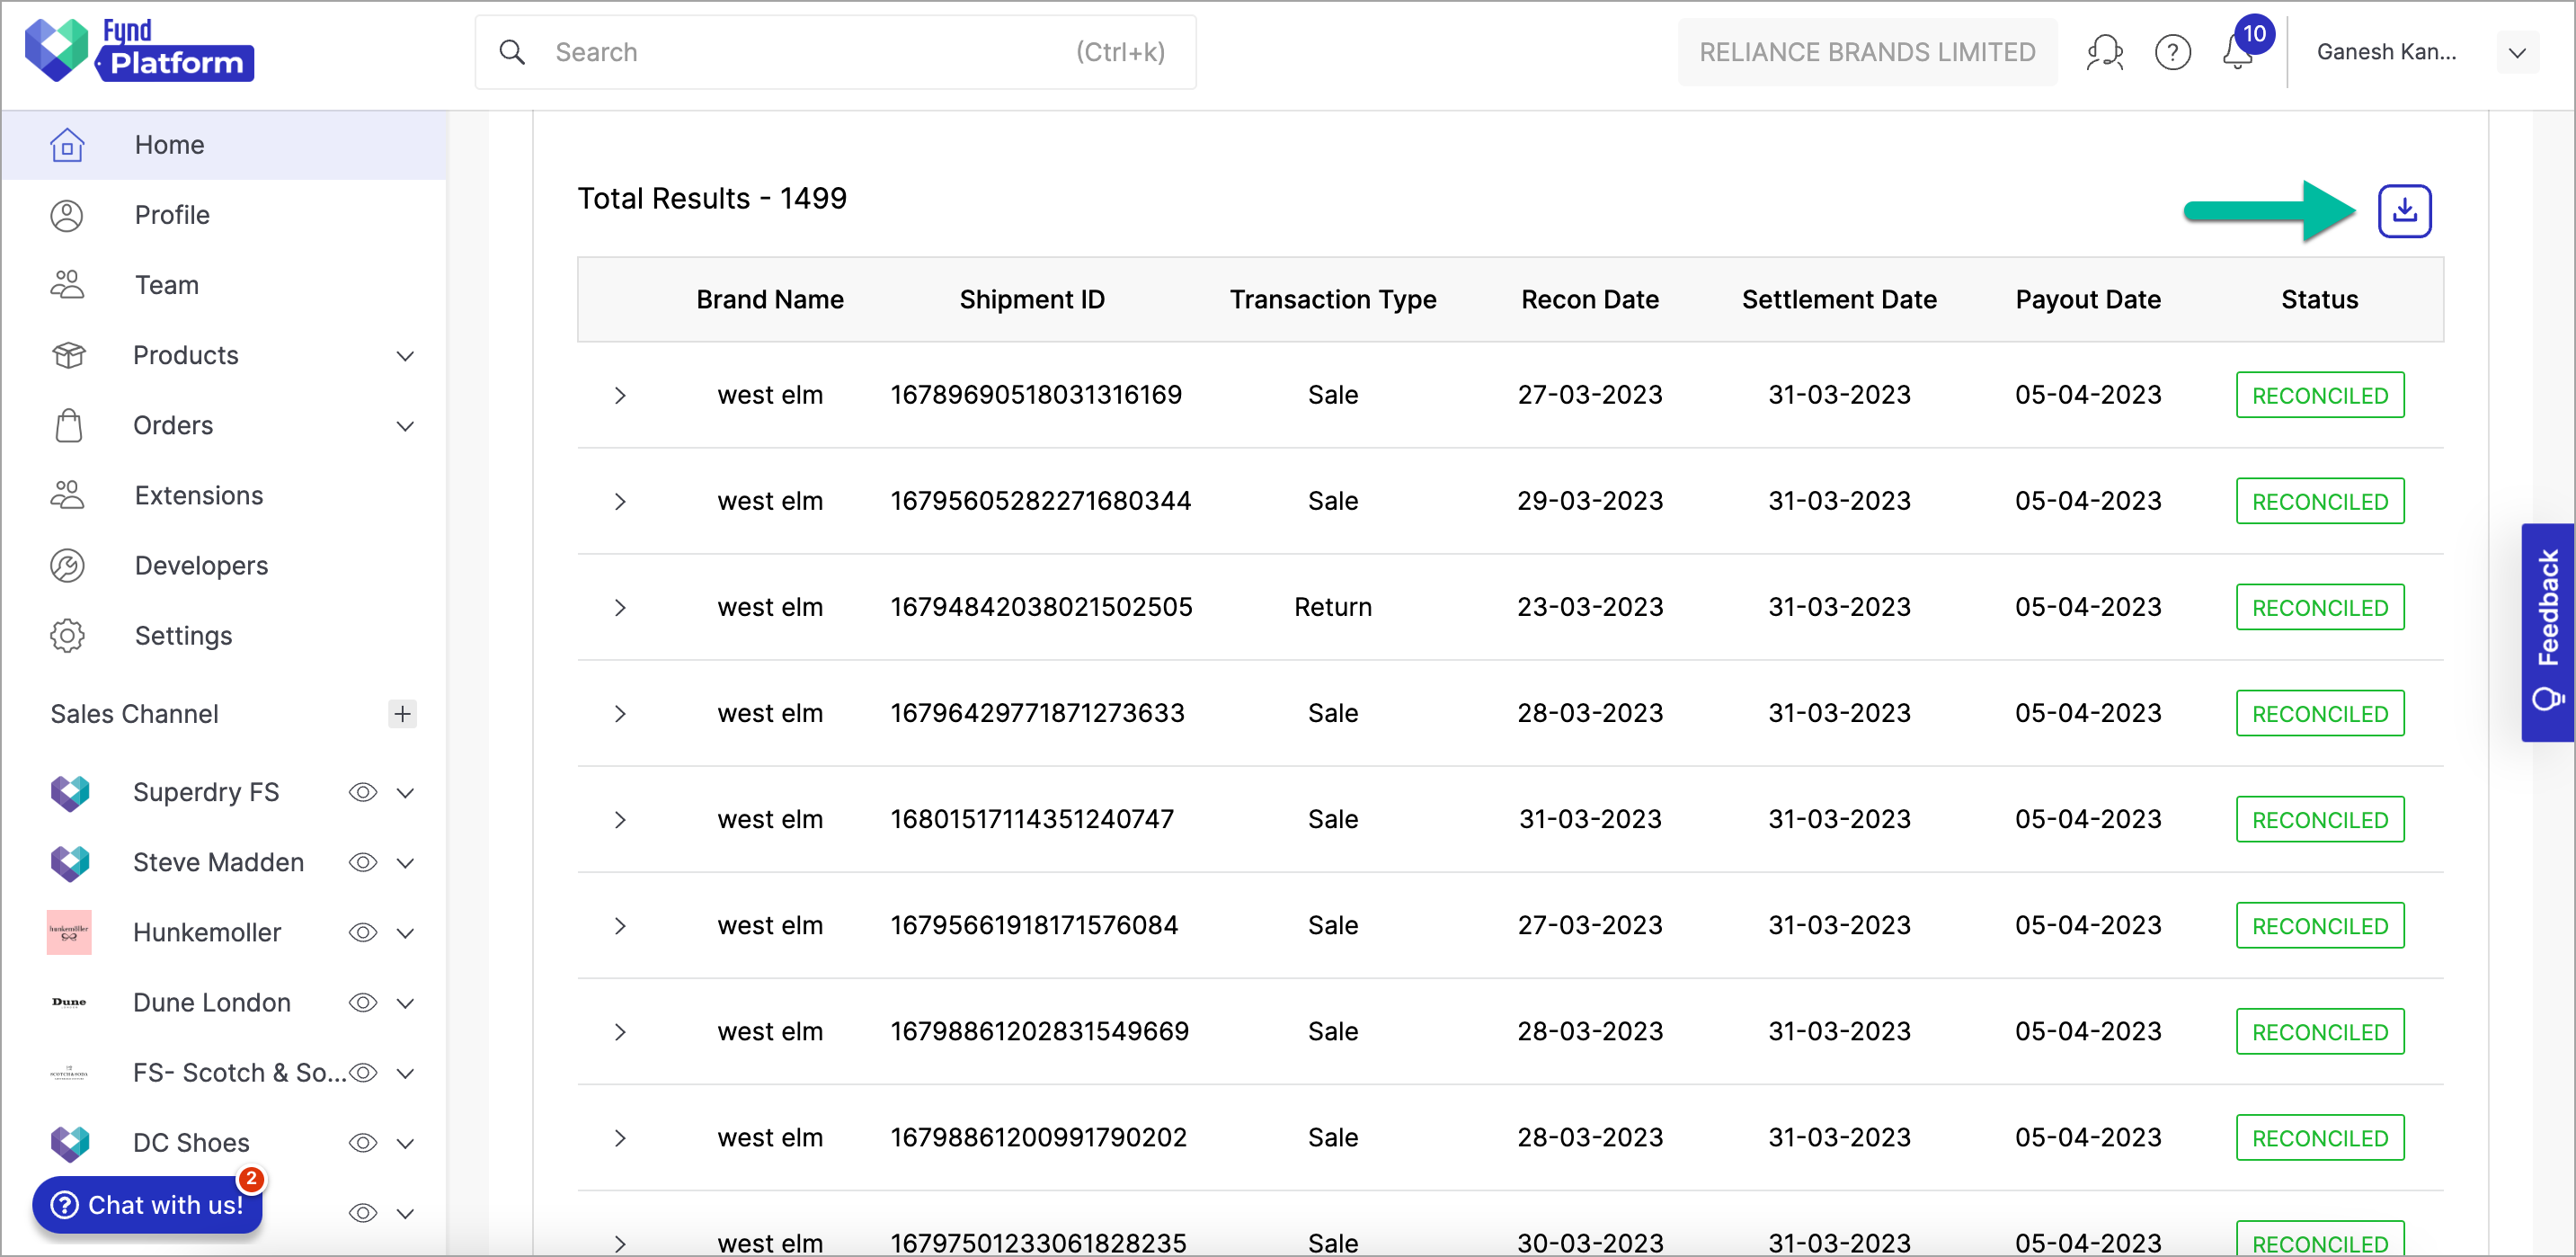
Figure 30: Reconciliation Data
-
Go to Report tab. You will see entry of your recently generated report.
-
Click Download Report option to download the reconciliation data file.
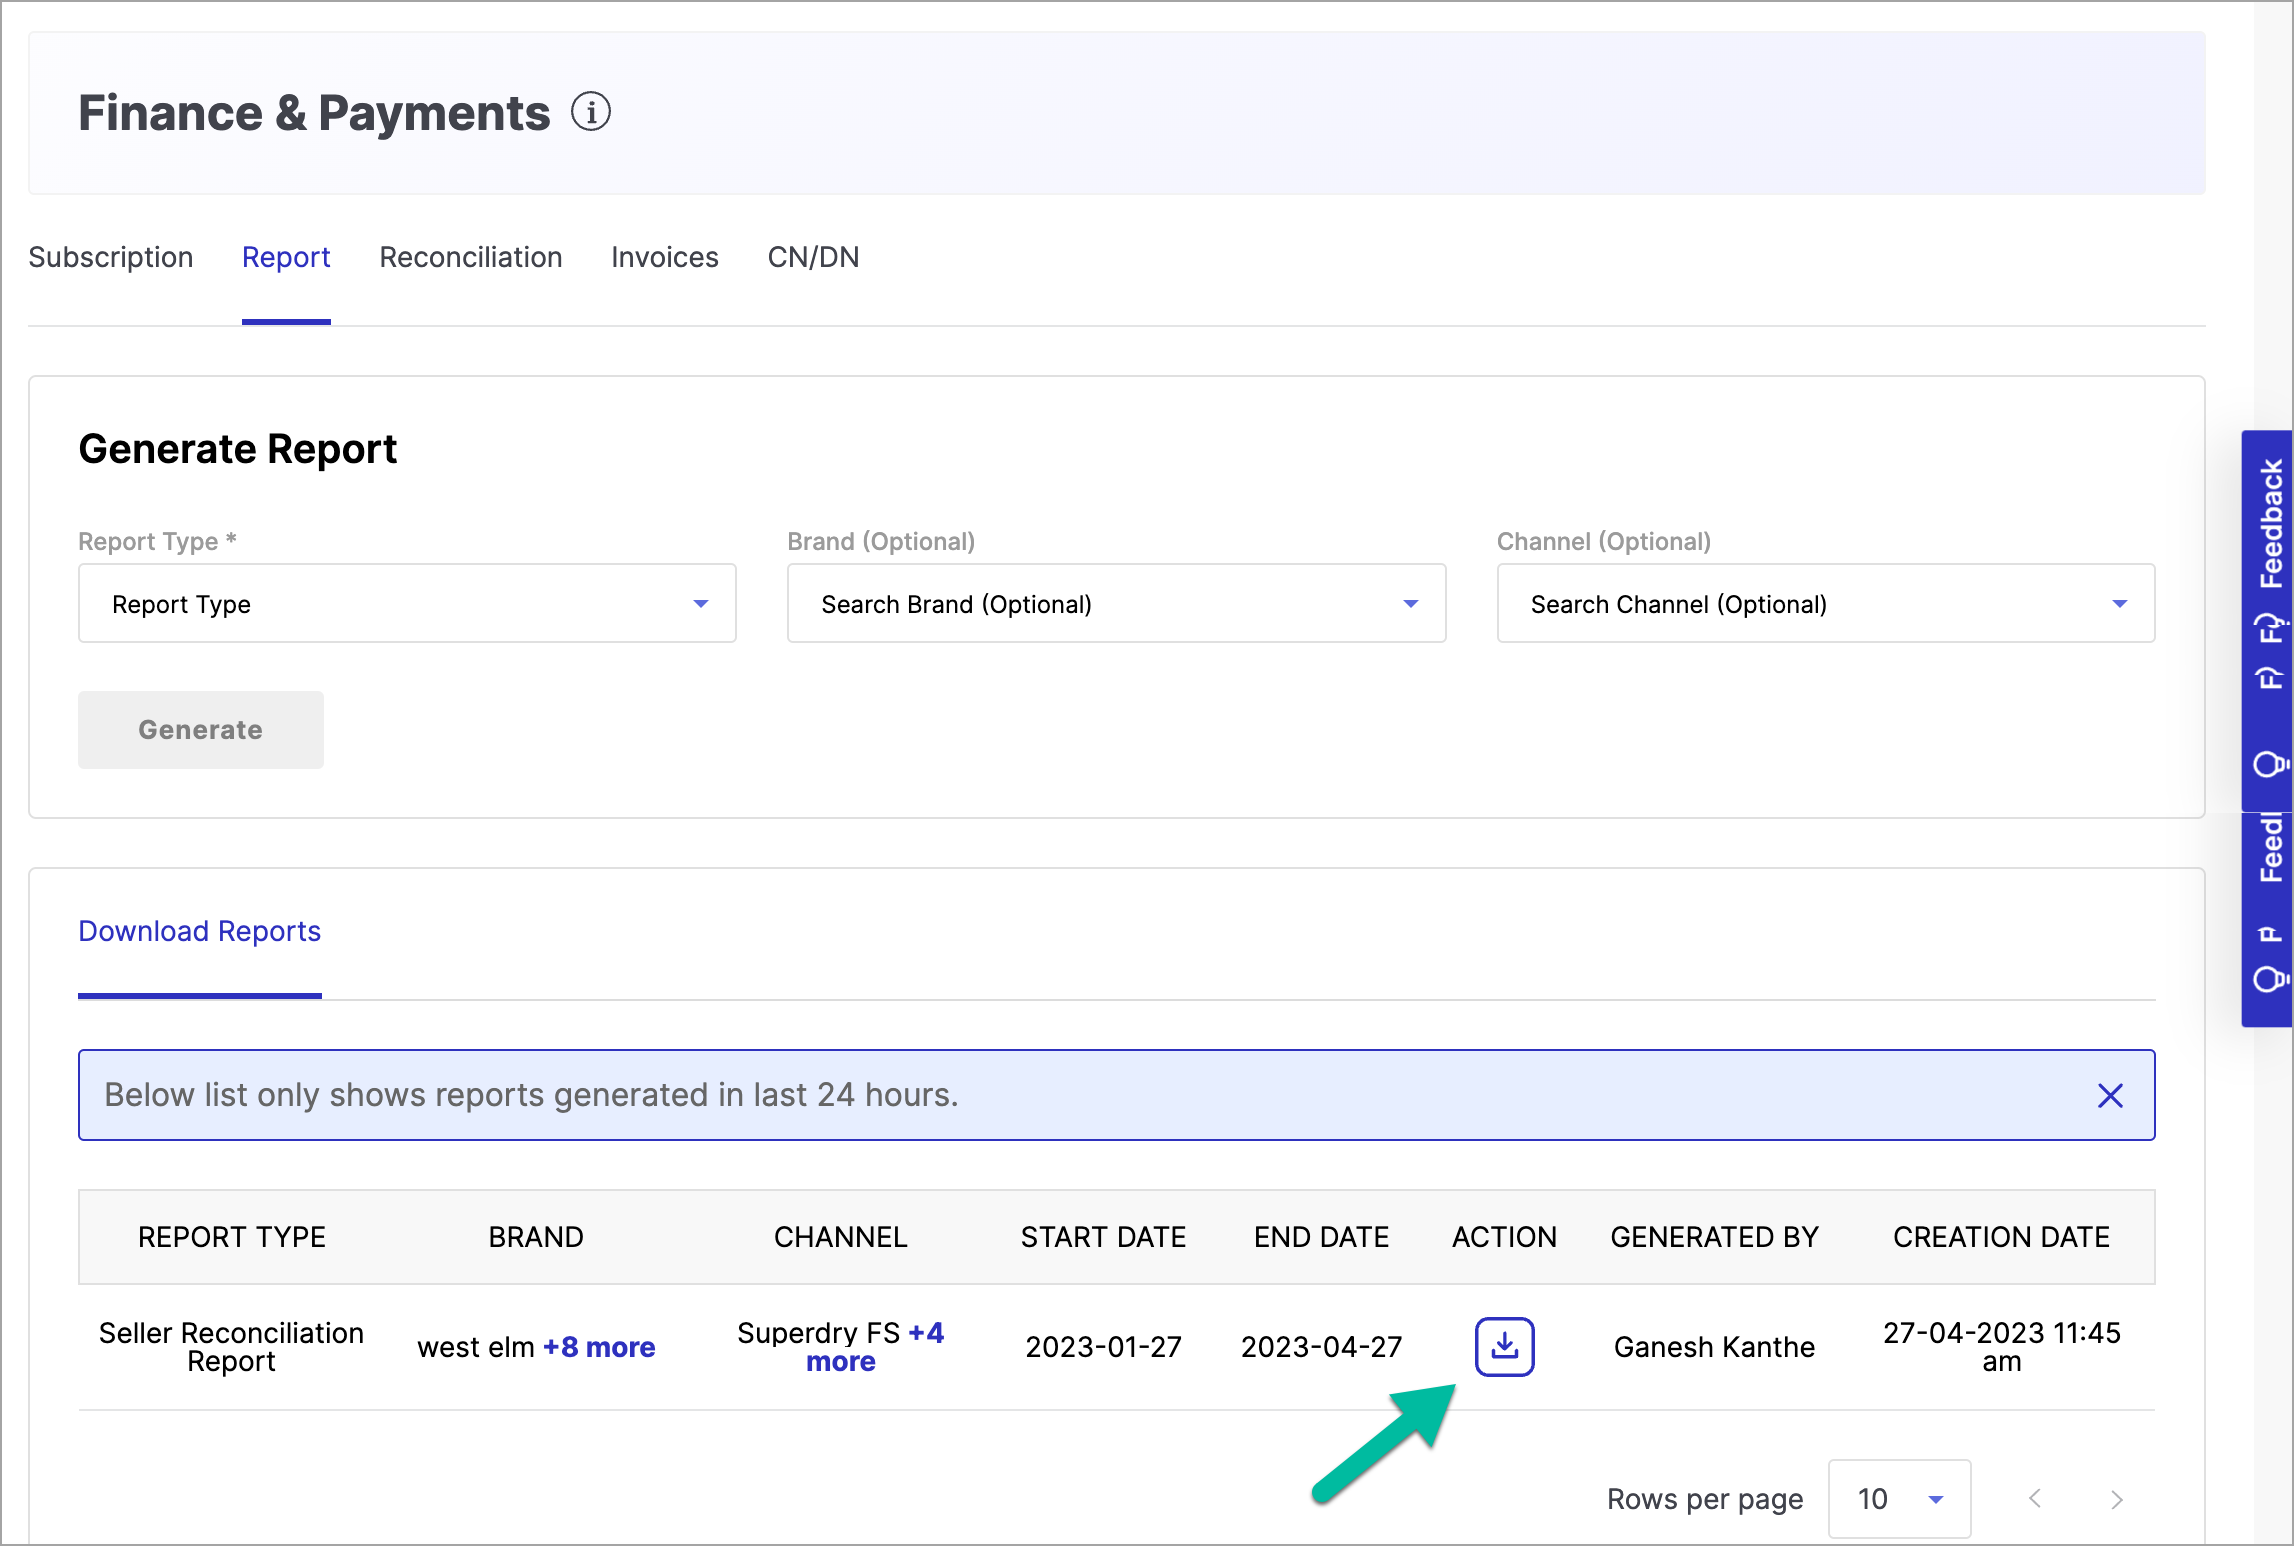
Figure 31a: Clicking Download Report Option
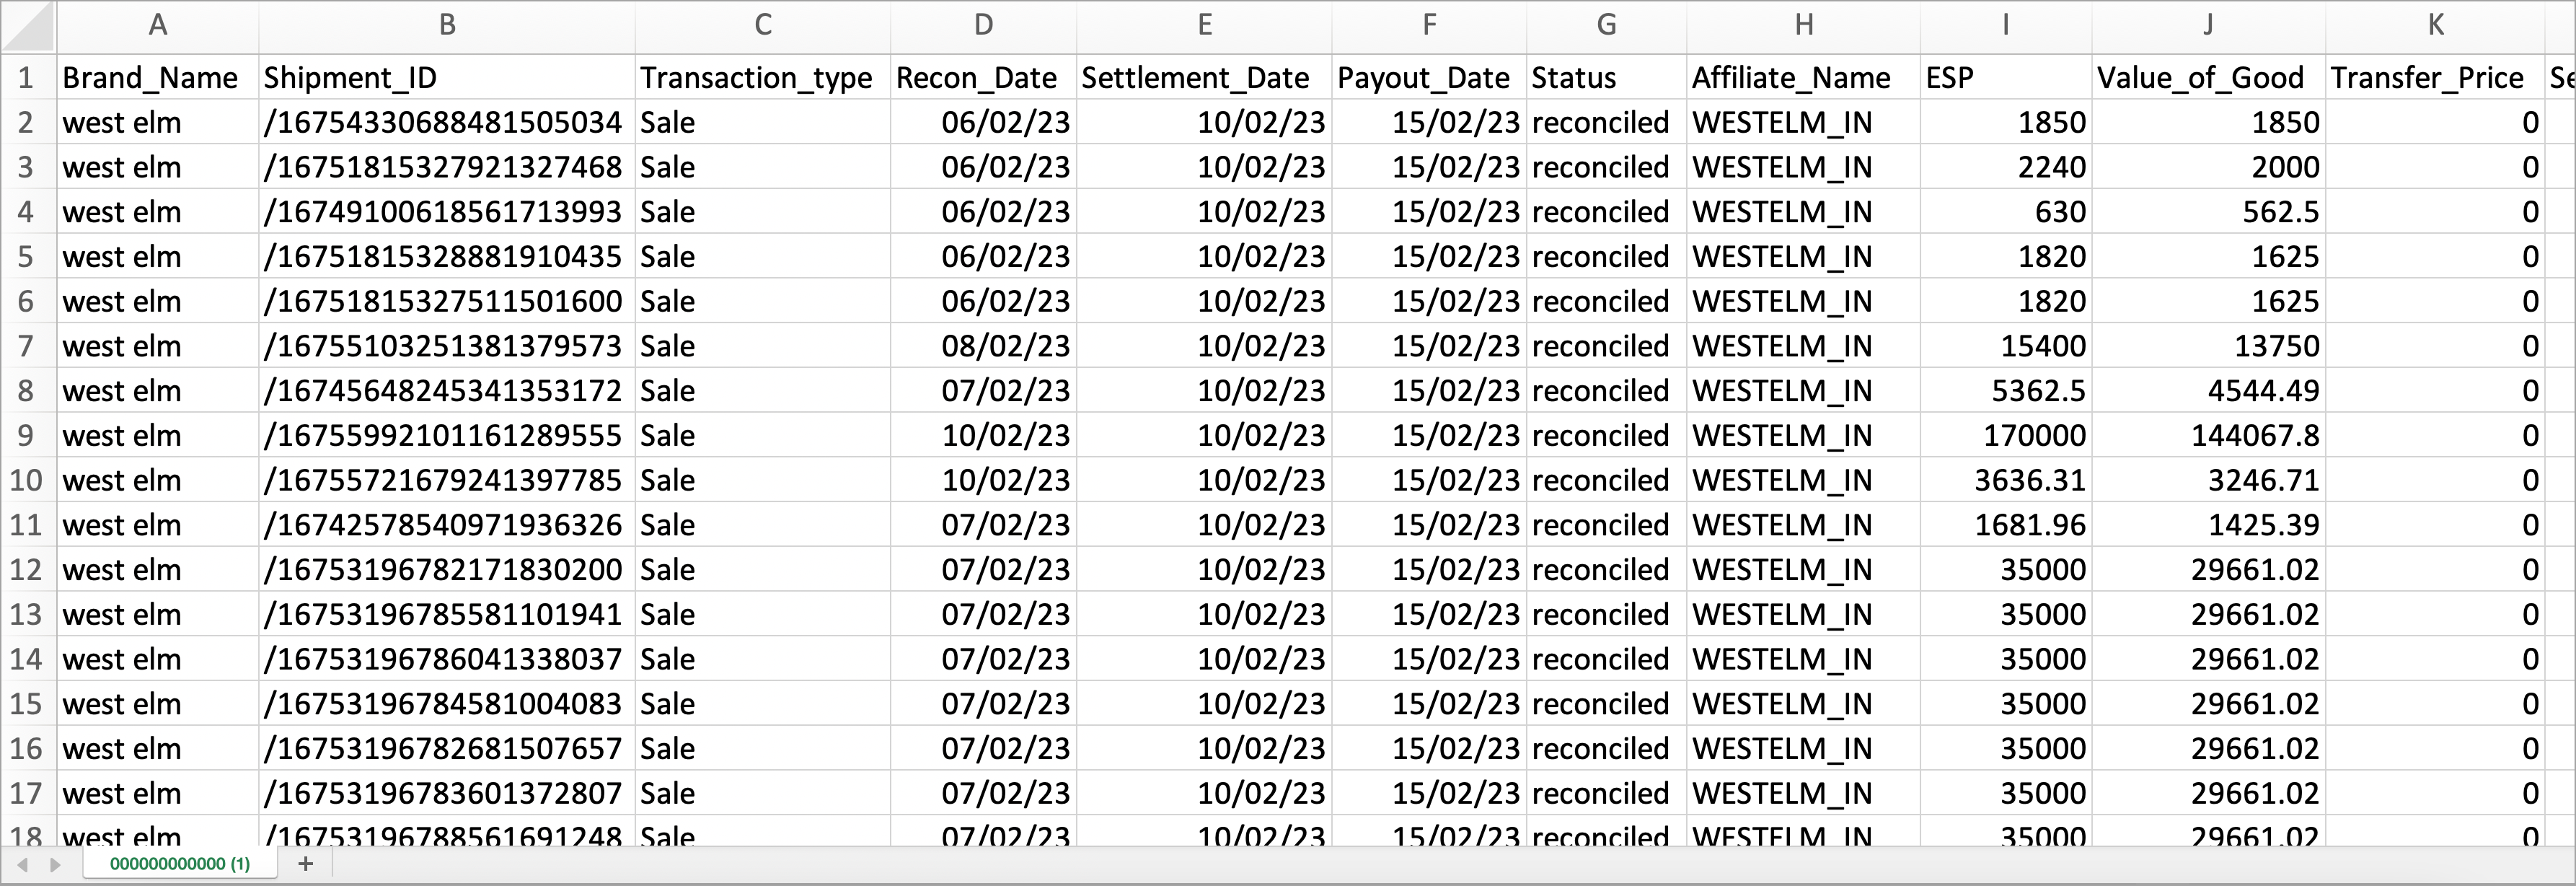
Figure 31b: Downloaded Data
View and Download Invoices
Download Single Invoice
-
Go to Invoices tab in main page Finance & Payments.
-
Click Download option of a particular invoice entry in the list.
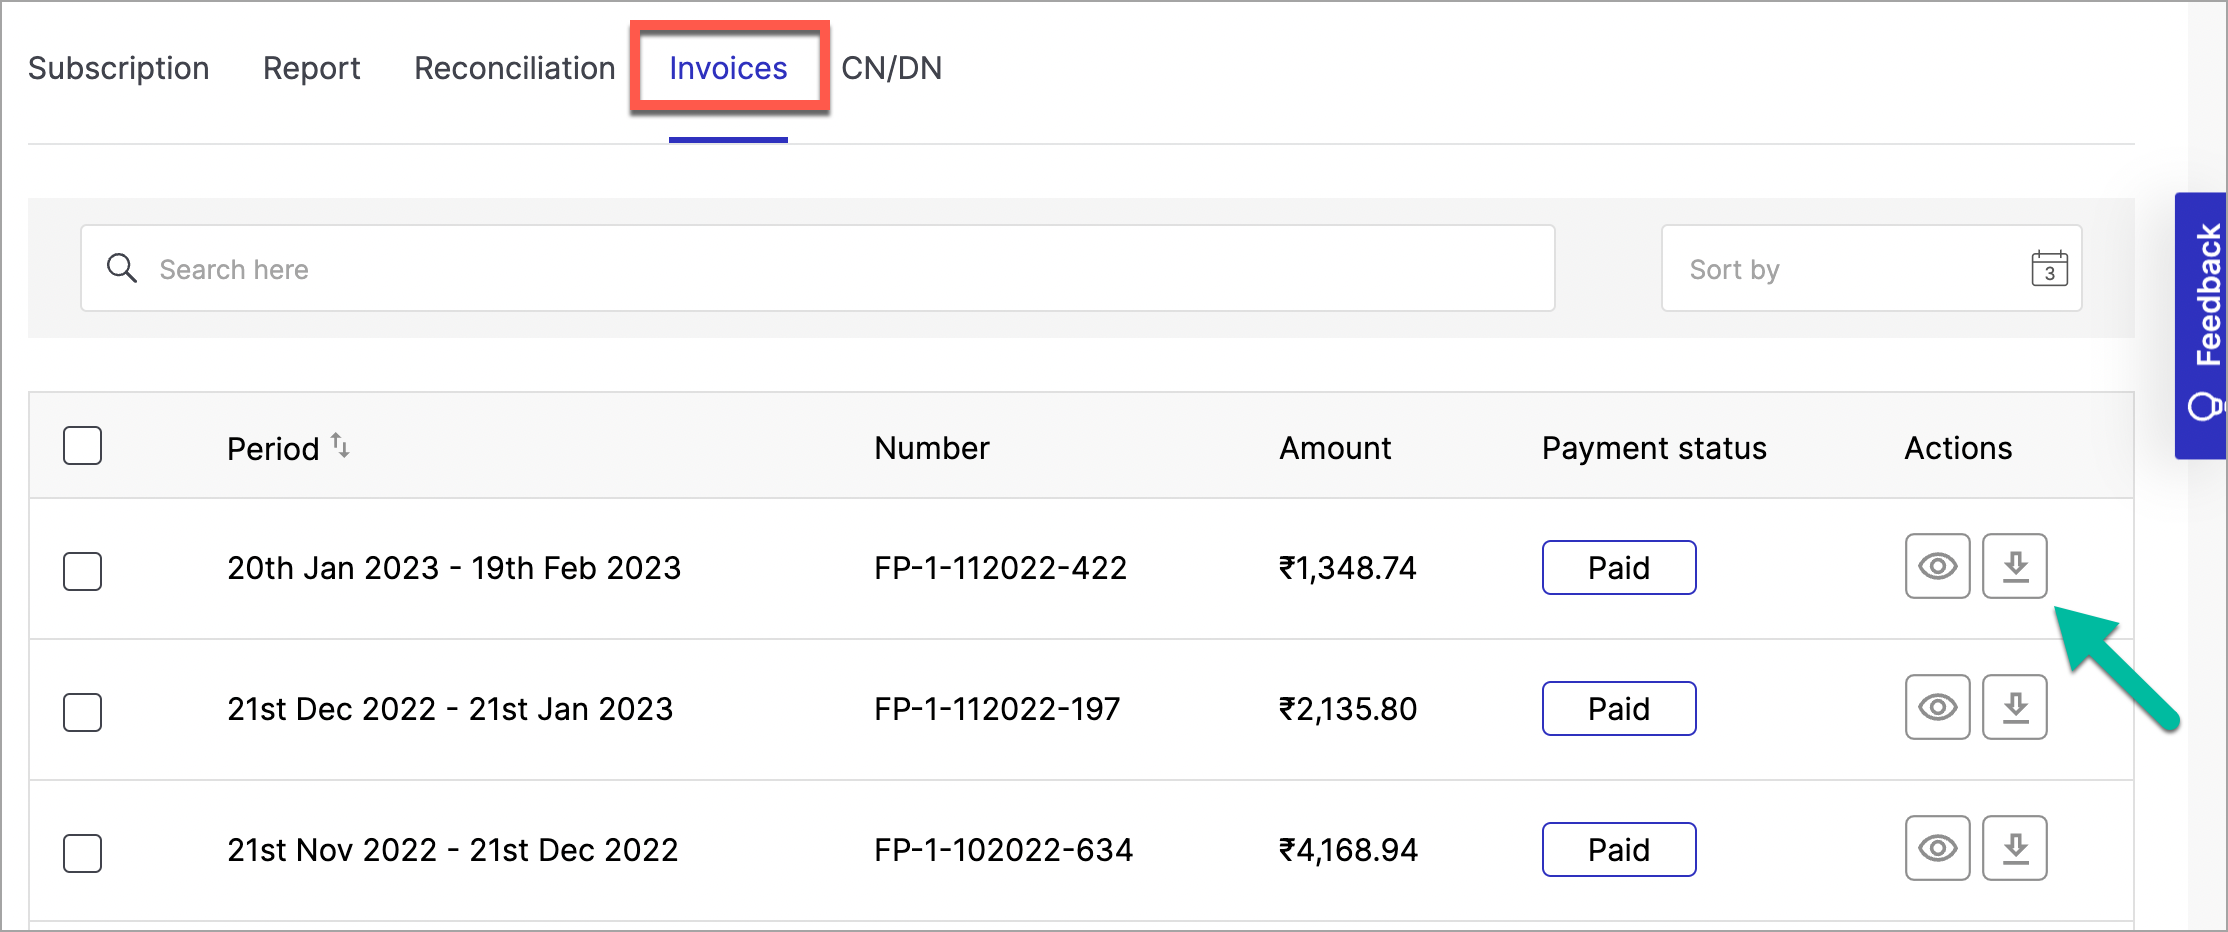
Figure 32a: Clicking Download Option
In this way, you can save invoice file on your system for your reference.

Figure 32b: Downloaded Invoice Details
Download Bulk Invoice
-
Tick the checkbox to select all invoice entries as mentioned in the screen below.
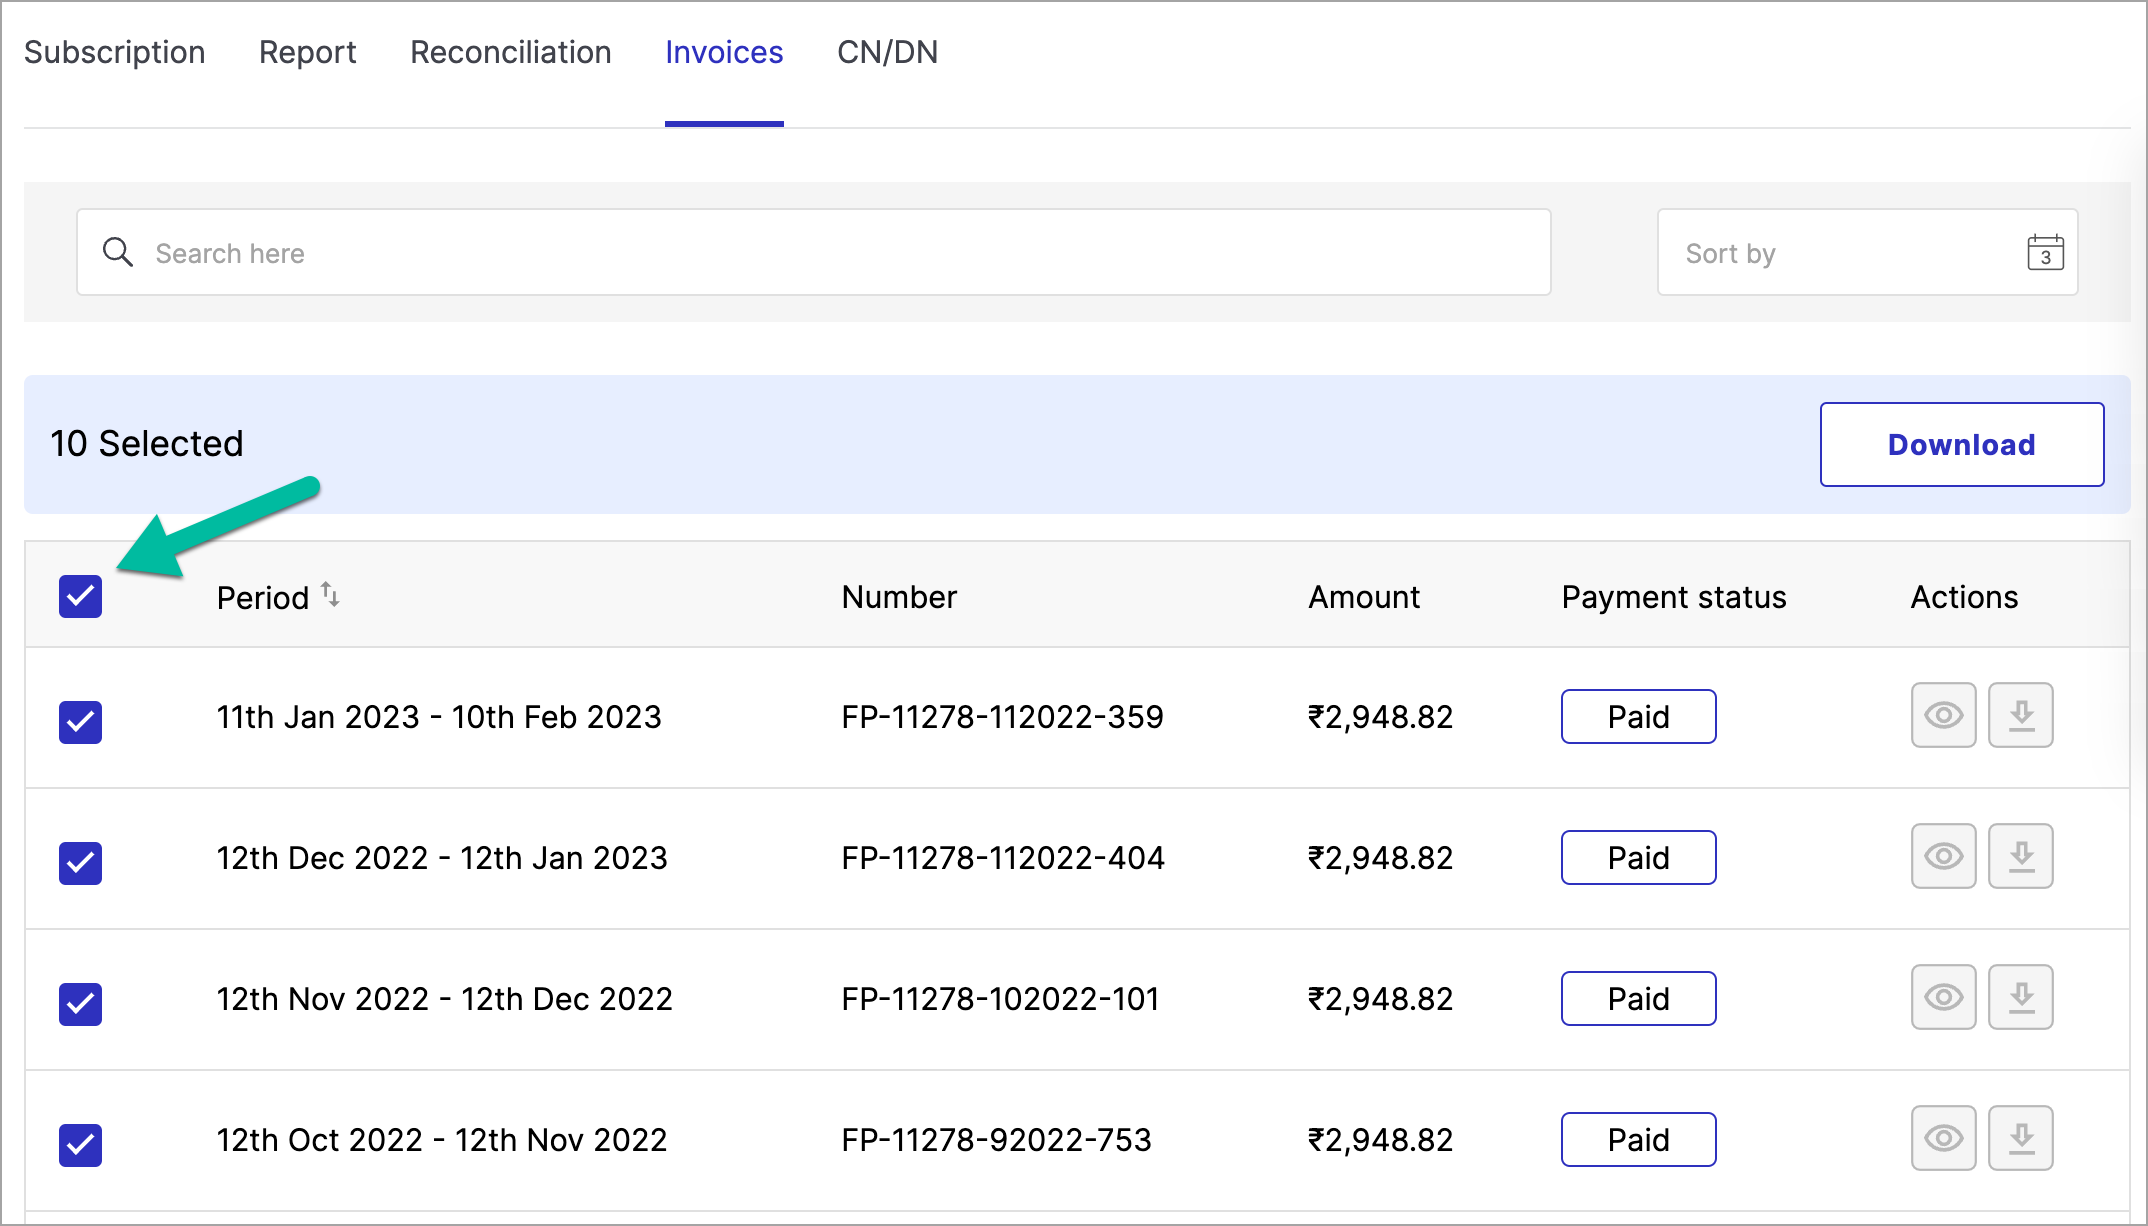
Figure 33: Selecting Bulk Invoices
-
Click Download.
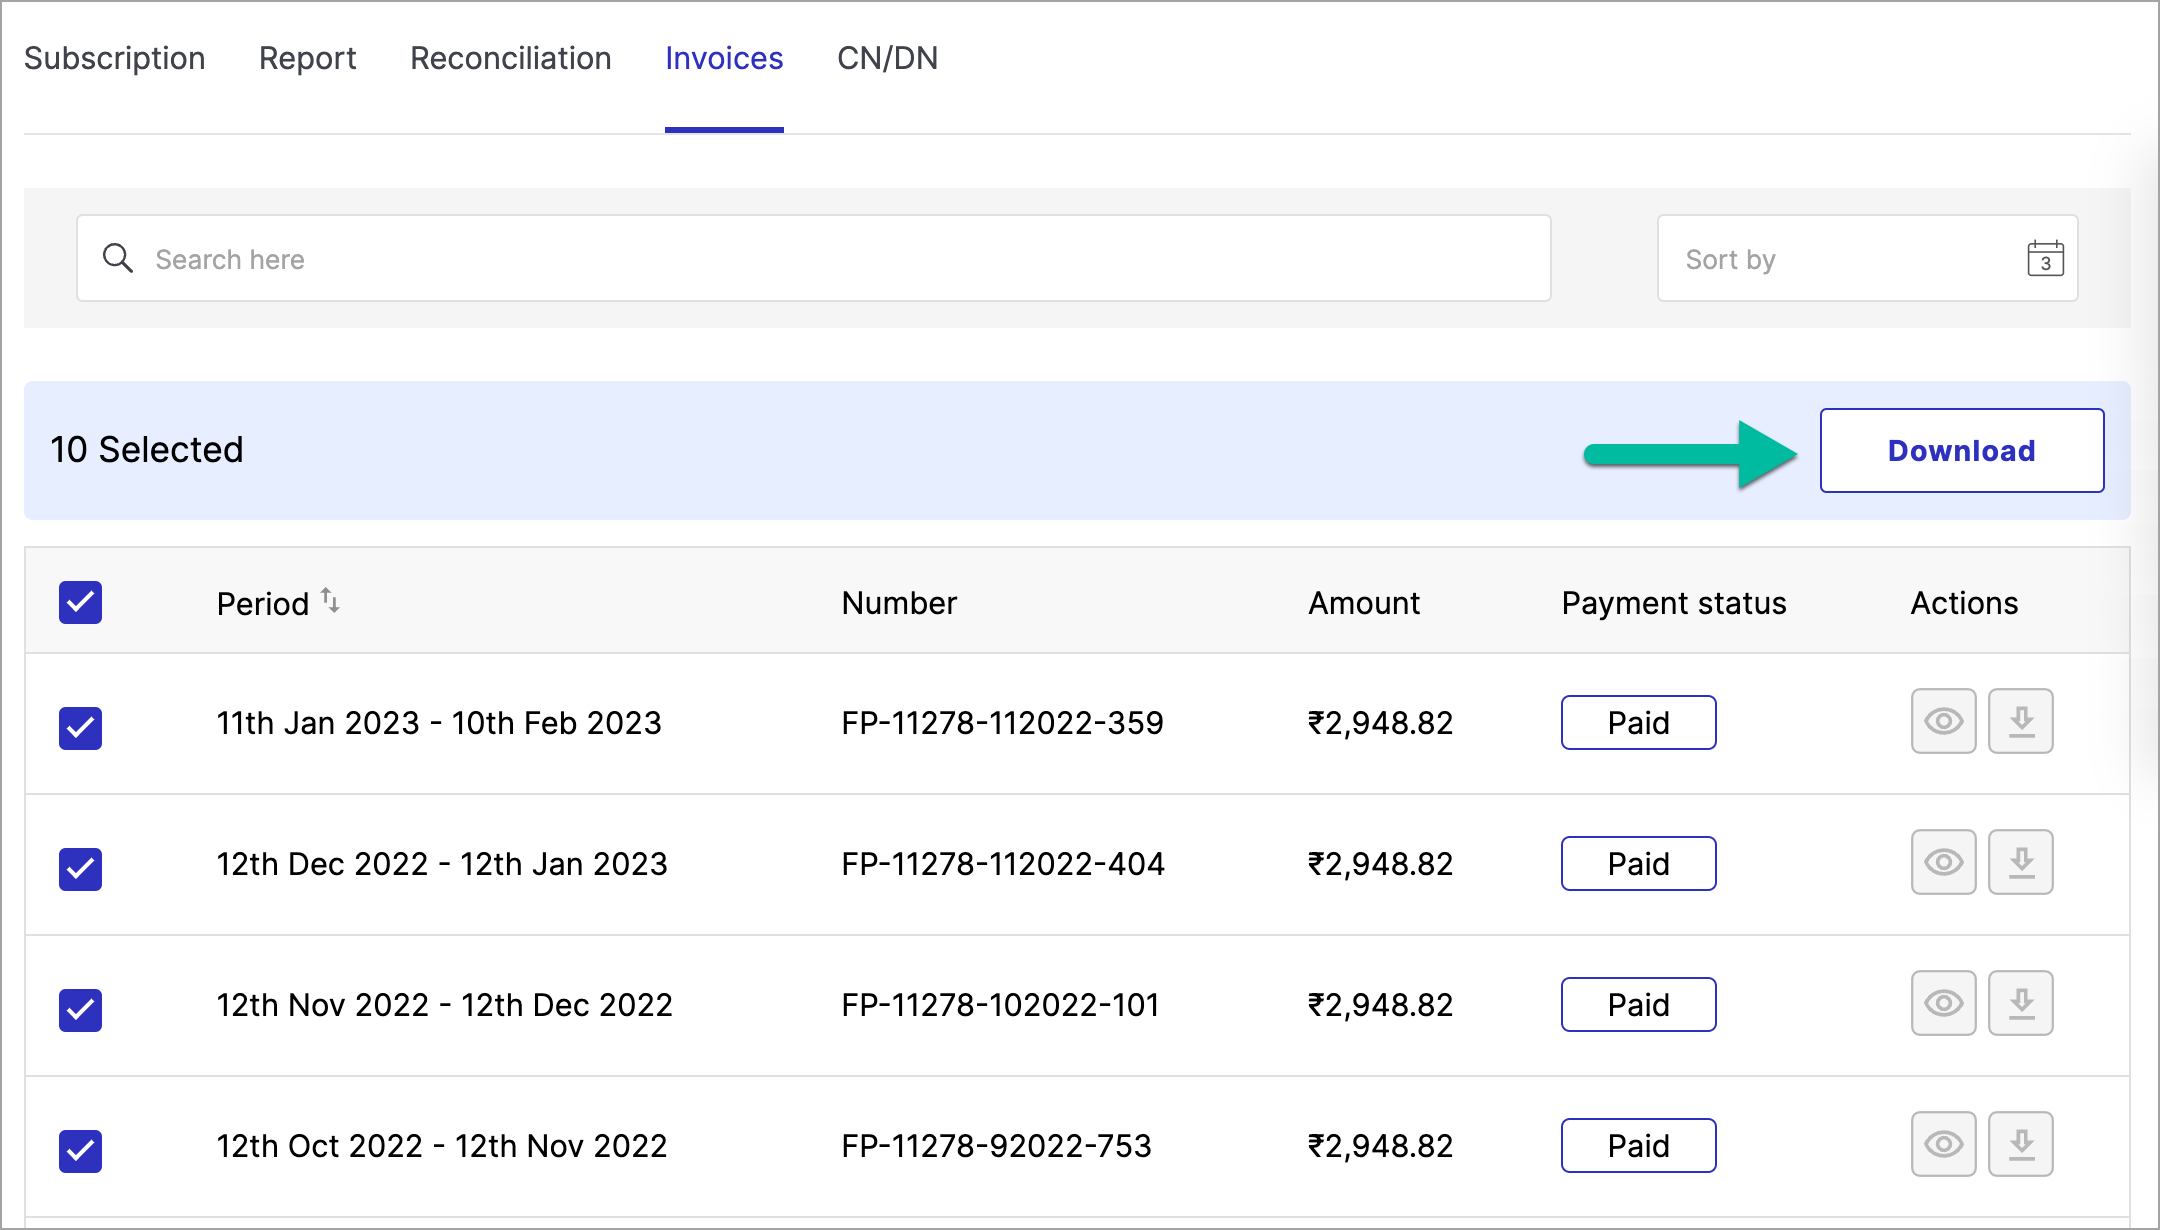
Figure 34: Clicking Download Button
In this way, you can download the bulk invoices for your reference.
Payment of Invoices
Do the following steps for invoice payments:
-
Login to the Fynd Platform.
-
Navigate to the upper-right corner of the window.

Figure 35: Finance and Payment Options
-
Click Finance & Payments from the dropdown menu.
-
Go to the Invoices tab.

Figure 36: Invoices Tab
-
Use the checkboxes to select each invoice you wish to pay.
![]()
The Status column will display Unpaid for those invoices that have not yet been paid.
Before proceeding with payment, ensure the correct invoices are selected to avoid any errors in billing.
-
After selecting the desired invoices, click Pay (Amount). This button will display the total amount for the selected invoices. The checkout page will open.
You will see several payment methods available:
- Credit Balance: Uses the available credits in your account balance.
- UPI (Unified Payments Interface): Choose this for quick payments via UPI apps.
- Credit/Debit Card: Enter your card details if you prefer to pay with a credit or debit card.
- Net Banking: Select your bank and proceed with net banking credentials.

Figure 38: Payment Methods for Invoice Payment
-
Fill in the necessary details for your chosen payment method.
-
Click Pay Now to finalize the payment. The platform will then process it, which may take a few moments.
After successful payment, you will see a confirmation message, and the Status column will show Paid for each of the involved invoices.
![]()
History of Credit Balance Transactions
Get a list of all transactions such as top-ups, applied to invoice, and so on happened on your Credit Balance.
-
Click on Past Transactions in Credit Balance section of main page.
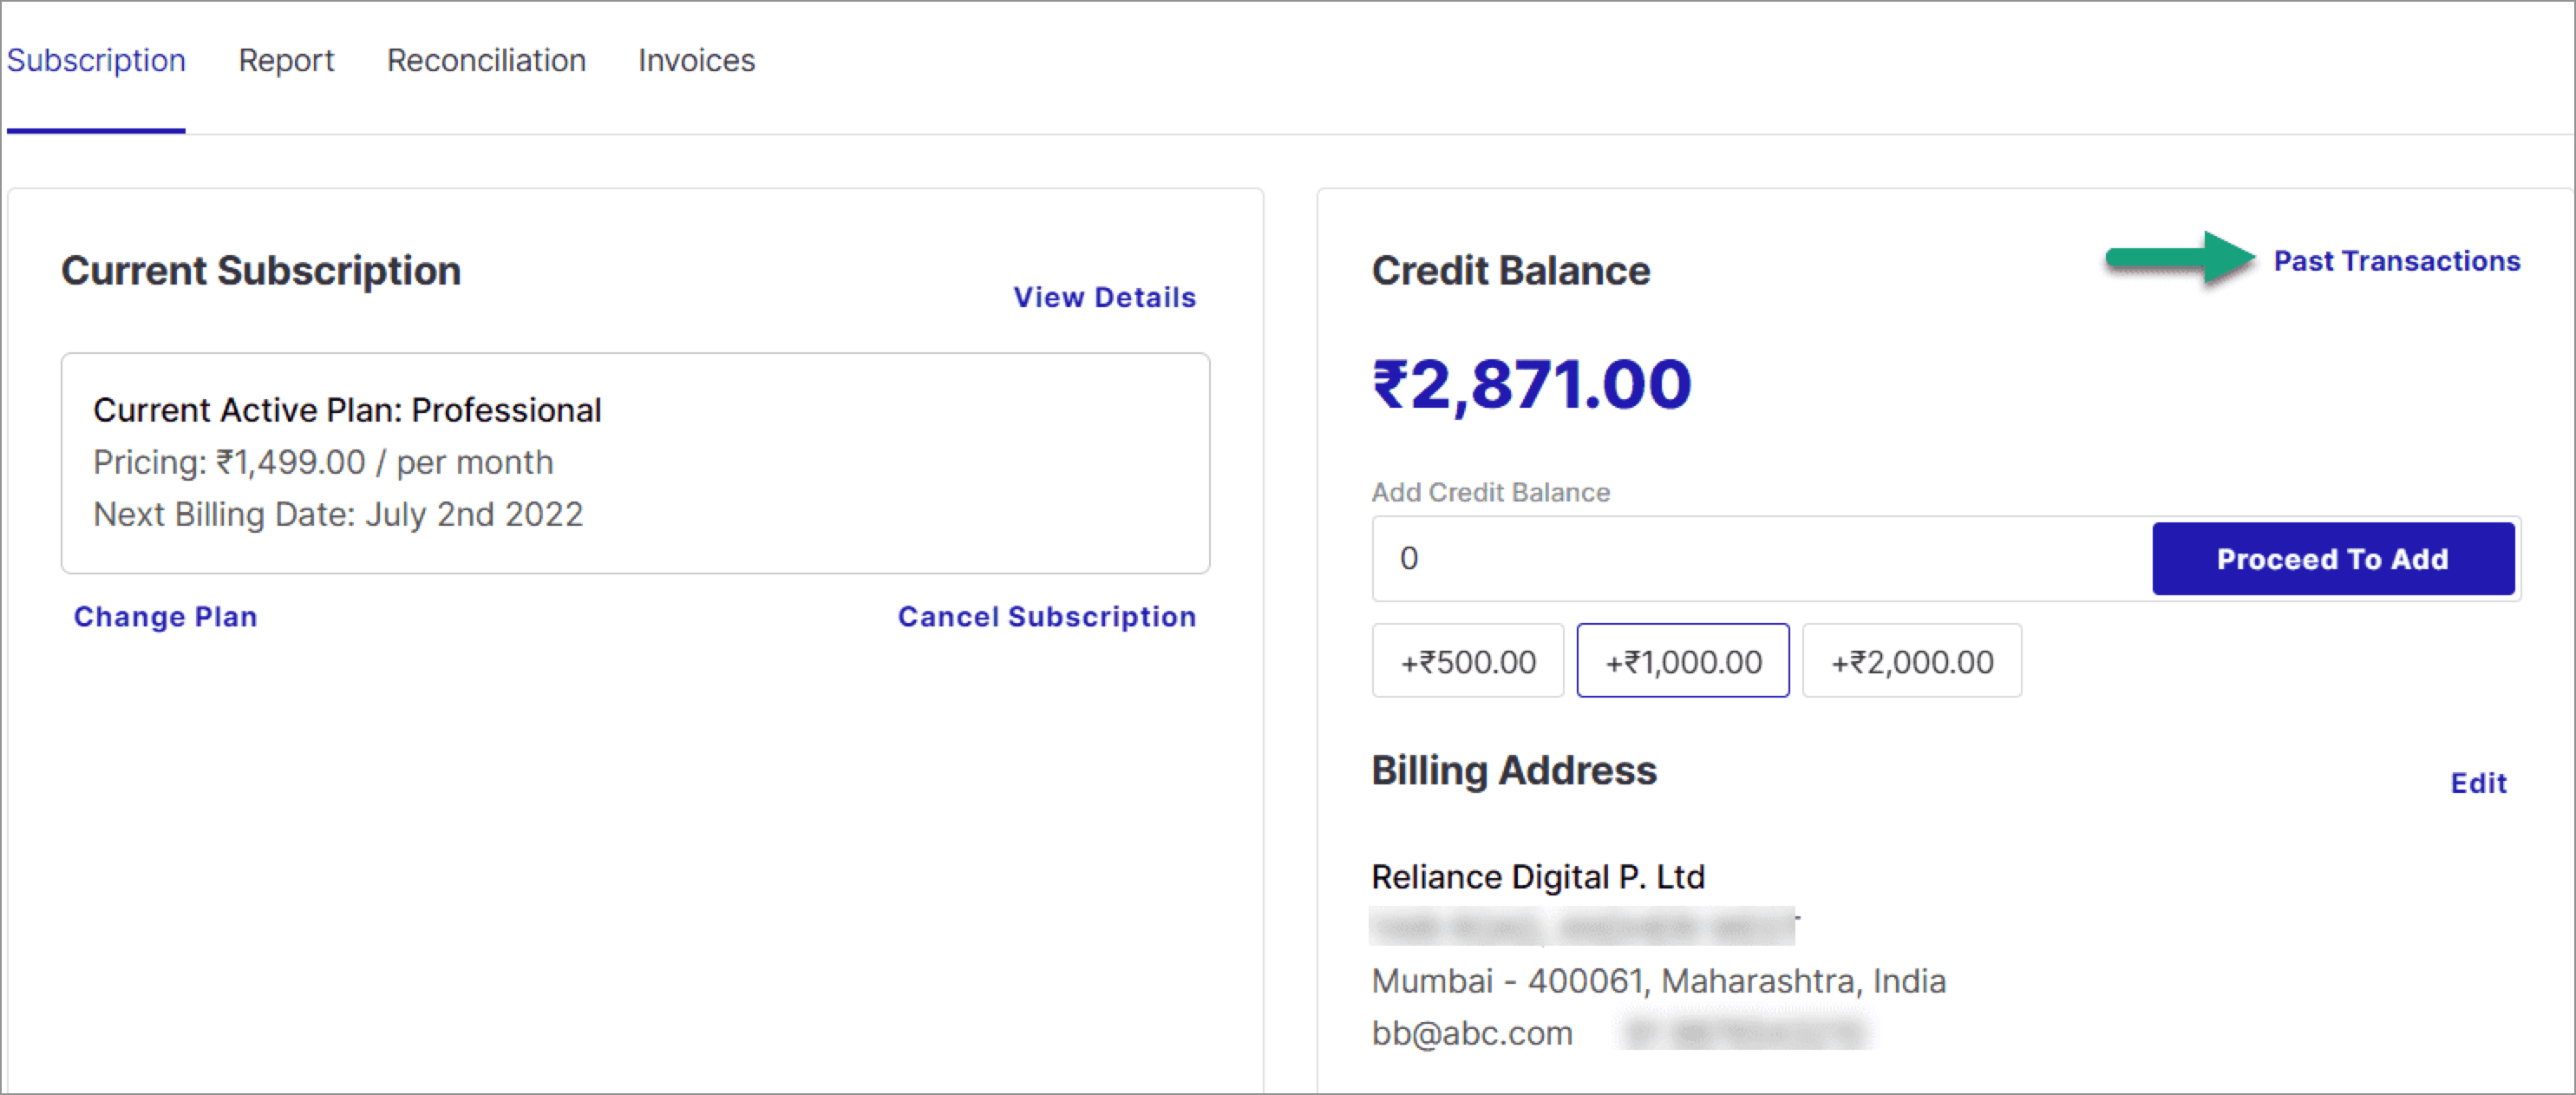
Figure 40: Clicking Past Transactions Option
-
Search particular transactions by Transaction ID, UTR, or Transaction Date.
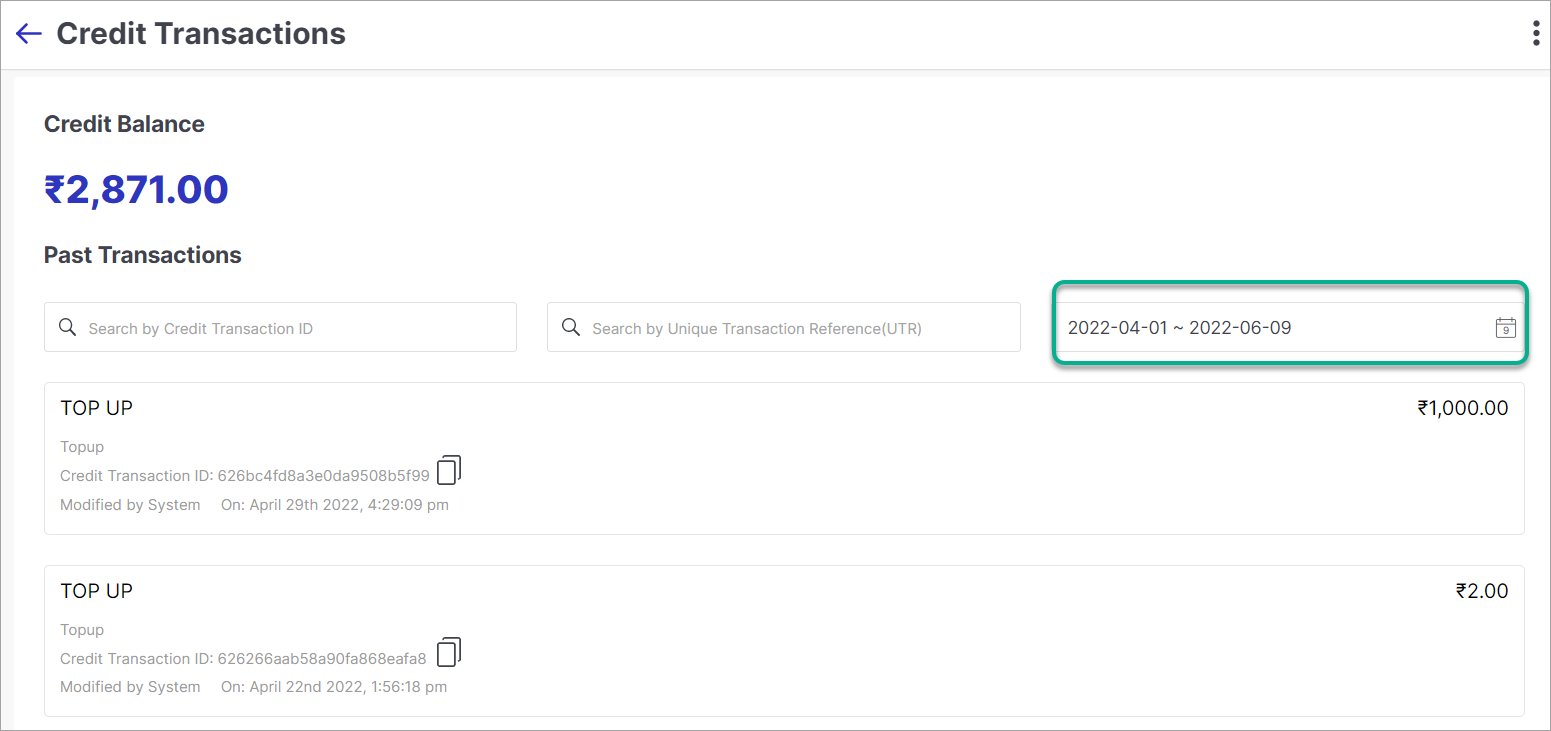
Figure 41: Searching Transcations
Change Billing Address
You can change or update your billing address for your subscription.
-
Click on Edit in Billing Address section of main page.
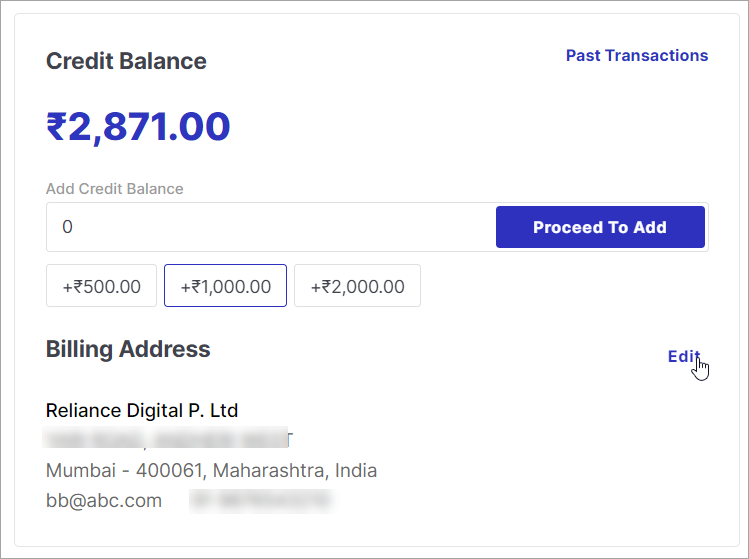
Figure 42: Clicking Edit Option
-
Update the address details as per your requirements and click Update.
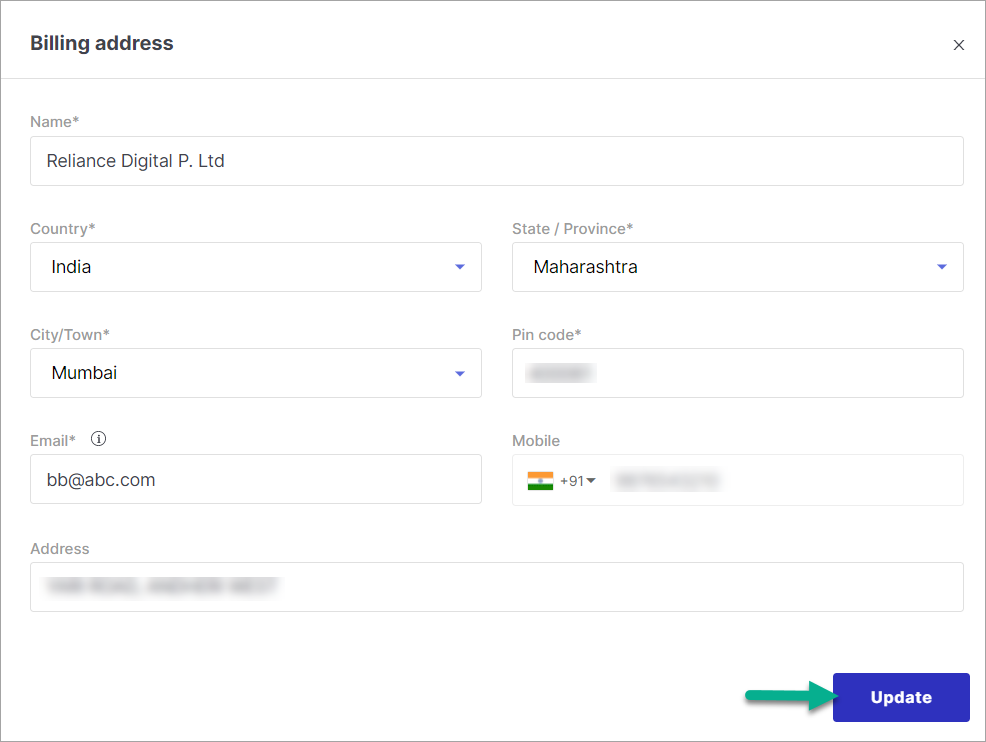
Figure 43: Updating Address Details
Tokenization
Card Tokenization stores the card details in the form of a token. It is the safest way to secure the card.
How this works
The card details are saved with the network providers and in return, they share a token with the user. If the user has tokenized the card then while making a purchase, then just providing the token will be sufficient. They will not have to enter the card details for each transaction.
Tokenization is free of charge. As stated by RBI, card data will be tokenized and safeguarded with the card networks assuring that card details are not exposed. The user can either choose to give consent to tokenize their card for future transactions or opt out of it.